Amazon advertising automation part two: 'Automatically blocks keywords with poor PPC efficiency? Negative keyword automation'
Posted 4/8/2026 1:06:13 AM
Thank you to the customers using SellerVisor.
Continuing from the last installment, we are serializing a series on Amazon ad automation. In the last installment, I explained how to track competitor product keywords to identify effective keywords while you sleep and automatically create campaigns. The world is great these days — it finds money-making keywords while you sleep and even automatically creates ad campaigns.
In this installment, if any of the situations below apply to you, you should definitely read to the end.
First, check whether these situations apply to you.
Amazon Ads Current Situation Checklist!
- You launched a product and initial ad performance was okay, but it gradually worsens
- Others say their ACoS is 30%, but my ad campaign's ACoS is over 200%
- You know ad campaign optimization in theory but it's too bothersome
- It seems you only spend on ads without sales. You'd buy it if ad spend was a bit lower
How is it? Do you think it's exactly like your situation? Do you relate? If so, you're in an opportunity to optimize your Amazon ads. You can certainly spend less on ads while maintaining or increasing sales. The ad optimization you know in theory can now be automated.
You have probably heard of negative keywords.
It's a very important element in Amazon advertising, so you should naturally know it.
For those who may not know, briefly: when your Amazon ads are being shown for keywords you don't want and ad spend is leaking, you register those keywords as negative keywords so your ads are no longer shown for them.
What is the negative keyword registration task?
Typically, you open the Amazon advertising search term report as a spreadsheet file, find negative keywords while looking through it, copy those keywords, go to the Amazon Seller Central page, and add the negative keywords — this cumbersome process. Of course it takes a lot of time and is a very tiring, boring, and repetitive task.
But if you don't do this work, you cannot progress with Amazon ad optimization. Because it's such an important task, Amazon sellers often perform it in pain. If this is too difficult, sellers give up on the task, causing ad performance to worsen, or they hire an agency to do it for them.
You've read this far — how do you feel? If you don't want to be in this pain or have already experienced this painful situation, now is your chance to get out of it. How about having negative keywords found and added automatically while you sleep?
Right now, in your head...
"But... what if important keywords are added as negative keywords?"
I know you might think like this.
I actually sell products on Amazon, so I am well aware of these realistic pains.
But what if we do it this way?
Register the important keywords for my product as protected keywords to prevent incorrect registration, and automatically add the inefficient keywords among the remaining keywords? That would be the best option.
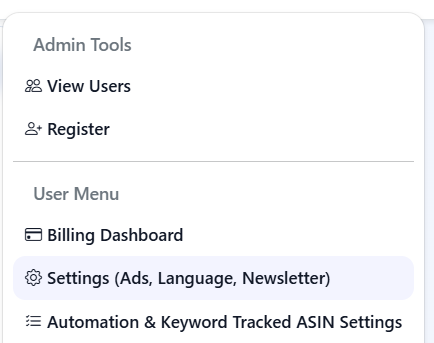
1. After logging into SellerVisor, select Settings (Ads, Language, Newsletter) from the gear icon at the top right.
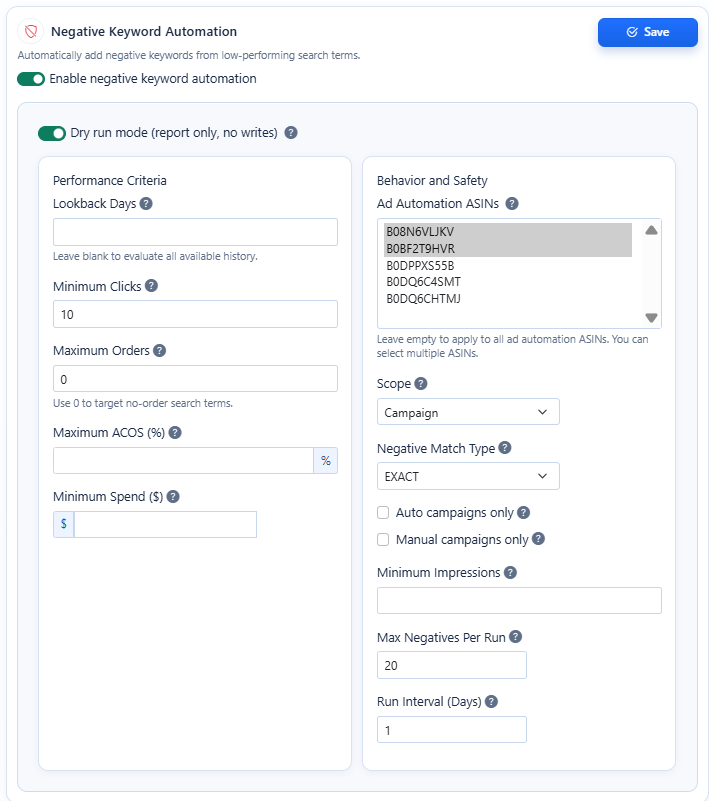
2. Go to the Negative Keyword Automation settings page.
If you scroll down a bit in Settings, you will find the area to configure Negative Keyword Automation. Please check the image above. Here you can set up negative keyword automation with your desired conditions. The items on this page are intuitive and easy to understand, but since beginners may read this article, I will explain the items.
Enable negative keyword automation This is the switch to turn on the negative keyword auto-registration feature. It automatically finds and handles inefficient search terms that meet the configured conditions.
Dry run mode (report only, no writes) A test mode that does not actually register, but shows in advance which keywords would be affected. Beginners should first review the results in this mode before applying them for real. (You will receive it by email)
Lookback Days Item that determines how many recent days of data to use for evaluation.
If left blank, the judgement is based on the overall cumulative data.
Minimum Clicks Sets from how many clicks a search term should be checked. Prevents hastily blocking search terms with too little data.
Maximum Orders Only considers search terms with orders less than or equal to this value as negative candidates. If set to 0, only search terms with no orders at all are targeted.
Maximum ACOS (%) Search terms with ACOS higher than this value can be judged as inefficient. Used to filter out search terms with very poor revenue efficiency relative to ad spend.
Minimum Spend ($) Determines that only search terms that spent at least this amount of ad spend will be evaluated. Reduces unnecessarily blocking search terms with almost no spend.
Ad Automation ASINs This is the option to select which ASIN(s) this automation will apply to. If left blank, it applies to all target ASINs; if selected, it applies only to the chosen product(s).
Scope This setting determines the range to which negative keywords will be applied. It's typically used to decide whether to apply them at the Campaign level or at the group level.
Negative Match Type Determines whether the negative keyword blocking method is Exact or Phrase. Exact blocks only when there is an exact match, while Phrase blocks more broadly if the phrase is contained.
Auto campaigns only Indicates that negative keywords will be applied only to automatic campaigns. Useful for reducing unnecessary search term wastage in automatic campaigns.
Manual campaigns only Indicates that negative keywords will be applied only to manual campaigns. Used when you want to clean up only inefficient search terms within campaigns you are already managing manually.
Minimum Impressions Only search terms with at least the minimum number of impressions are considered for evaluation. Search terms with too few impressions can be excluded because it's too early to judge them.
Max Negatives Per Run Sets how many negative keywords to add at most each time this runs. A safety measure to prevent too many keywords from being blocked at once.
Run Interval (Days) Specifies how many days apart this automation should run. Set to 1 to run daily, 7 to run once a week.
Save Button to save the settings you have just configured. You must save for the settings to actually take effect.
How does that sound?
If you've read this far you might be thinking:
“The feature sounds good, but what values should I start with?” “What if I set it wrong and end up blocking important keywords?” “How should a beginner use this safely?”
These questions are perfectly natural.
Because negative keyword automation is not simply a function to block a lot
Because it should be a feature that automatically organizes search terms that are just spending money.
In other words, it's not about blocking just because ACOS is high Search terms that have accumulated a certain amount of clicks and spent enough ad budget but have no orders Focusing automation on such search terms is much safer and more realistic.
Therefore, at SellerVisor, so that beginners can easily use it we recommend approaching it in a preset manner as shown below.
What settings should you start with?
Two negative keyword automation presets
Rather than fiddling with everything complicated It's best to start with one of the two scenarios below.
The core is simple.
If you are a beginner, safely
If your account accumulates a lot of data, a bit more quickly
Approach it like this.
Preset 1. Safe type
Auto Campaign Waste Cut
This preset is the most recommended approach for those starting negative keyword automation for the first time. In short,
This setting safely organizes search terms in auto campaigns that only spend money and have no orders.
Automatic campaigns have the advantage of discovering good search terms, but conversely they often get exposed to search terms that only vaguely match my product and search terms that just waste ad spend.
So it's safest to start by cleaning up automatic campaigns first.
Recommended settings
Enable negative keyword automation: ON
Dry run mode: ON
Lookback Days: 30
Minimum Clicks: 12
Maximum Orders: 0
Maximum ACOS (%): leave blank
Minimum Spend ($): 10
Ad Automation ASINs: select all or specific ASINs
Scope: Campaign
Negative Match Type: EXACT
Auto campaigns only: ON
Manual campaigns only: OFF
Minimum Impressions: 300
Max Negatives Per Run: 10
Run Interval (Days): 7
Why set it this way?
First, the reason for setting Lookback Days to 30 is because if you look over too short a period, a few random clicks can lead you to hastily block search terms. About 30 days gives a more reliable view of whether a search term is truly consistently underperforming.
And it's also important to set Minimum Clicks and Minimum Spend together. Search terms with very few clicks or almost no ad spend are still premature to judge. Conversely, if clicks have accumulated and ad spend occurred but there are no orders, there is little reason to keep that search term alive.
The most important value here is Maximum Orders = 0. Keywords that have even a single order still have a chance to be revived. However, keywords with no orders at all and only accumulating clicks and costs are much more clearly candidates for automatic cleanup.
Also, it is important to set the Negative Match Type to EXACT. If you start blocking broadly with Phrase from the beginning, you may block many more related search terms than expected. Beginners are much better off starting cautiously with the Exact method.
Recommended for
Those using ad automation for the first time
Those who want to first reduce waste from automatic campaigns
Those worried that important keywords might be wrongly blocked
Those who do not yet have much ad data
Preset 2. Reinforced
Fast Waste Cutter
The second preset is for those who want to reduce ad spend waste a bit faster.
In short, this preset,
This setting blocks non-order search terms faster on accounts that have accumulated a certain amount of data.
If you are already running ads consistently and your account accumulates a considerable number of clicks and ad spend daily, inefficient search terms will become apparent quickly without waiting 30 days. In that case, it's better to clean up at a slightly faster rhythm.
Recommended settings
Enable negative keyword automation: ON
Dry run mode: ON to test for about 1 week first
Lookback Days: 14
Minimum Clicks: 15
Maximum Orders: 0
Maximum ACOS (%): Leave blank
Minimum Spend ($): 20
Ad Automation ASINs: Recommended to select mainly core ASINs
Scope: Campaign
Negative Match Type: EXACT
Auto campaigns only: OFF
Manual campaigns only: OFF
Minimum Impressions: 500
Max Negatives Per Run: 20
Run Interval (Days): 3
What is different about this setting?
The biggest difference is the speed of decision-making. Because it looks at the last 14 days of data instead of 30 days, it can filter out inefficient search terms more quickly.
Also, because the Minimum Spend is set a bit higher, it will target only search terms that have actually incurred a certain amount of cost. In other words, rather than search terms that haven't been tested enough, it will more quickly cut search terms where “enough ad spend was used but orders are not coming.”
The Run Interval is also short at 3 days. In other words, you can tidy up confirmed problem keywords more frequently without waiting a week meaning you can clean up more often.
However, this preset may be somewhat fast for accounts with limited data. If you are a seller with low ad spend, we recommend starting with the conservative option first.
Recommended for
Accounts with steady clicks and ad spend
Sellers with some advertising experience
Those who want to reduce overall waste faster, not just with automatic campaigns
Those who want to more aggressively prevent ad spend leakage
Why didn't we set ACOS as the default preset?
Many people might think this.
“If the ad performance is poor, can't we just automatically block keywords with high ACOS?”
In theory, that may seem reasonable. But actual ad operations are not that simple.
Even if ACOS is high that keyword may still be in a testing phase, and It may be a keyword you should keep in the long term, or it could be a keyword intentionally run for brand expansion.
On the other hand, if a search term has received enough clicks, enough ad spend, and zero orders, the judgment is much clearer.
Therefore, the basic axis of negative keyword automation is No Orders + Enough Clicks + Enough Spend rather than High ACOS This structure is safer and more practical.
If you're just starting, do it like this
The most practically recommended order is as follows.
Step 1
Start with the safe preset first.
Step 2
Turn on Dry run mode and first check the results. In other words, do not actually register; just check which search terms are picked as negative candidates.
Step 3
After reviewing the results, if the search terms that make you think "this can really be blocked" are well captured, switch to actual automatic registration then.
Step 4
When ad data accumulates faster and ad scale begins to grow you can switch to the Enhanced preset then.
But one more thing is important here
You must protect important keywords
While reading up to this point you might have had this thought.
“What if important keywords are automatically added to negatives?”
That's right. This is a very realistic concern.
So SellerVisor offers a Protected Keyword Registration feature along with negative keyword automation Protected Keyword Registration.
Simply put, this feature tells the automation this.
“These keywords are important for my product, so do not touch them automatically.”
With this mechanism, automation becomes much safer, and it will operate in the direction you intend.
Setting up Protected Keyword Registration
Register the keywords to be protected first
Negative keyword automation is a powerful feature. But if you run it without safeguards you'll end up worrying about core keywords you need to keep alive.
So it's best to register the keywords to protect first.
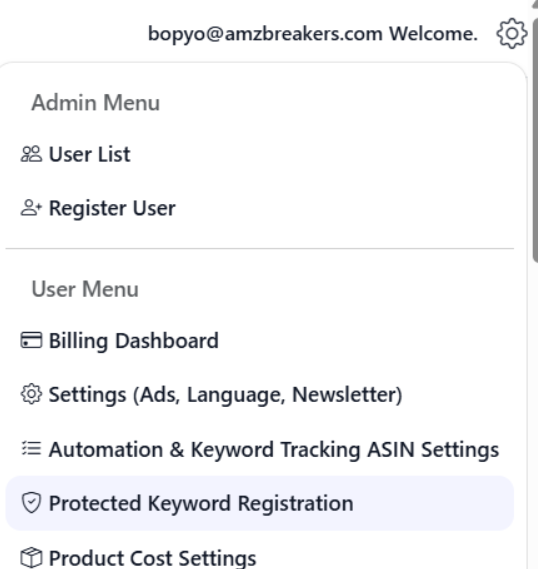
1) Go to the menu
When you open the menu at the top right of SellerVisor, you will see the items below. (See the image above)
Automation & Keyword Tracking ASIN Settings
Protected Keyword Registration
From here, go into Protected Keyword Registration.
This menu is a space to pre-register keywords that automation should not touch.
2) Check recommended keywords by ASIN
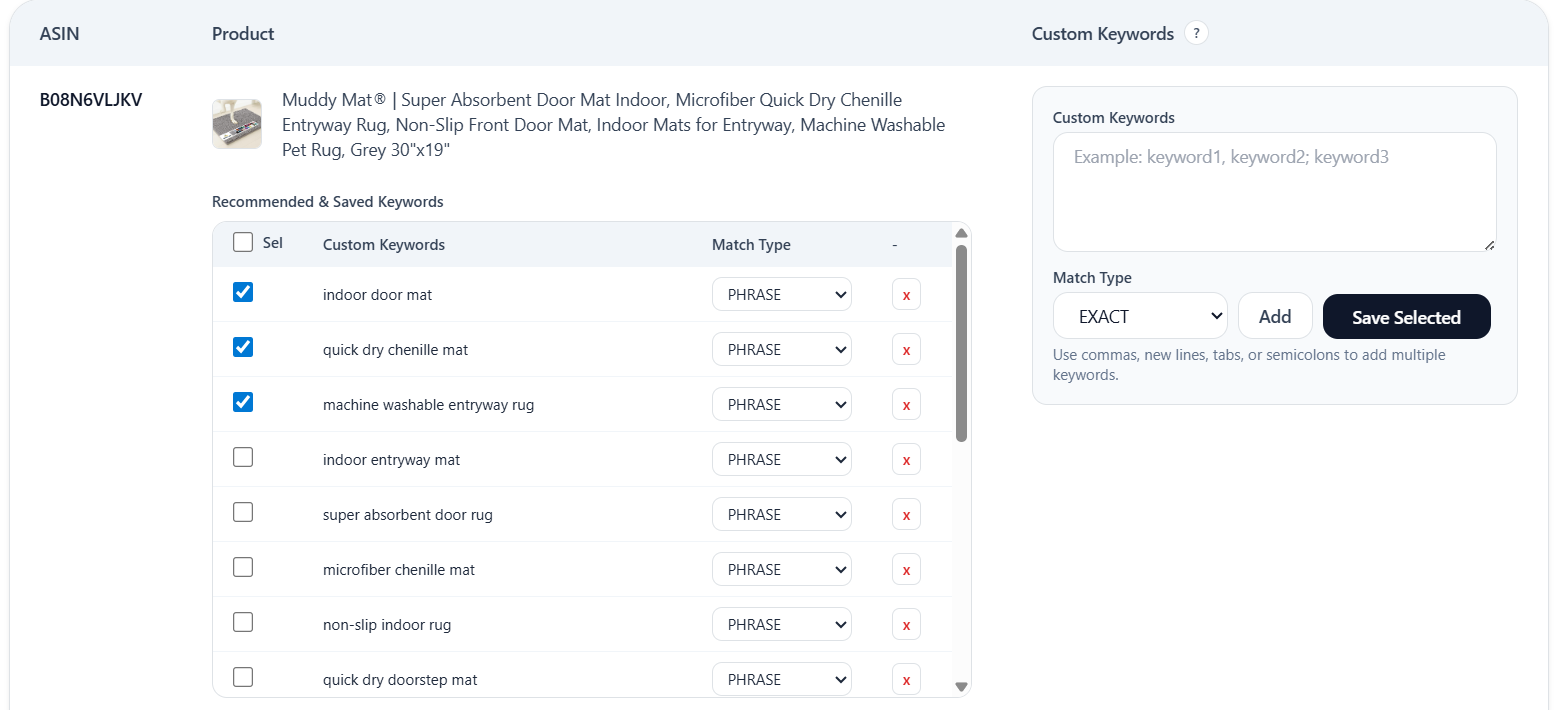
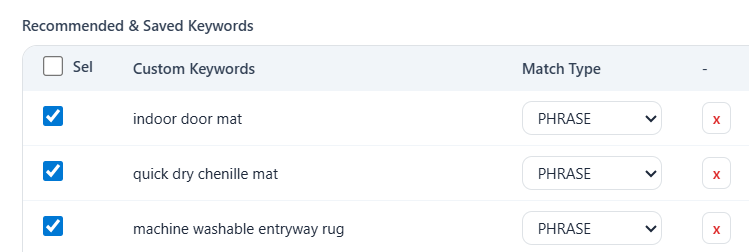
When you enter the settings page you will see the Protected Keyword Recommendations screen.
Here, recommended keywords are organized by ASIN. SellerVisor displays keywords that it deems highly relevant to the product first as candidate suggestions.
For example, as shown on the screen, under a specific ASIN
indoor door mat
quick dry chenille mat
machine washable entryway rug
Recommended keywords may appear like this.
The advantage of these recommended keywords is you don't have to think of every single one from the start SellerVisor suggests first, “these keywords can be protection candidates.”
Check the keywords to protect
There is a checkbox to the left of the recommended keyword list. You can select the keywords you want to protect here.
The criteria here are simpler than you might think.
You should protect keywords like these
Core main keywords of your product
Keywords that have already generated conversions or that you want to keep pushing
Keywords that should be maintained long-term even if ad performance fluctuates temporarily
Keywords highly relevant to my product
Keywords that must be preserved for brand management
On the other hand If a keyword is not very relevant, continues to just spend costs, and is not strategically important there is no need to protect it.
The key is this.
“This keyword should be maintained even if it doesn't perform well right away.” This is protecting such keywords.
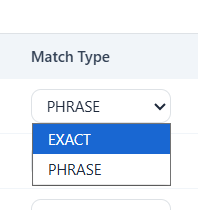
Choose a Match Type
Next to each keyword is a Match Type field. You typically choose between EXACT and PHRASE.
EXACT
Only protects when it exactly matches that keyword. This is the most conservative and safest method.
PHRASE
You can protect a wider range of search terms that include this phrase. You can use this when you want to protect a slightly broader range.
For beginners, we recommend primarily protecting with EXACT. If you set the protection range too broadly, automation may end up cleaning up fewer search terms that need to be organized.
You can also add keywords directly
Recommended keywords alone may not be sufficient. Because, in addition to the keywords SellerVisor recommends, you may have strategic keywords you know better yourself.
In the Custom Keywords input on the right, you can enter the keywords you want to protect directly.
For example
keyword1, keyword2
keyword1; keyword2
Enter multiple items separated by line breaks
You can enter it like this.
Then select the Match Type below Click Add to add them to the list.
This feature is especially useful in the following cases.
Long-tail keywords I really want to push
Keywords important for brand strategy
Keywords you want to grow rankings for in the future
Core expressions that differentiate you from competing products
In other words, recommended keywords are the starting point and strategic keywords are something you complete yourself.
Save with Save Selected
Once checking and adding are finished finally click the Save Selected button to save.
After completing this process Even if negative keyword automation is running the keywords protected here will not be included as automatic blocking targets.
In other words, the automation does not run blindly but becomes automation that reflects your operational intent.
This difference is truly important.
How should we understand the Protected Keyword feature?
This feature is not simply for storing keywords.
More precisely,
it is a function that lays guardrails in advance so the automation does not make mistakes.
Automation is powerful because it handles repetitive tasks for you. But it does not understand every context perfectly like a human does.
For example,
keywords that need to be pushed continuously even if efficiency is temporarily poor
keywords connected to the product's identity
keywords that need to build ranking over the long term
These kinds of keywords should not be cut off by only looking at short-term efficiency.
Therefore, when using negative keyword automation This order is always correct.
Decide what to protect first, then automate
Following this order is much safer.
Let's summarize
In this article, among SellerVisor's ad automation features, I explained negative keyword automation and the Protected Keyword Registration feature that acts as a safety mechanism.
The core idea is simple.
What matters when running Amazon ads is not only finding good keywords but consistently cleaning up inefficient keywords that are just spending money.
However, although everyone knows this task is important, in reality it is too tedious, repetitive, and draining.
So most sellers usually fall into one of the three categories below.
They know they should do it but keep postponing it, or
they give up because it becomes too cumbersome, or
they end up paying someone else to handle it.
SellerVisor automates exactly that repetitive task This is a feature created to change into a system.
If you set condition values,
it automatically finds inefficient search terms
and can automatically register them as negative keywords,
and important keywords can be protected as Protected Keywords.
In other words, it does not block automatically without thought, but is an automation approach that protects what should be protected and cleans up what should be cleaned up.
I believe this approach is realistic. Because actual ad operations are not as neat as theory. Therefore, automation especially needs safety mechanisms.
Amazon advertising can be a tool to generate sales when managed well, but if not managed, it can become a structure where ad spend keeps leaking.
In particular, negative keyword management is the foundation of improving ad efficiency, yet This is a very repetitive and tedious area that many sellers miss.
But this important task no longer requires you to open Excel files, copy, paste, and add items one by one.
What you need to do is gradually reduce your involvement, and instead have the system handle the repetitive tasks for you.
I believe that this is ultimately the way to run Amazon ads longer and more stably.
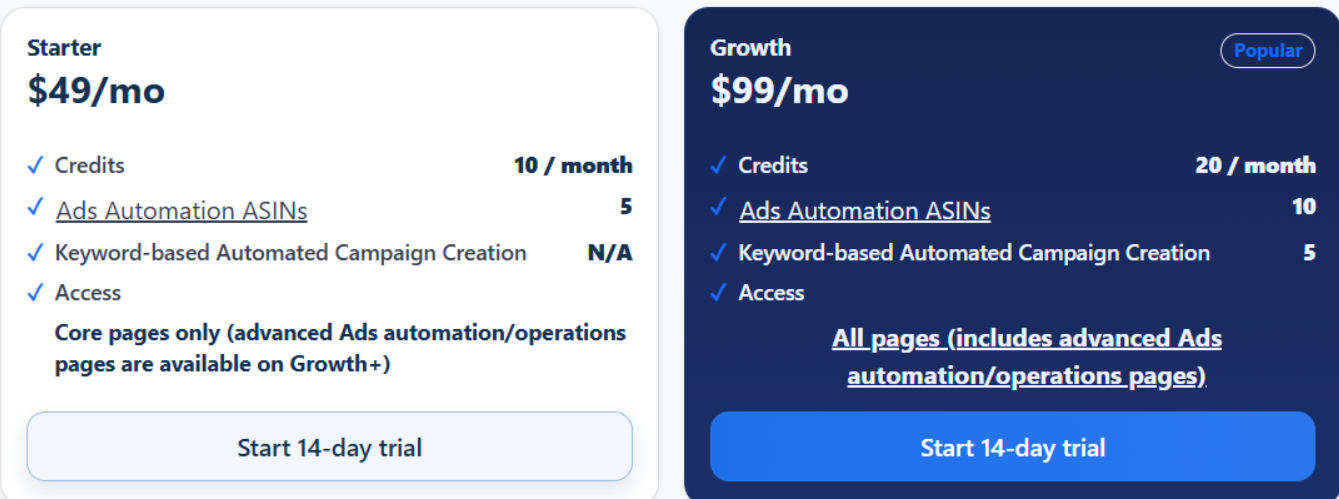
How does that sound? To use this feature, SellerVisor's Growth Plan is required.
This point needs to be emphasized once more. Because the core point explained in this article is not merely viewing data, but whether ad automation is actually running.
Starter is fine for checking SellerVisor's basic structure and trying out features lightly. However, the flow described in this article, that is
Track efficient keywords of competing products
Automatically create campaigns based on those keywords
Automatically register inefficient search terms as negative keywords
Protect important keywords as Protected Keywords
This kind of practical ads automation operation becomes available starting from the Growth Plan.
The differences are clear as well.
Ads Automation ASINs
Starter: 5
Growth: 10
Keyword-based Automated Campaign Creation
Starter: Not available
Growth: up to 5
Access
Starter: Core pages only
Growth: full page access including advanced Ads automation / operations pages
In short, Starter is closer to a stage for learning the structure, while Growth is the stage where you actually run ads automation.
Why is this important?
Amazon advertising is ultimately a boring and simple repetitive task, the person who executes it accurately and repeatedly wins.
Even if you find good keywords, if you don't create campaigns you will miss opportunities to increase sales. Even if you know inefficient search terms, if you don't register them as negatives, ad spend will continue to leak. So the important thing is not to "know" but to make it execute automatically.
From the Growth Plan, that part changes. While you are sleeping, ad campaigns can be created based on effective keywords from competing products, and underperforming search terms can be organized as negative keywords.
From this point, advertising is no longer manual management and becomes closer to an operational system that runs according to the set criteria.
So the Growth Plan is better suited for these people.
Those who want to manage ads for multiple ASINs together
Those who want to go beyond tracking competitor product keywords and actually create campaigns
Those who want to automate negative keyword organization instead of doing it manually repeatedly
Those who want to manage advertising operations as a system rather than by intuition
Those who find ad management bothersome (I wish someone would manage it well for me...)
On the other hand, the following people can start with Starter first.
People who are using SellerVisor for the first time
People who can spend about 2 hours a day reviewing ads and performing detailed work
People who do not rely on Amazon advertising
Ultimately, the criterion is simple.
If you don't need campaign automation, Starter is fine. However, if you want true automation — competitive product keyword tracking, automatic campaign creation, and automatic registration of negative keywords — you should use the Growth Plan.
The core of the features described in this article is exactly that. Not managing ads more diligently by hand, but creating a structure where good keywords are executed automatically and inefficient keywords are cleaned up automatically.
And this is not something that should be viewed only as a difference in plan price. The difference between Starter and Growth is $50 per month, but in actual ad operations this gap can have a larger impact than you might expect.
When running ads, inefficient search terms can continue to incur unnecessary ad spend if not stopped in time, and conversely, you can miss sales opportunities by failing to immediately connect efficient keywords to campaigns. With the Growth Plan, you can connect these flows through automation, allowing you to simultaneously manage areas where ad spend can be reduced and areas where additional sales opportunities can be created.
Therefore, the $50 monthly difference is less a simple cost difference and more, the difference between continuing to manage ads manually or switching to a structure that runs according to defined criteria.
In fact, even slightly reducing the areas where advertising spend is leaking can be enough to fully offset that difference. If this then leads to automatic campaign creation based on competitors’ high-performing keywords, you can create an opportunity for additional revenue growth beyond merely saving costs.
So after seeing the features in this article “This makes me want to try proper automation” If you feel this way, start now with the Growth Plan rather than Starter.