In Minutes
SellerVisor
Learn Quickly
Follow the steps below to configure your workspace and start researching markets with AI.
1. Settings
This guide walks you through configuring SellerVisor so your workspace matches your language, time zone, and workflow.
- Most items apply instantly without page reload.
- All settings can be adjusted later in the same page.
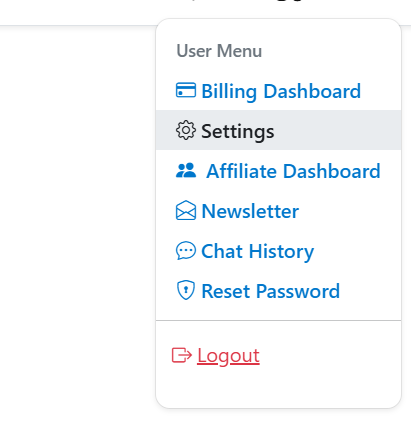
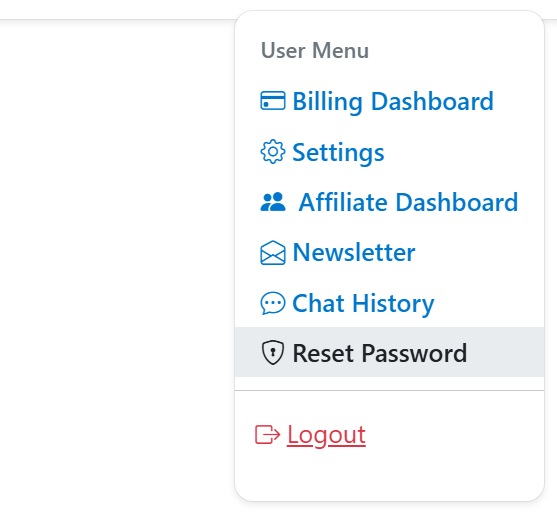
1-1. Open Settings
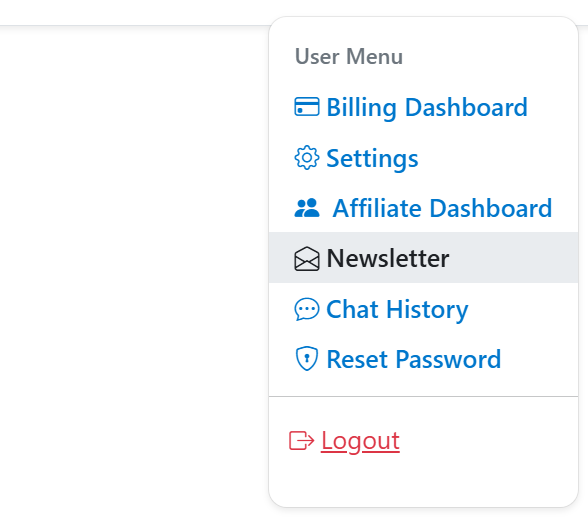
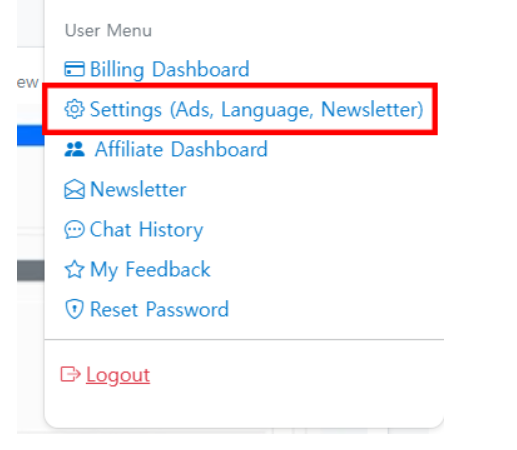
- Click your user name at the top-right.
- Select Settings from the dropdown.
- You will be taken to the main settings page.
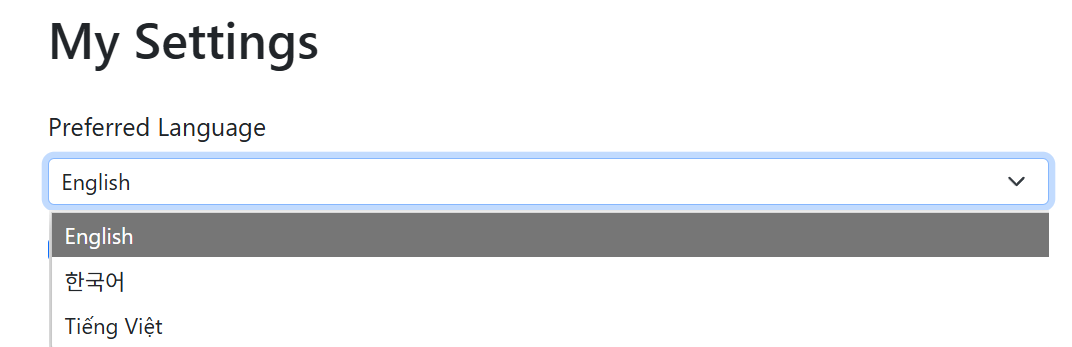
1-2. Language
- Choose your preferred language.
- Supported: Korean, Vietnamese, English.
- Changes apply instantly across the app.
1-3. Newsletter Subscription
- Receive personalized, data-driven insights (not promotional spam).
- Set delivery frequency, send time, and time zone.
- Content adapts to your recent keyword searches.

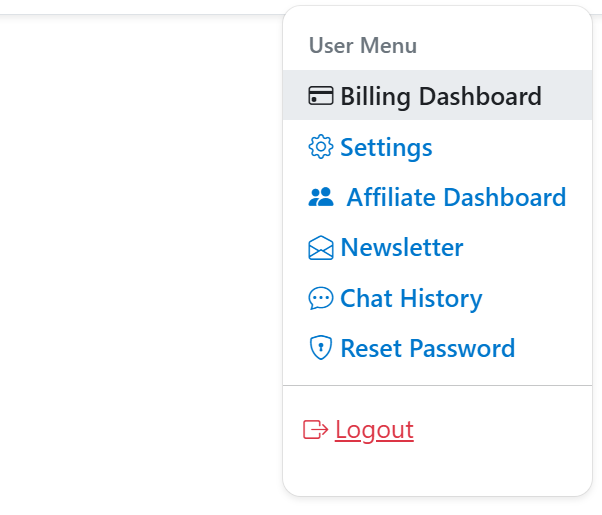
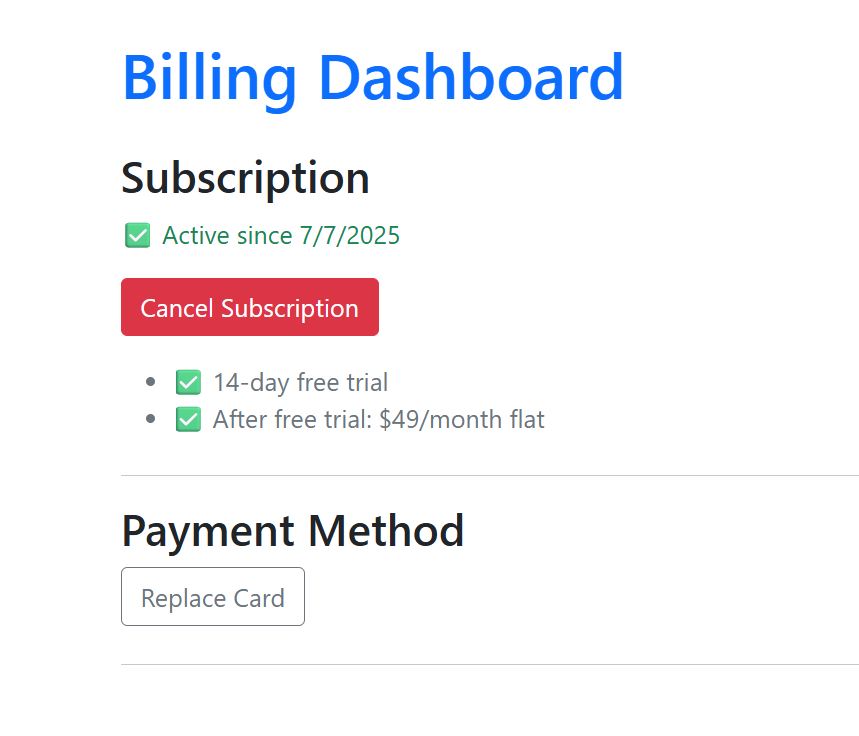
1-4. Billing Dashboard
- View and update payment methods and invoices.
- Check subscription status and add-ons.
- Download receipts for accounting.
1-5. Newsletter Archive
- Browse previously received newsletters.
- Use past insights for trend comparisons.

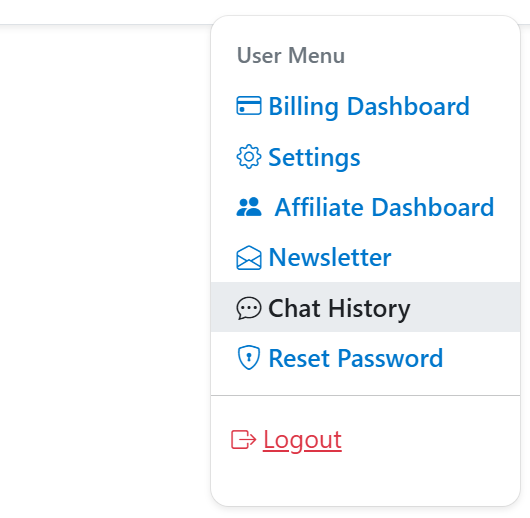
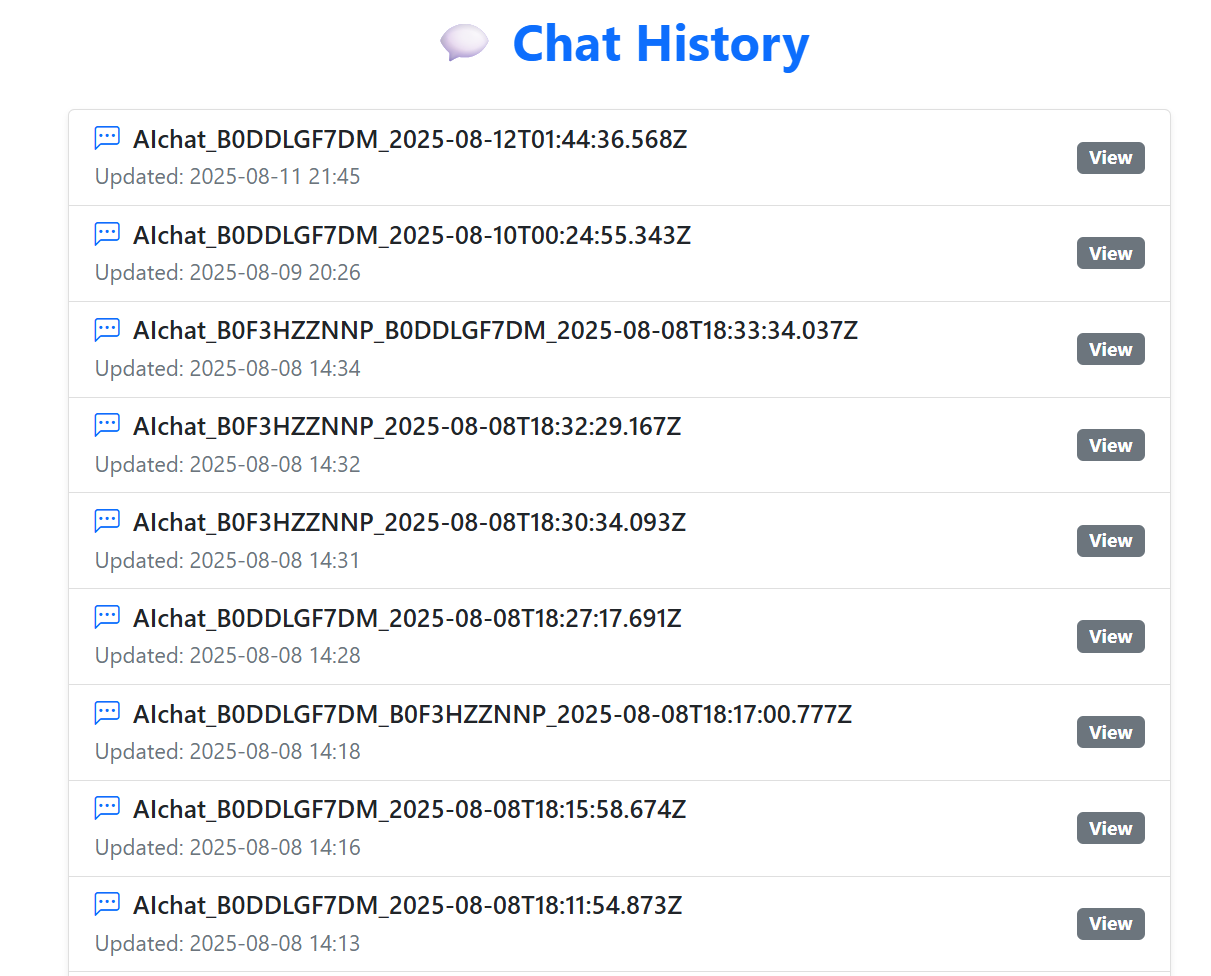
1-6. Chat History
- Review all AI chats you have had in SellerVisor.
- Revisit answers and reuse prompts.
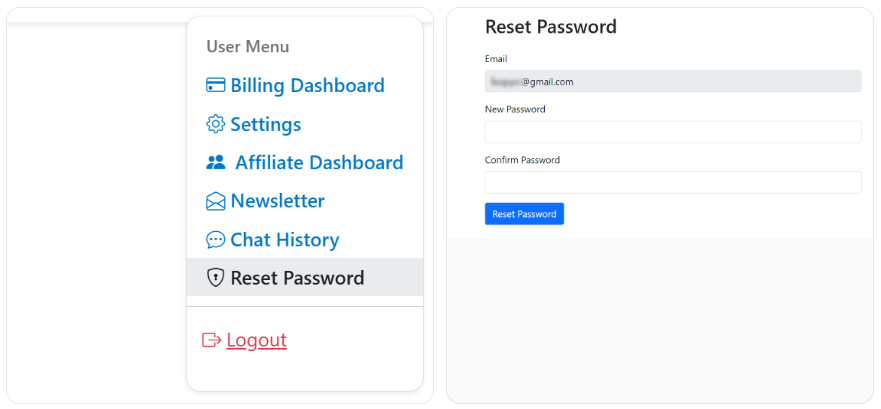
1-7. Reset Password
- Click Reset Password to set a new one.
- Use a strong, unique password for security.
- Change it periodically to reduce risk.
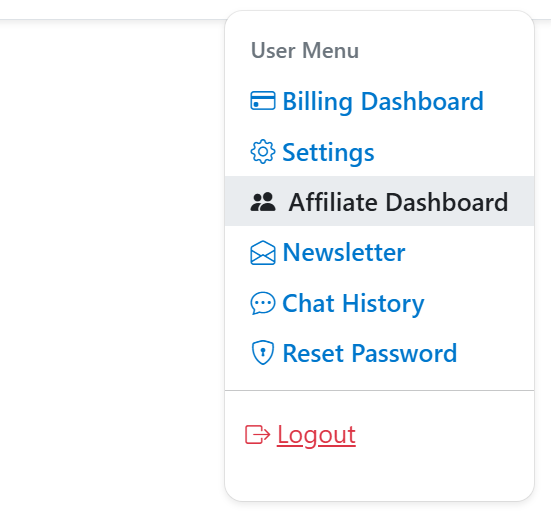
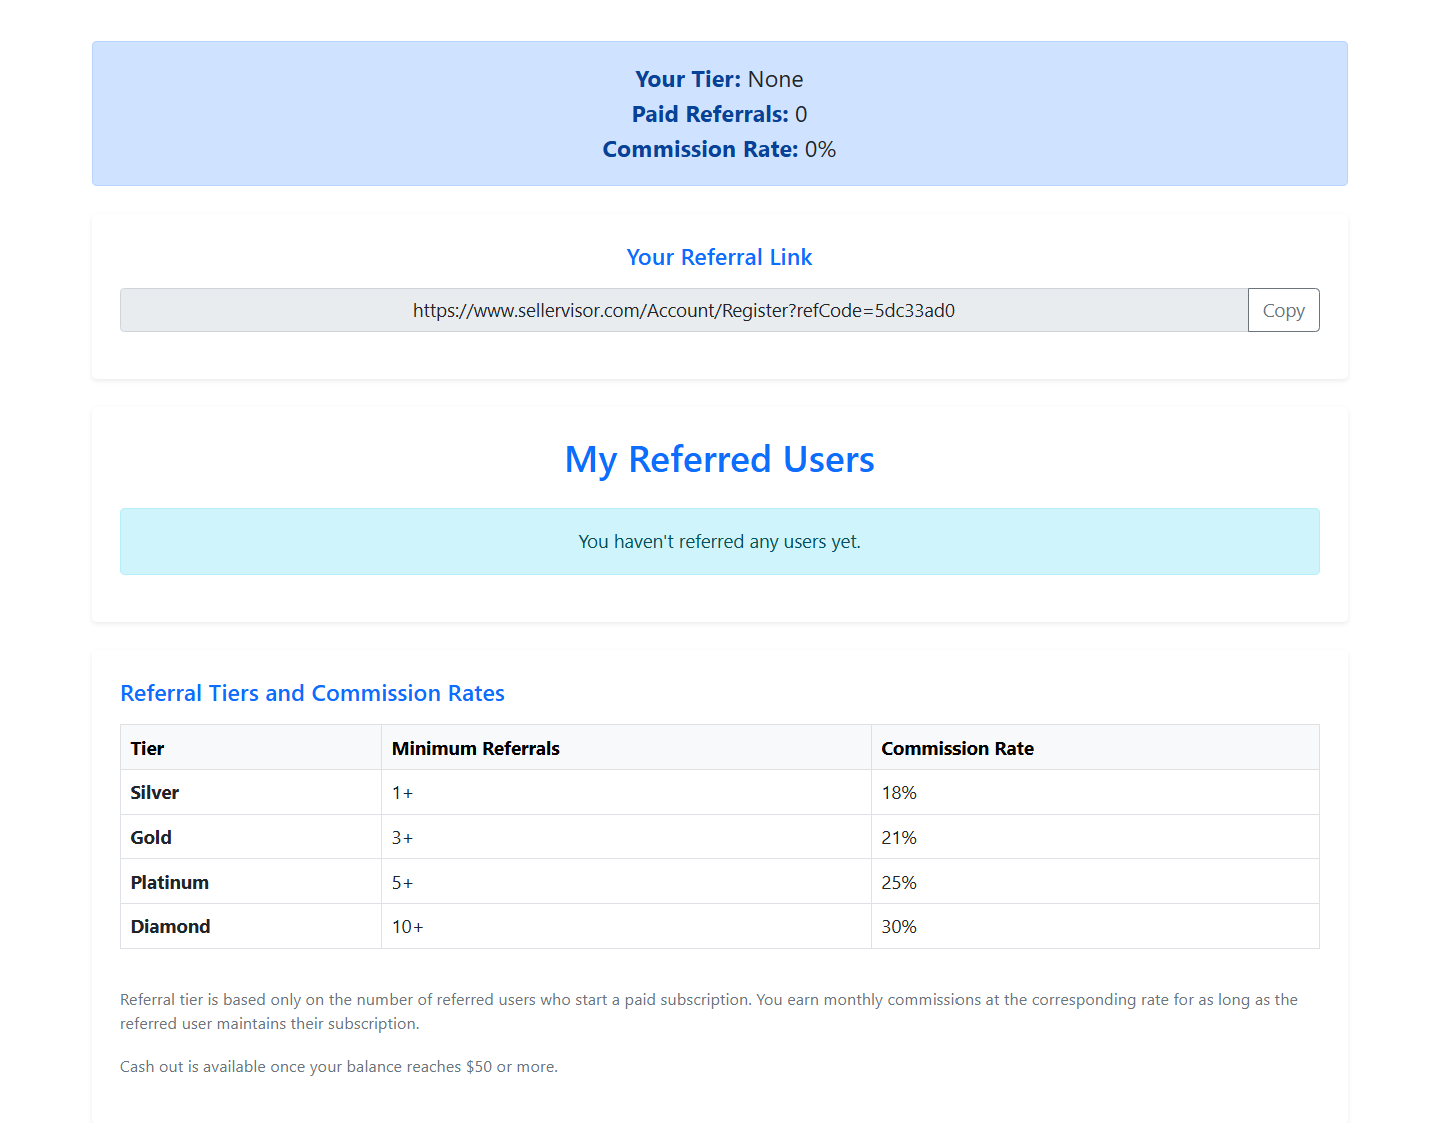
1-8. Affiliate Dashboard
- Track referrals, clicks, and earnings.
- Copy your referral link and share it.
- See tier status and payout history.
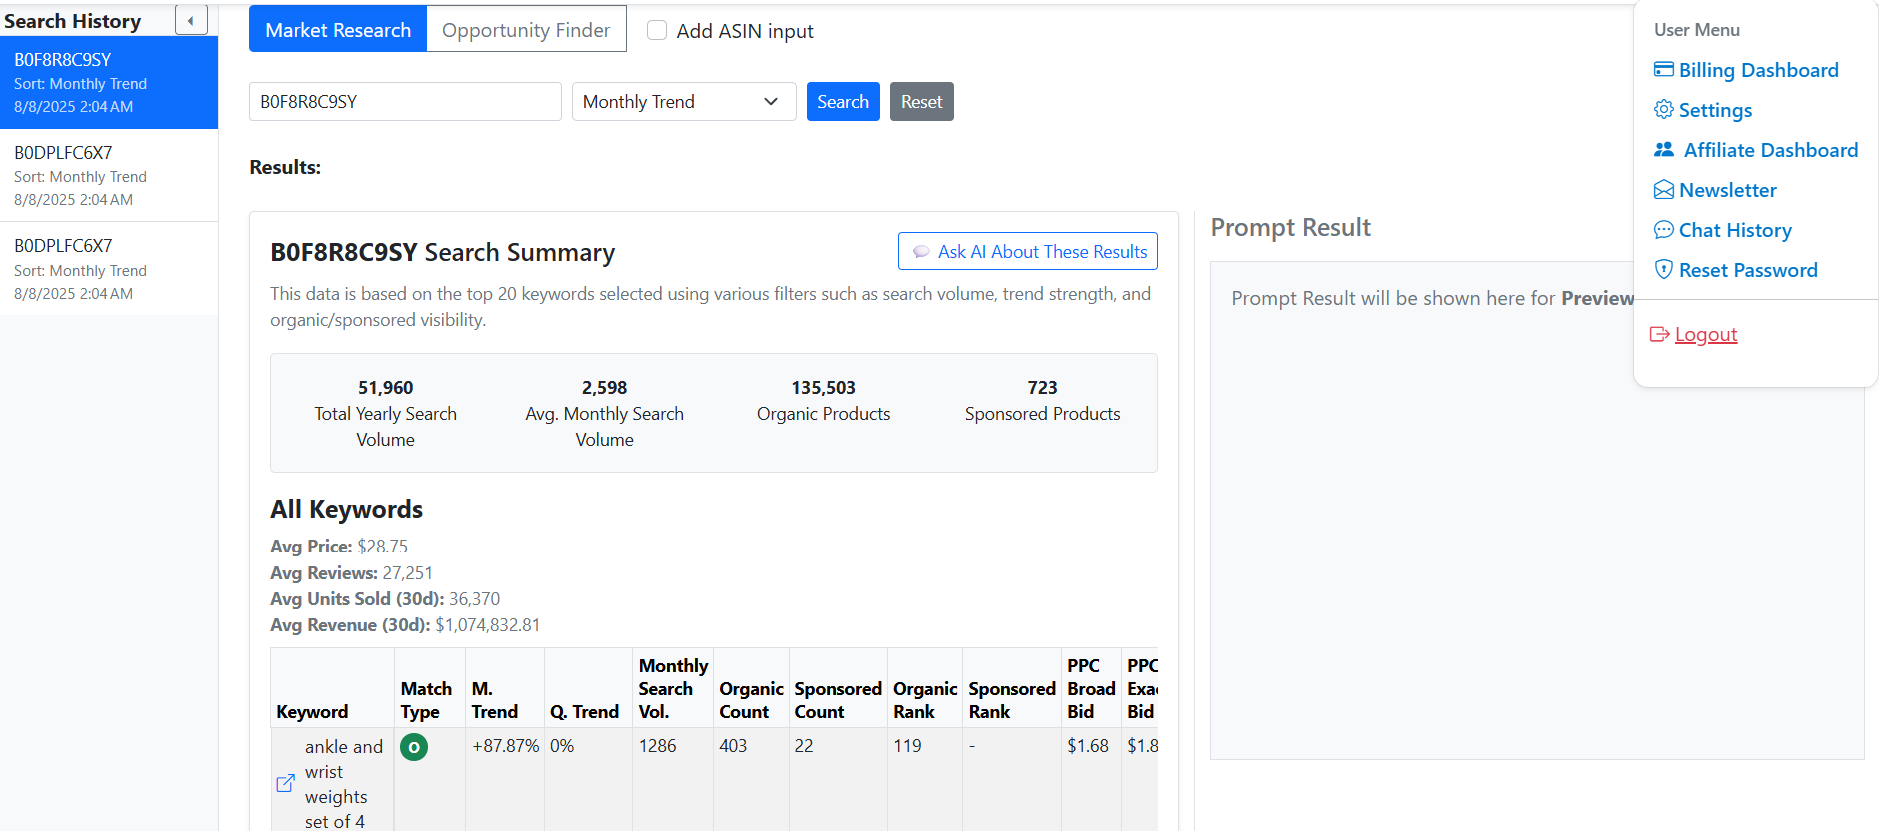
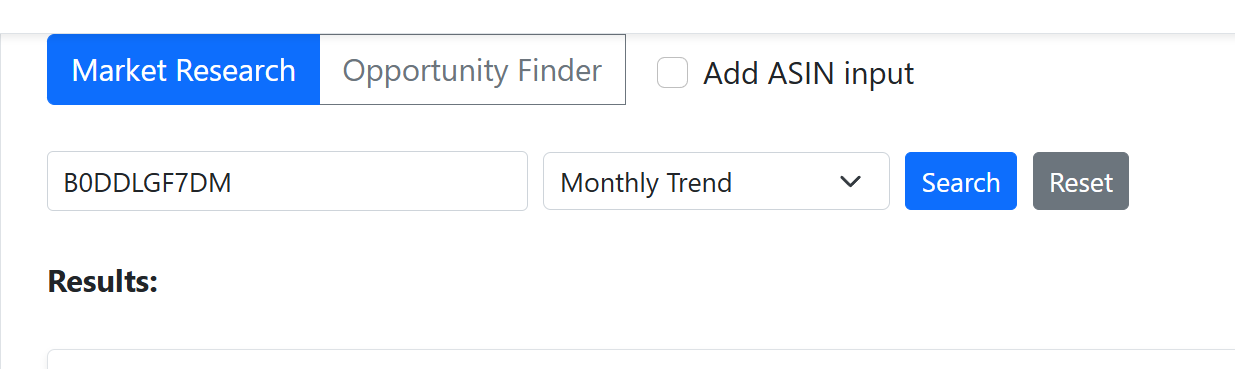
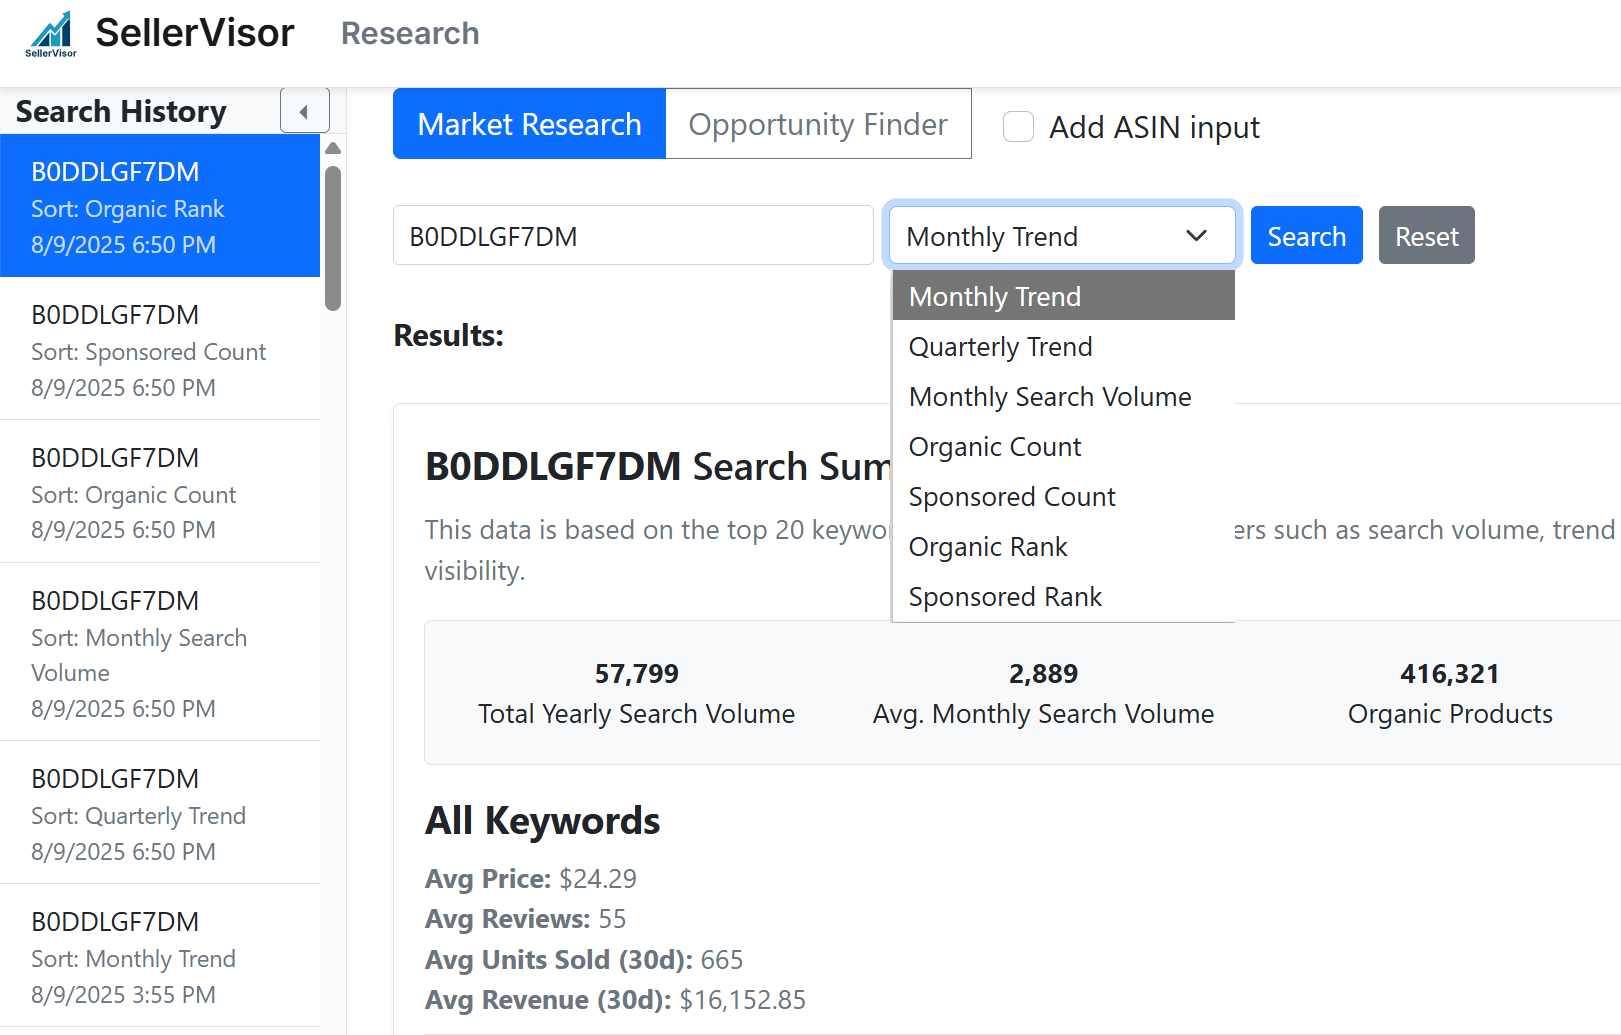
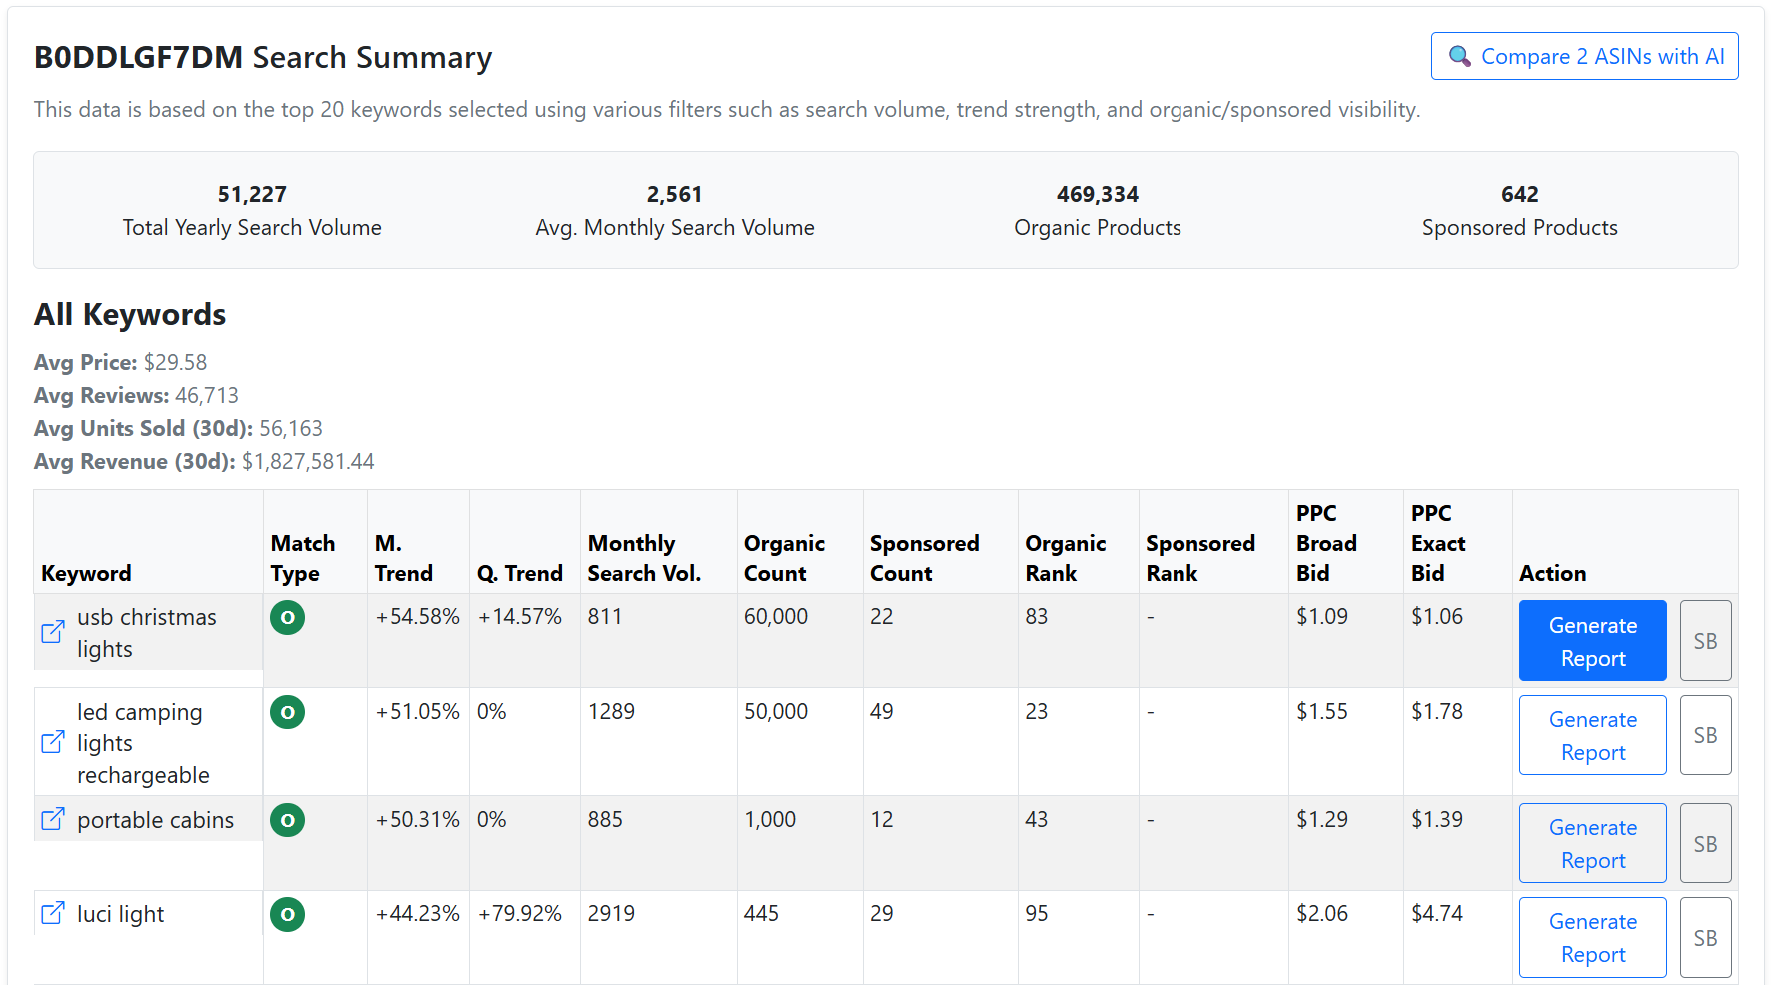
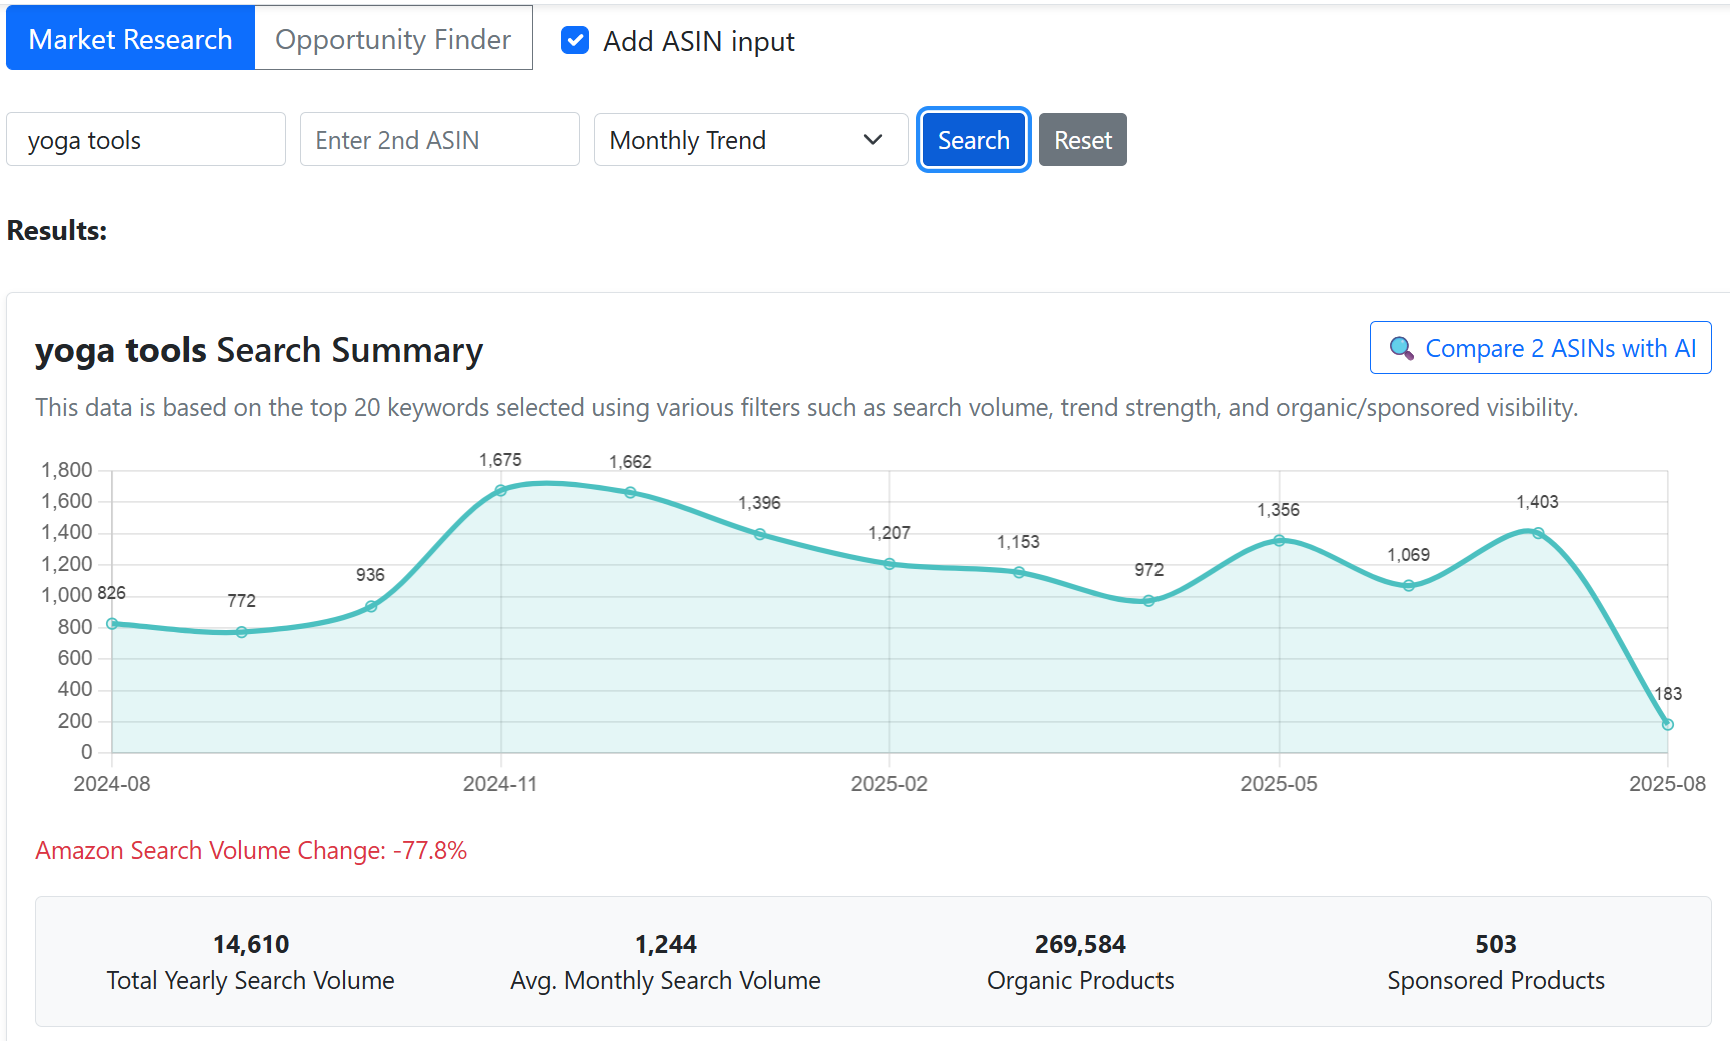
2. How to use Market Research
Analyze market data by ASIN or keyword to discover opportunities.
- Access: Research → Market Research from the top menu.
- Input ASIN for keyword/rank/ad data or input keywords for trend & competition analysis.
Main analysis items
- Monthly Trend
- Top rising keywords
- Quarterly Trend
- Organic vs Sponsored Count
- Organic Rank / Sponsored Rank
- Total Search Volume, avg monthly, and product counts
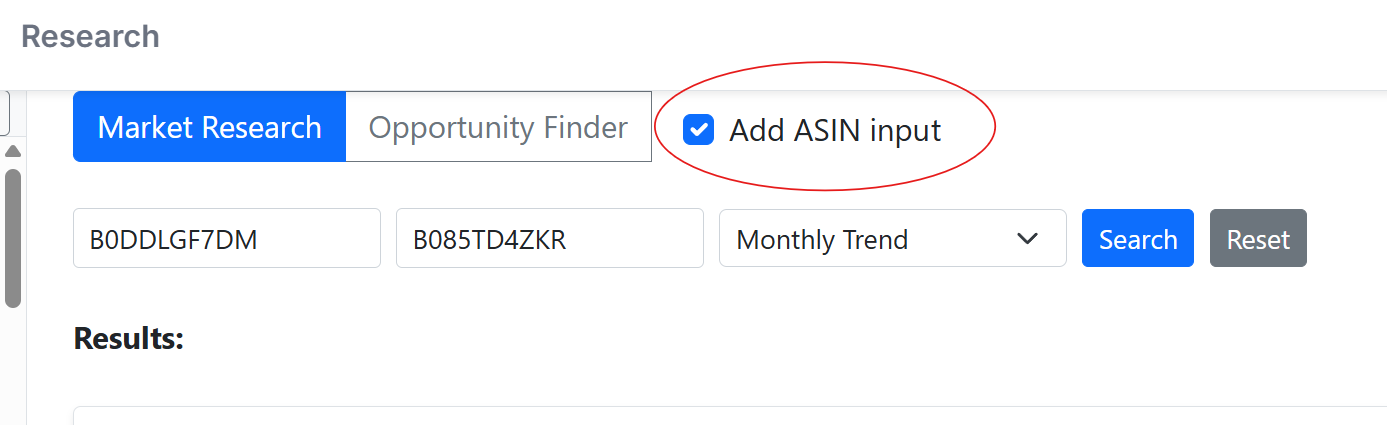
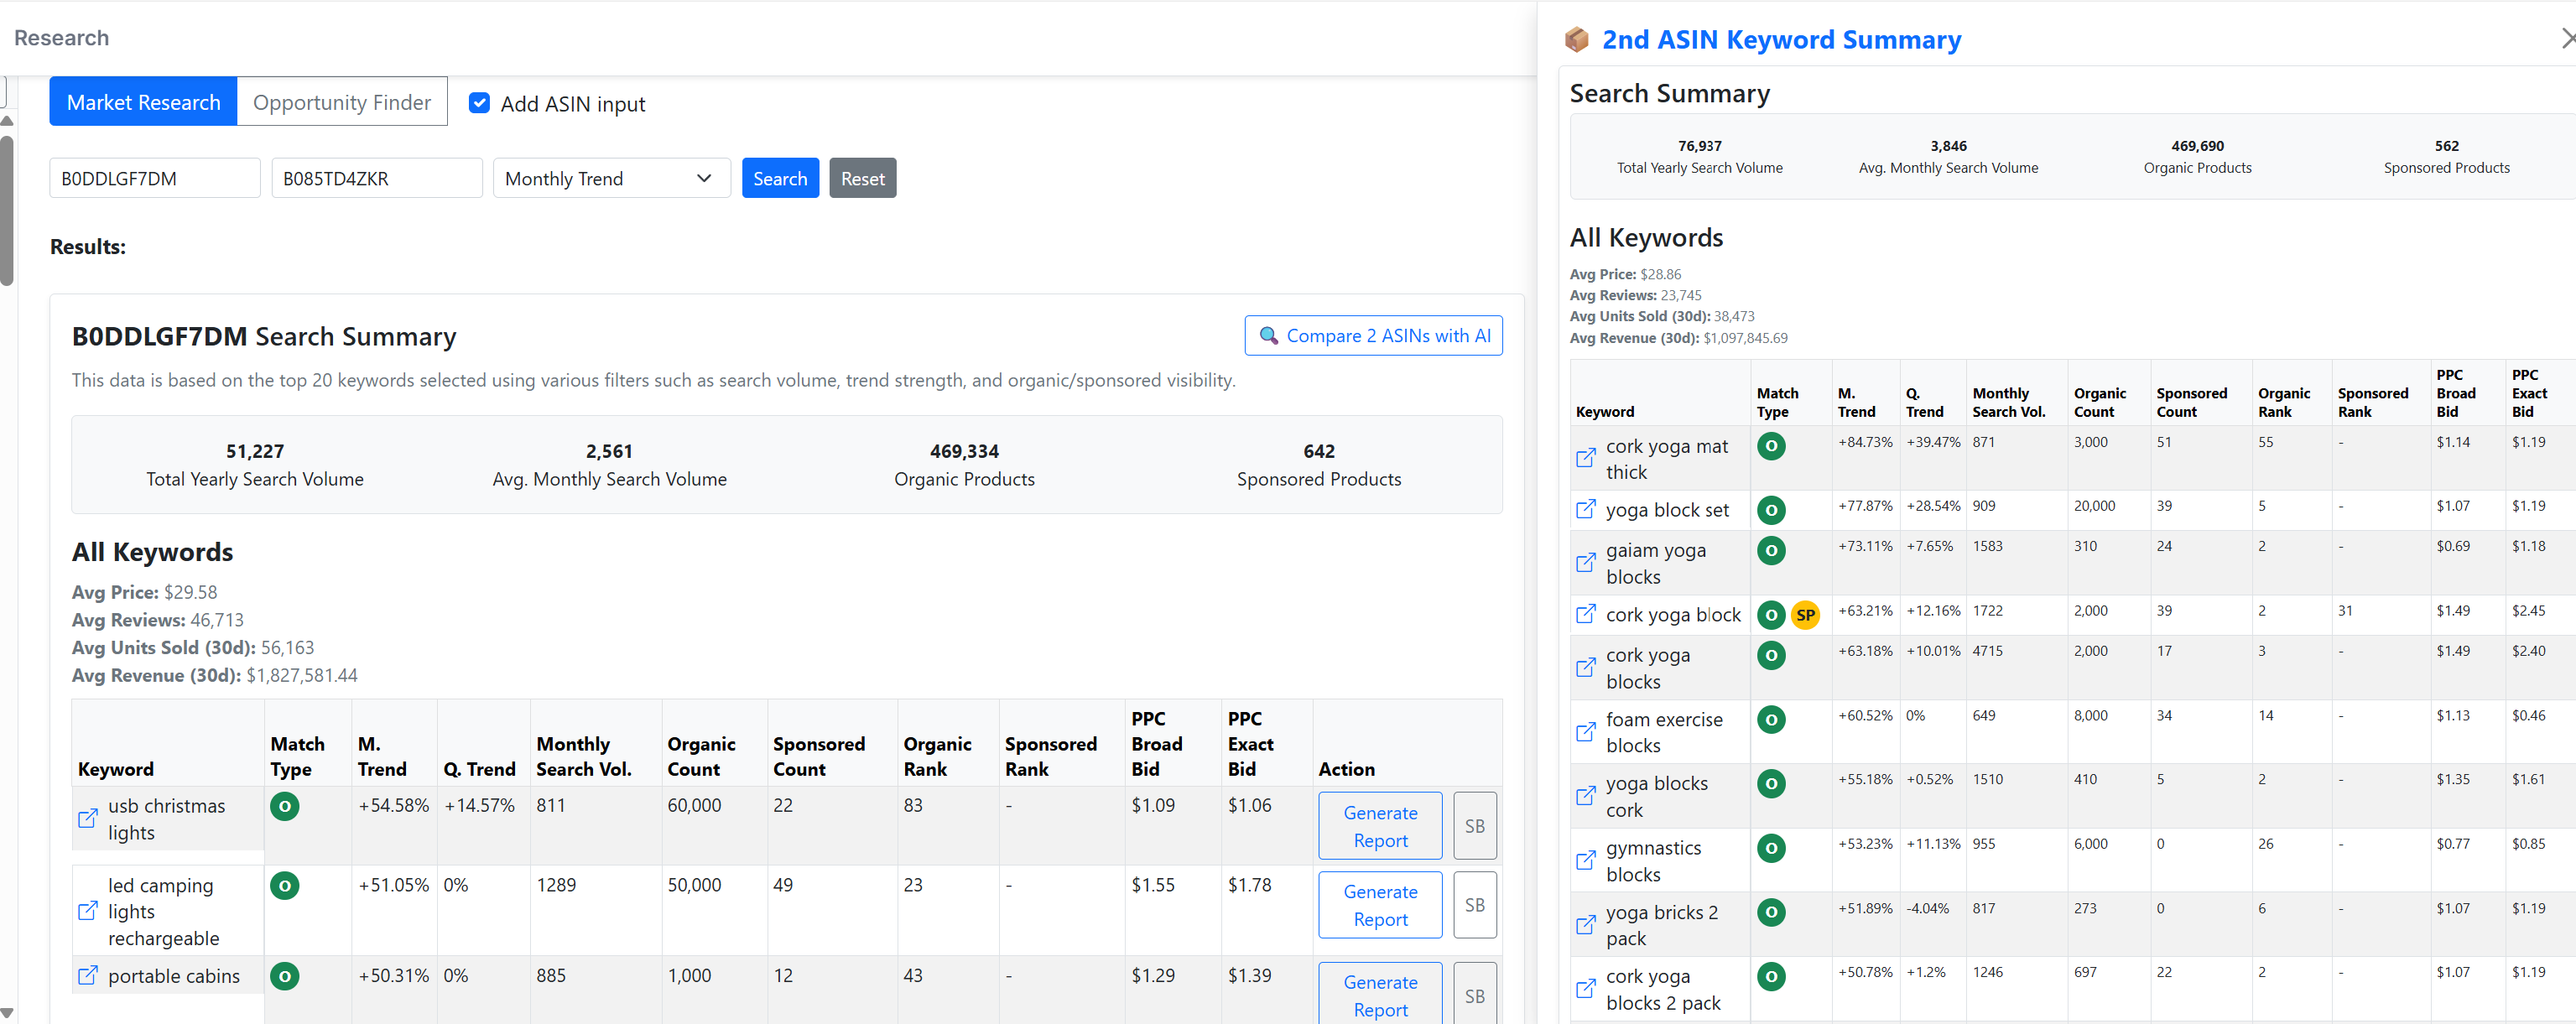
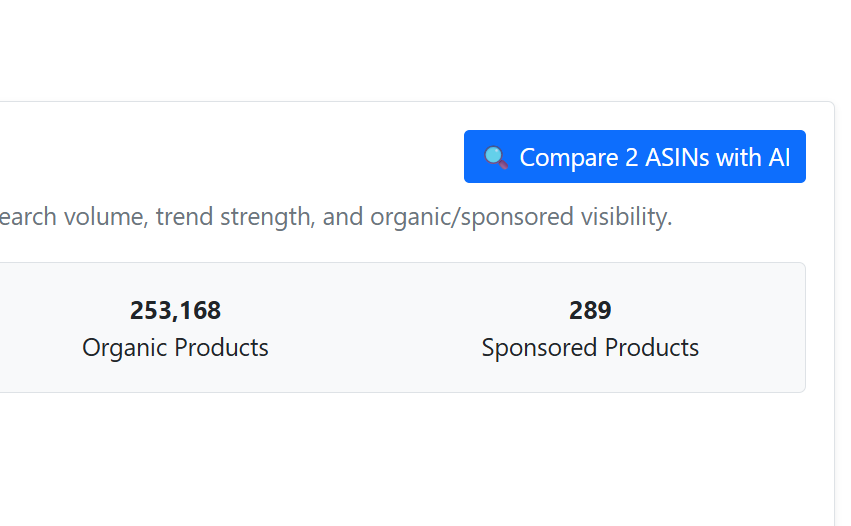
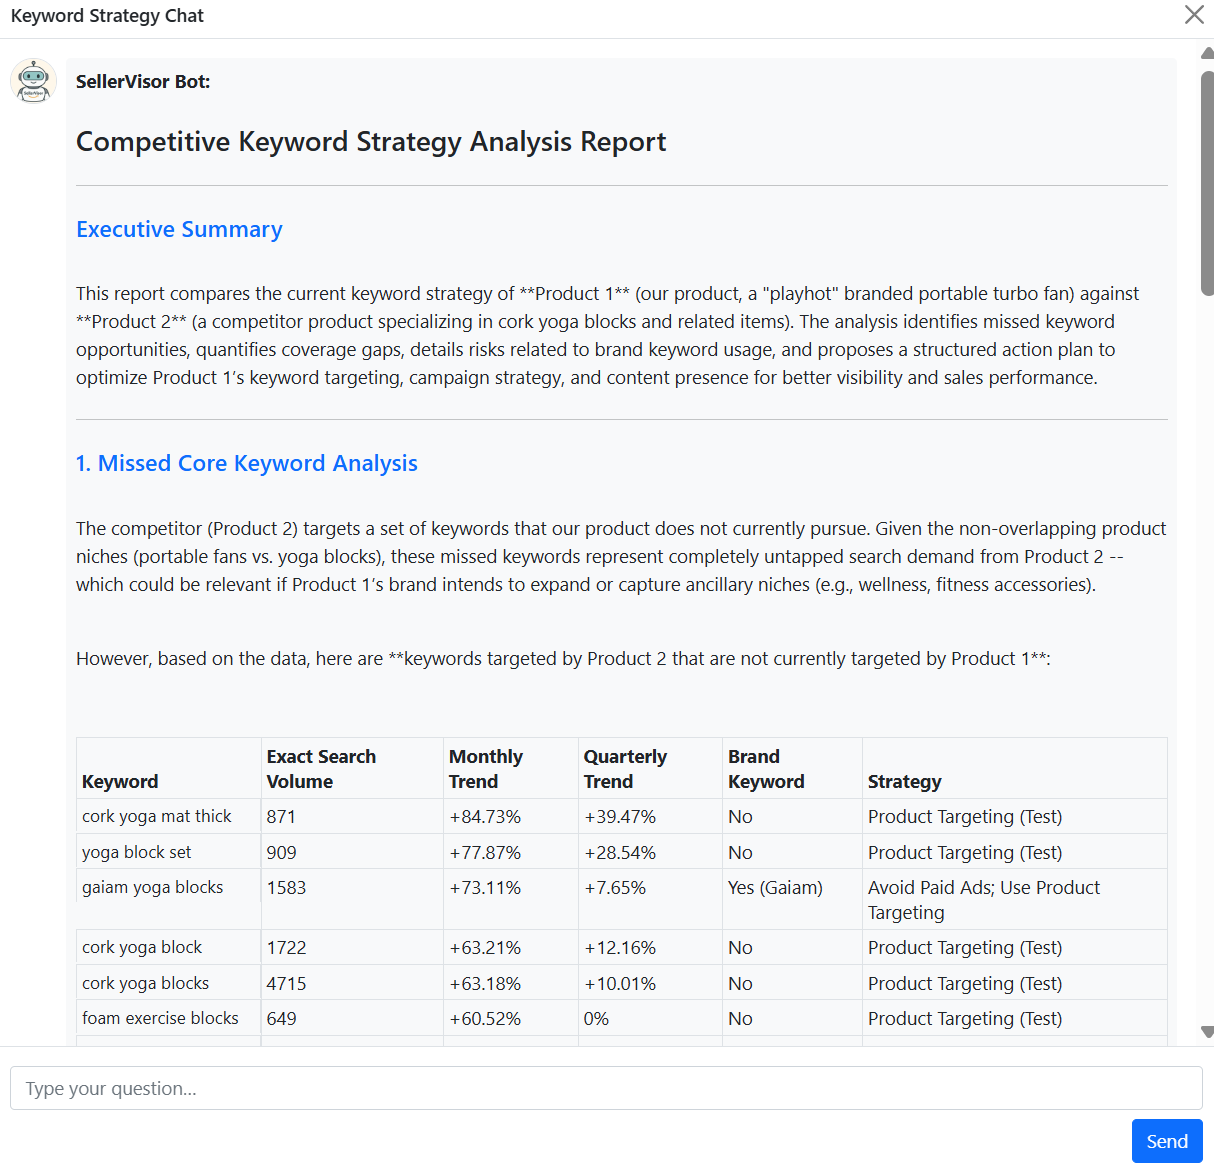
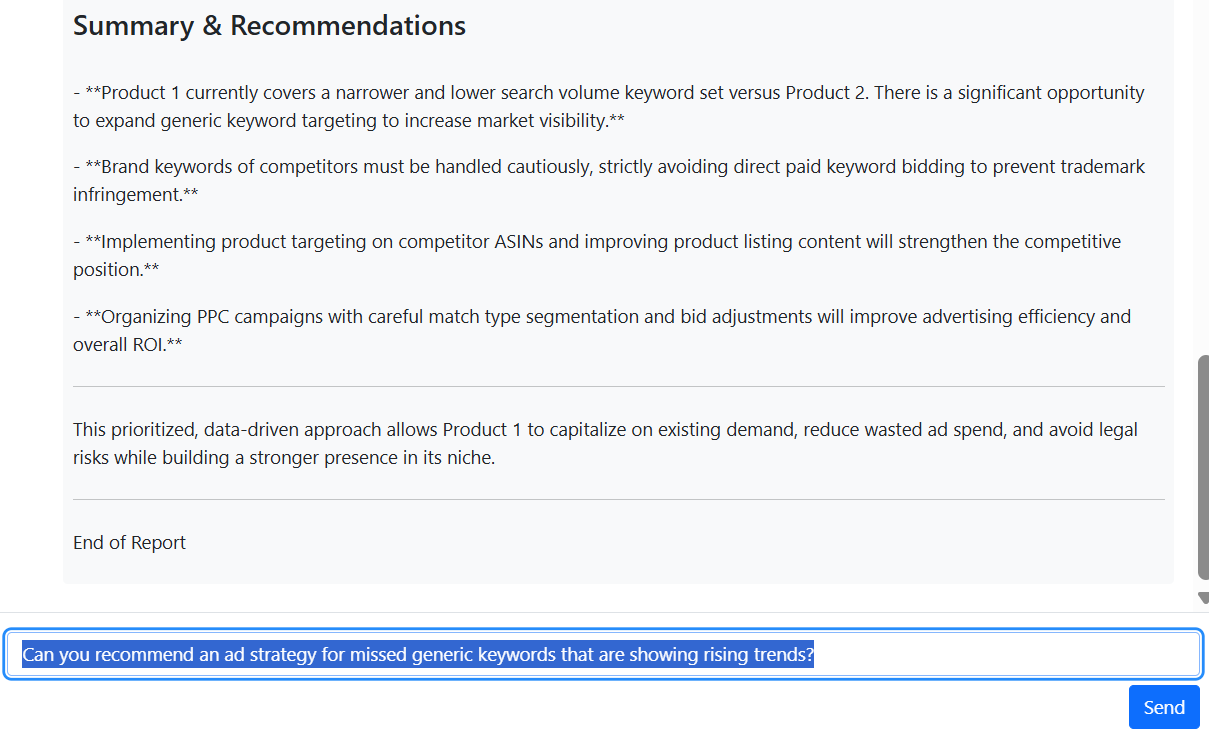
2-1. Compare two ASINs
- Enter your ASIN and competitor ASIN.
- Find common and unique keywords.
- AI comparison report highlights missing keywords and volumes.
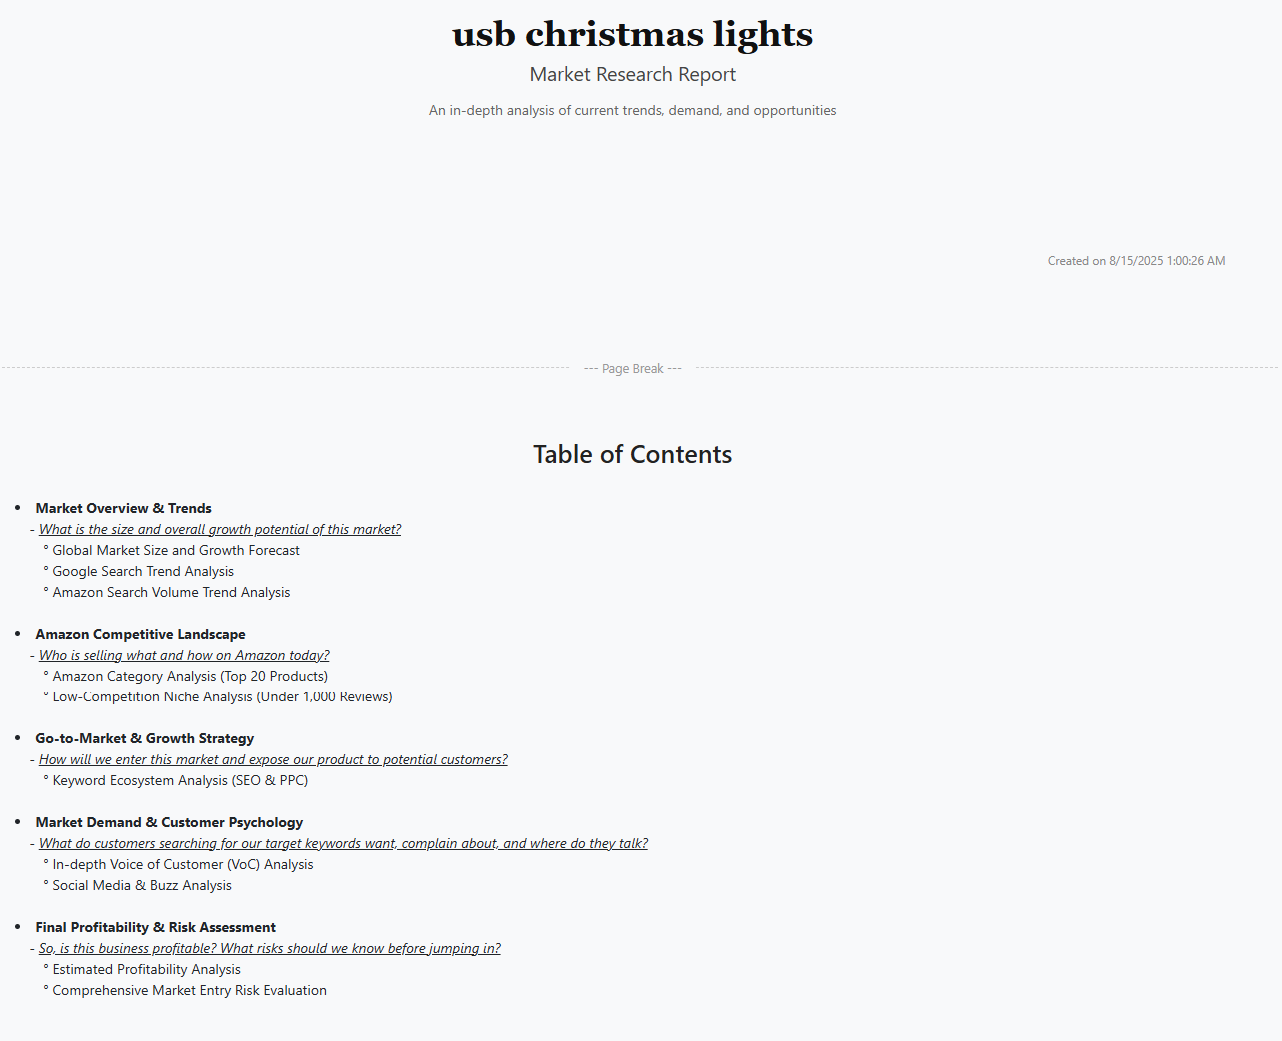
2-2. Generate a Report
- Integrates internal and external data.
- Time to build: ~60–120s.
- Global size & trend
- Google & Amazon search trends
- Competitive analysis & new entrants
- Customer feedback & social keyword paths
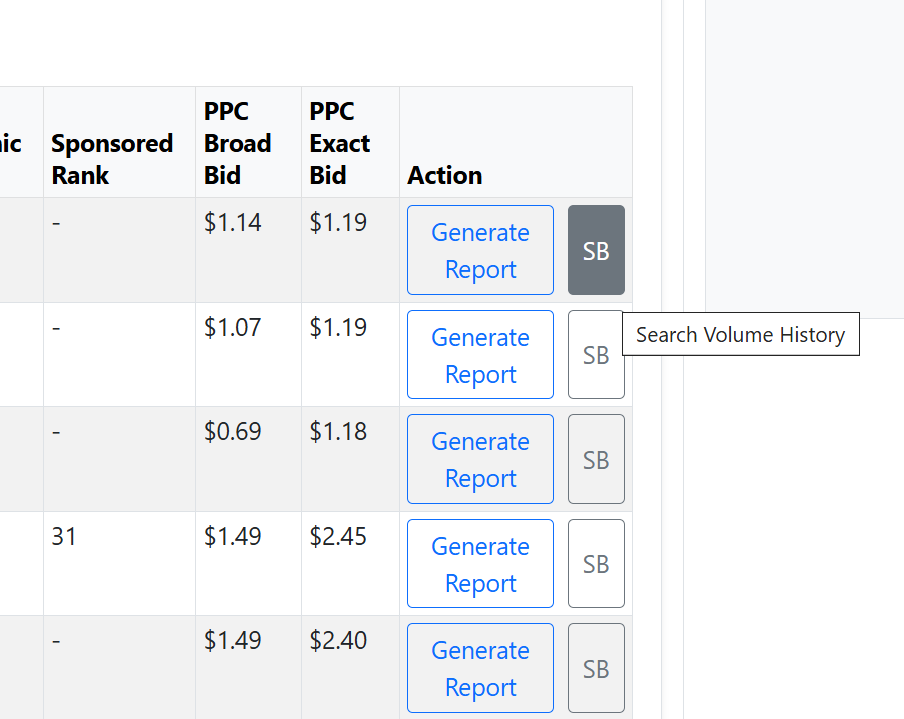
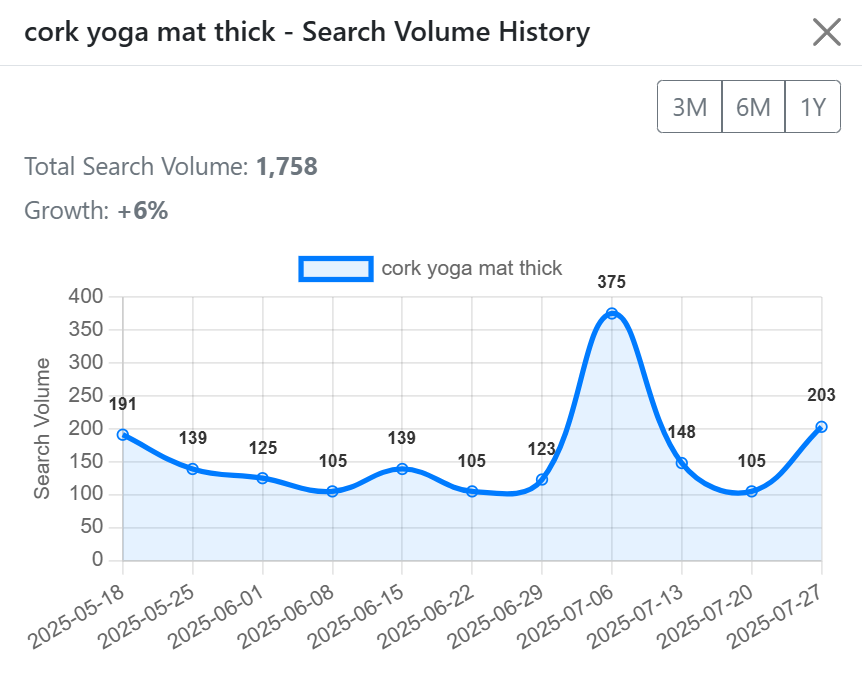
2-3. View Amazon search volume
- Monthly trend
- Quarterly search
- 3/6/12-month toggles
- Identify rising keywords for campaigns
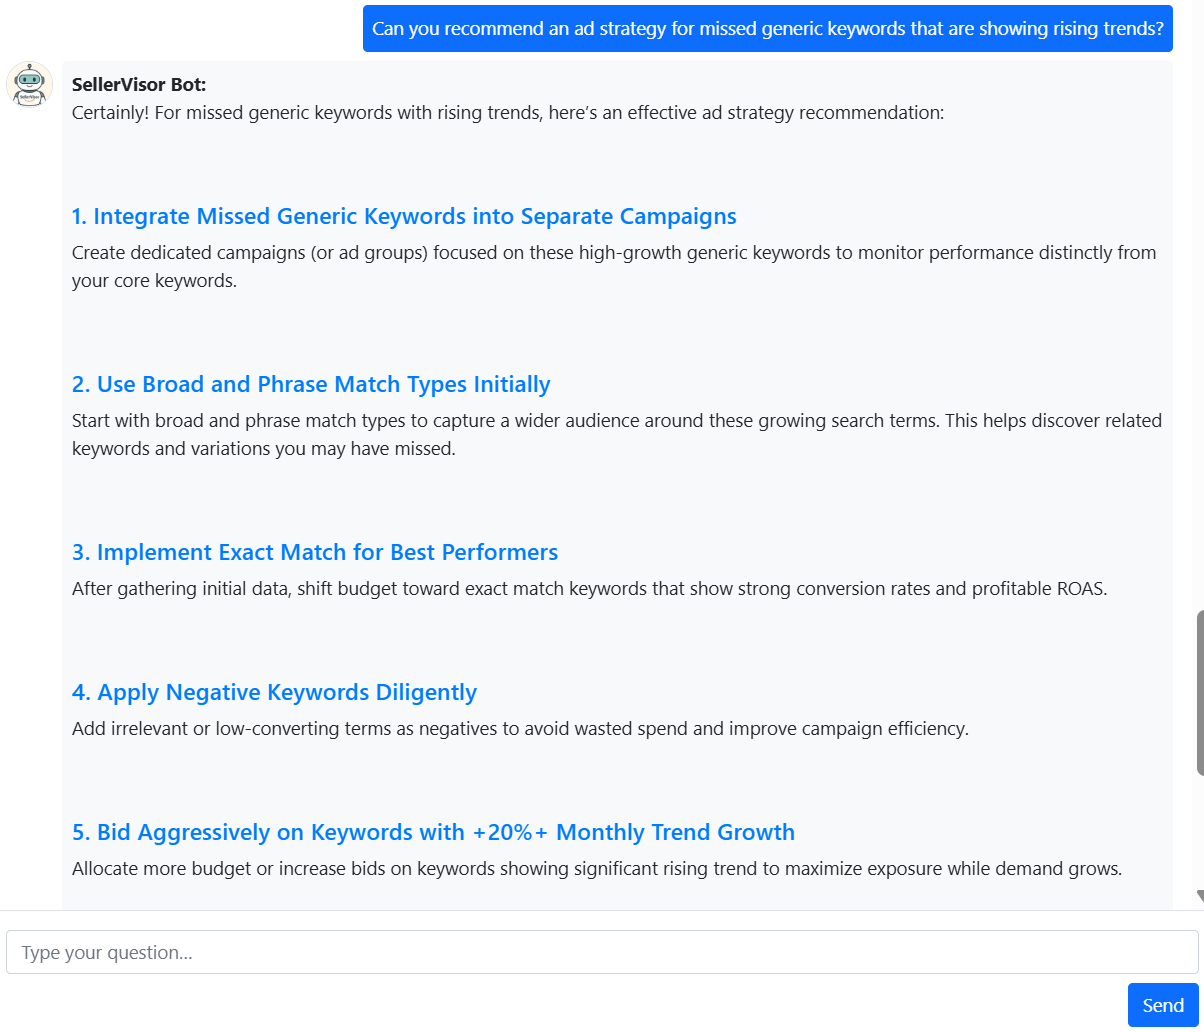
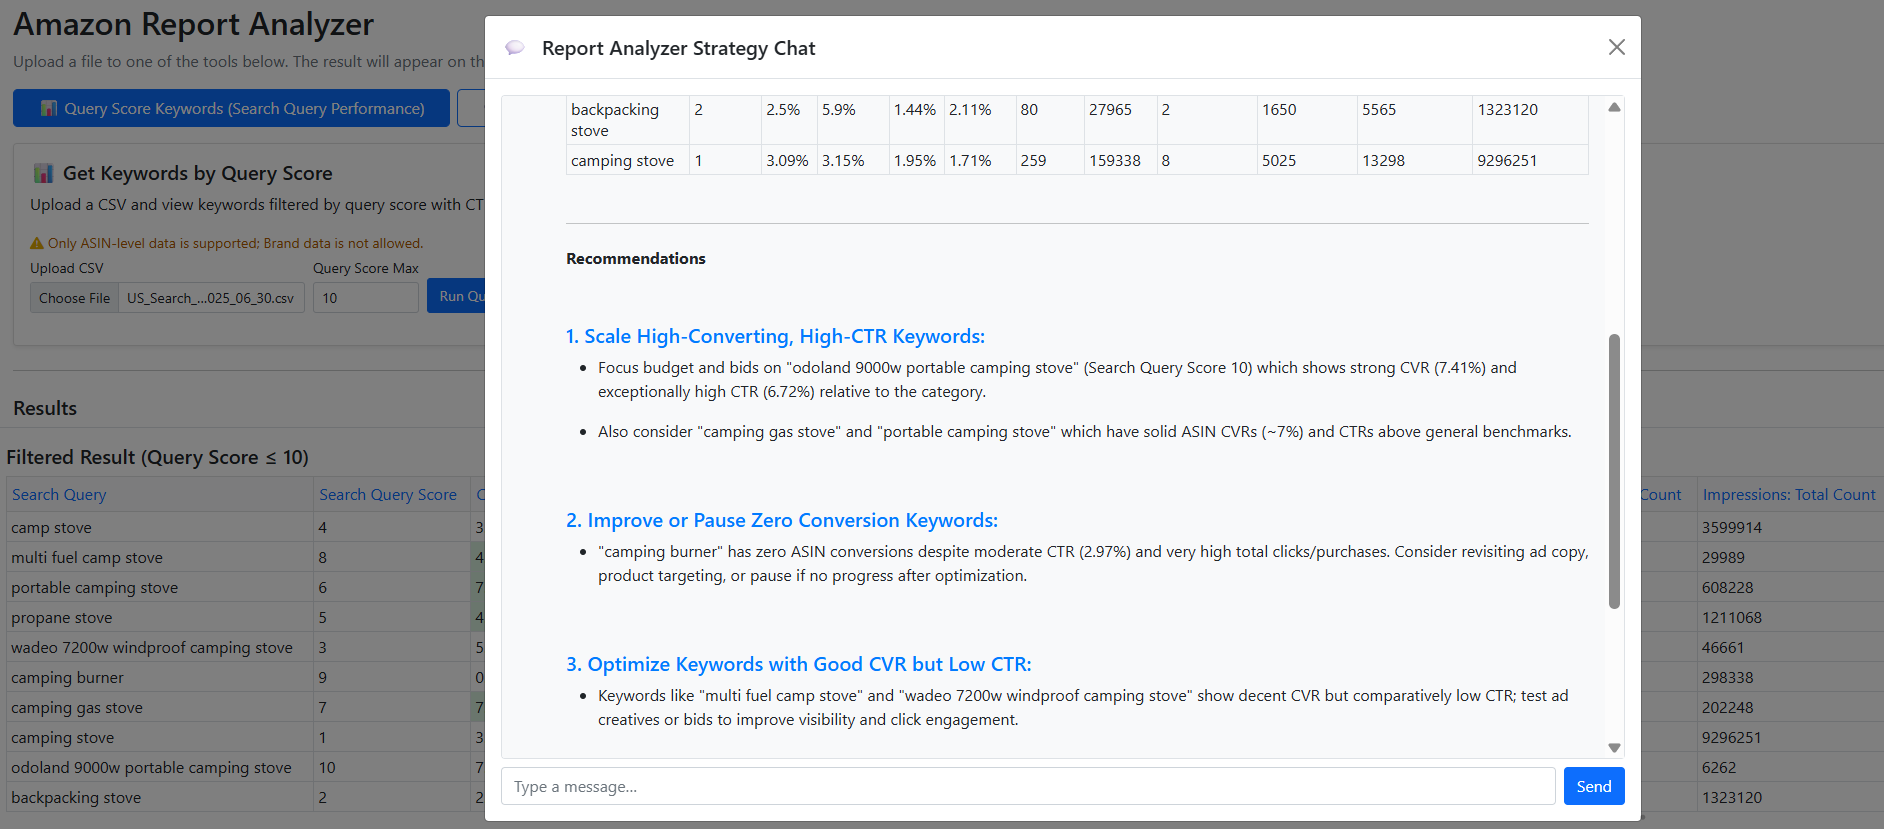
2-4. Use AI Chat
- Supported: English, Korean, Vietnamese
- Strategy design & keyword suggestions
- Competitor ASIN targeting & content tips
- Priority-based execution roadmap
- Combine AI + research for fast optimization
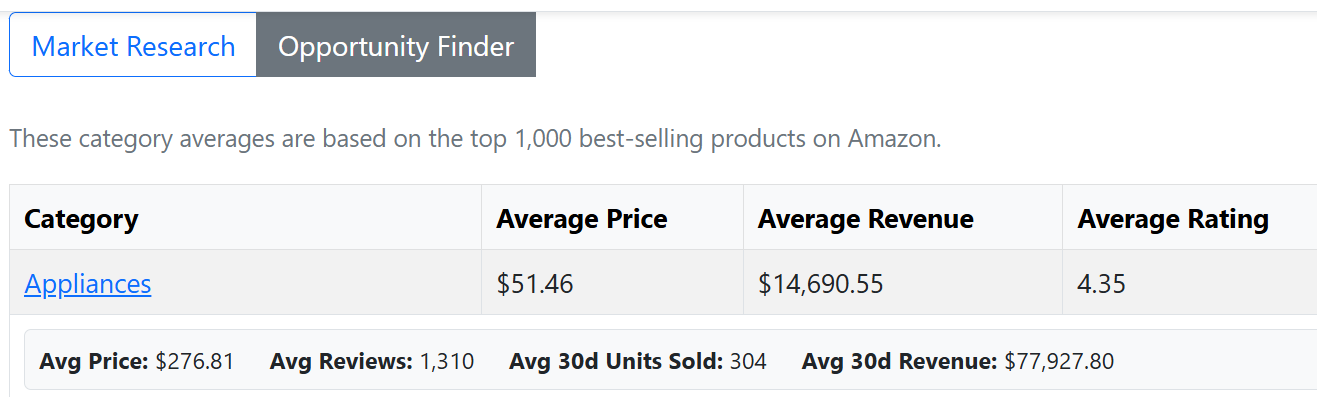
3. How to use Opportunity Finder
Identify fast-growing categories and niche keywords, powered by combined data sources.
3-1. Overview
- Category growth analysis
- Identify fast-rising keywords
- Combine Amazon + Google data
- Spot low-competition niches
3-2. Example: Beauty & Personal Care
Check PCA, Hydrating, Toner growth via Google Trends; find rising sub-groups like Milky Toner.
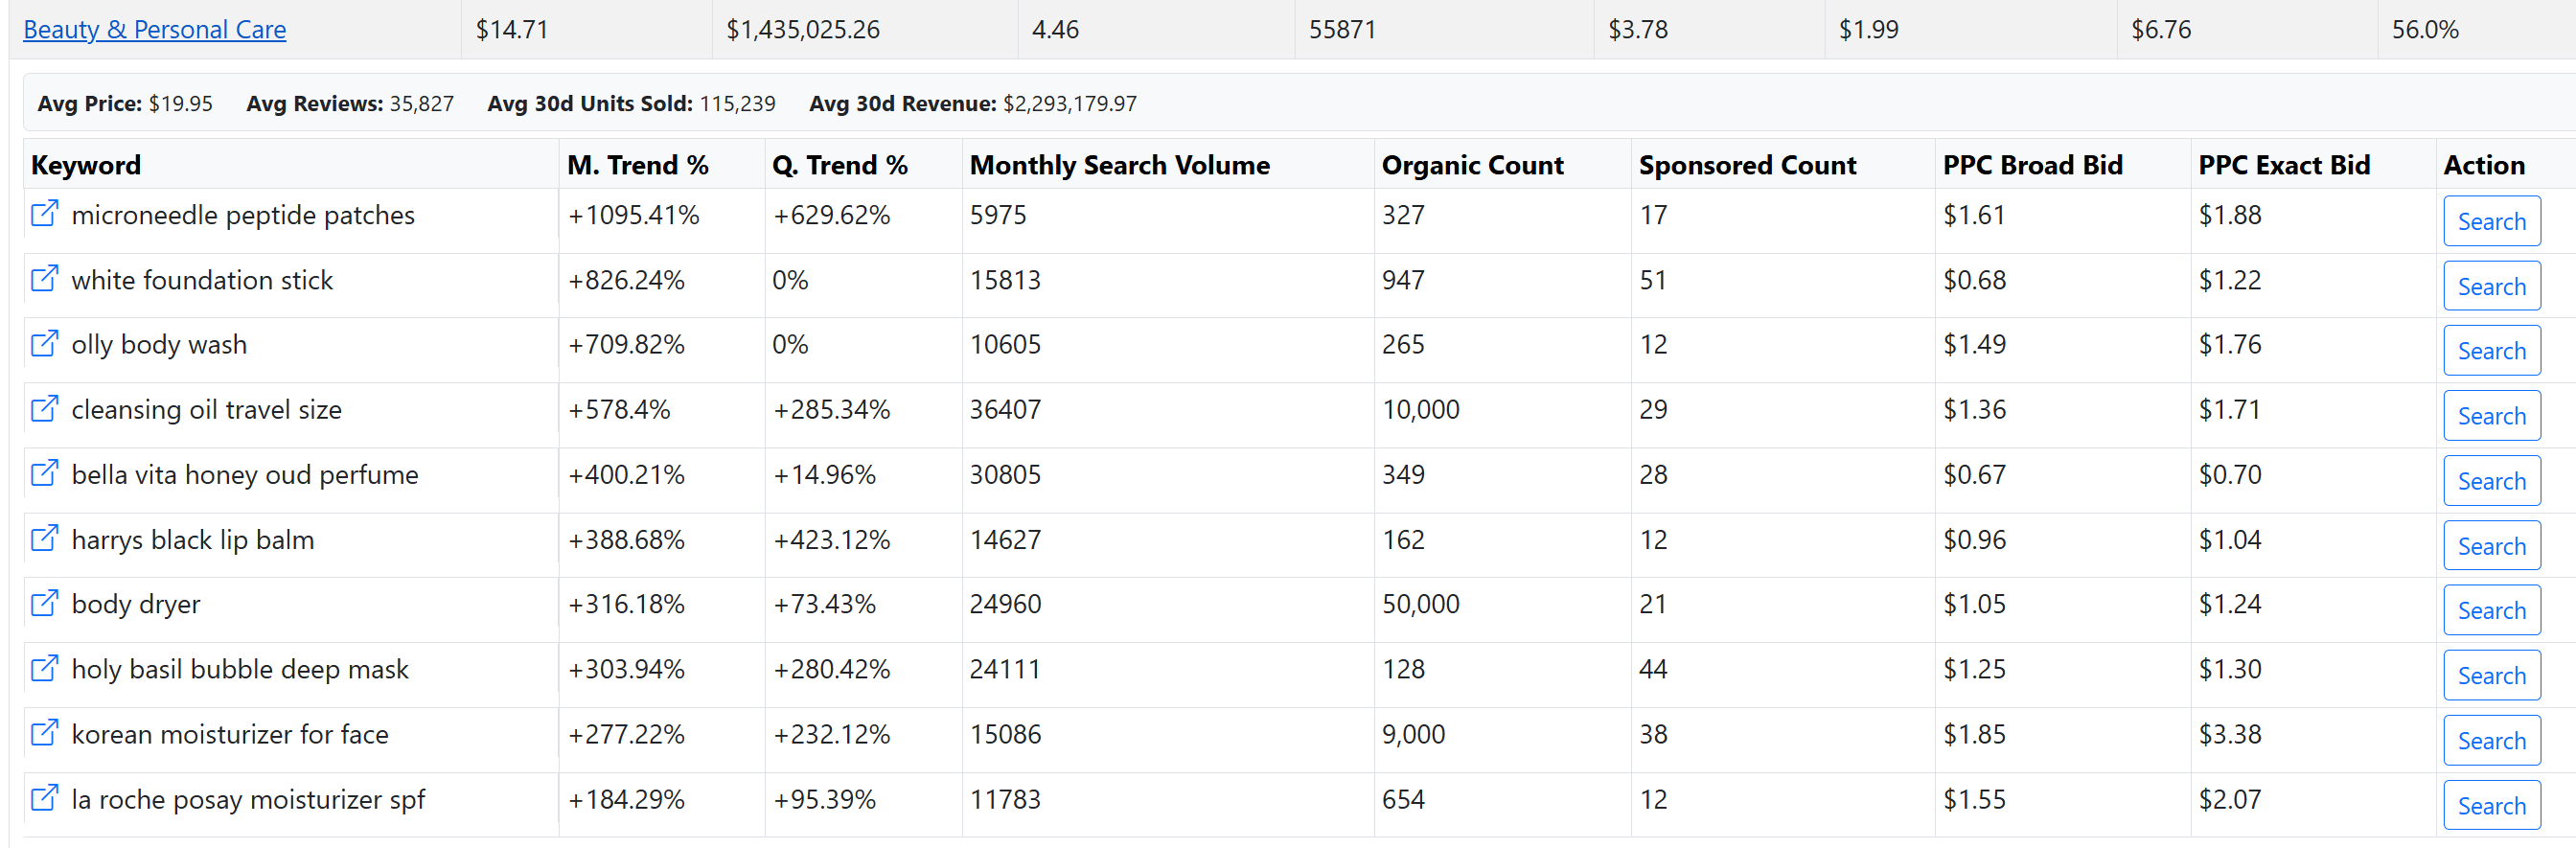
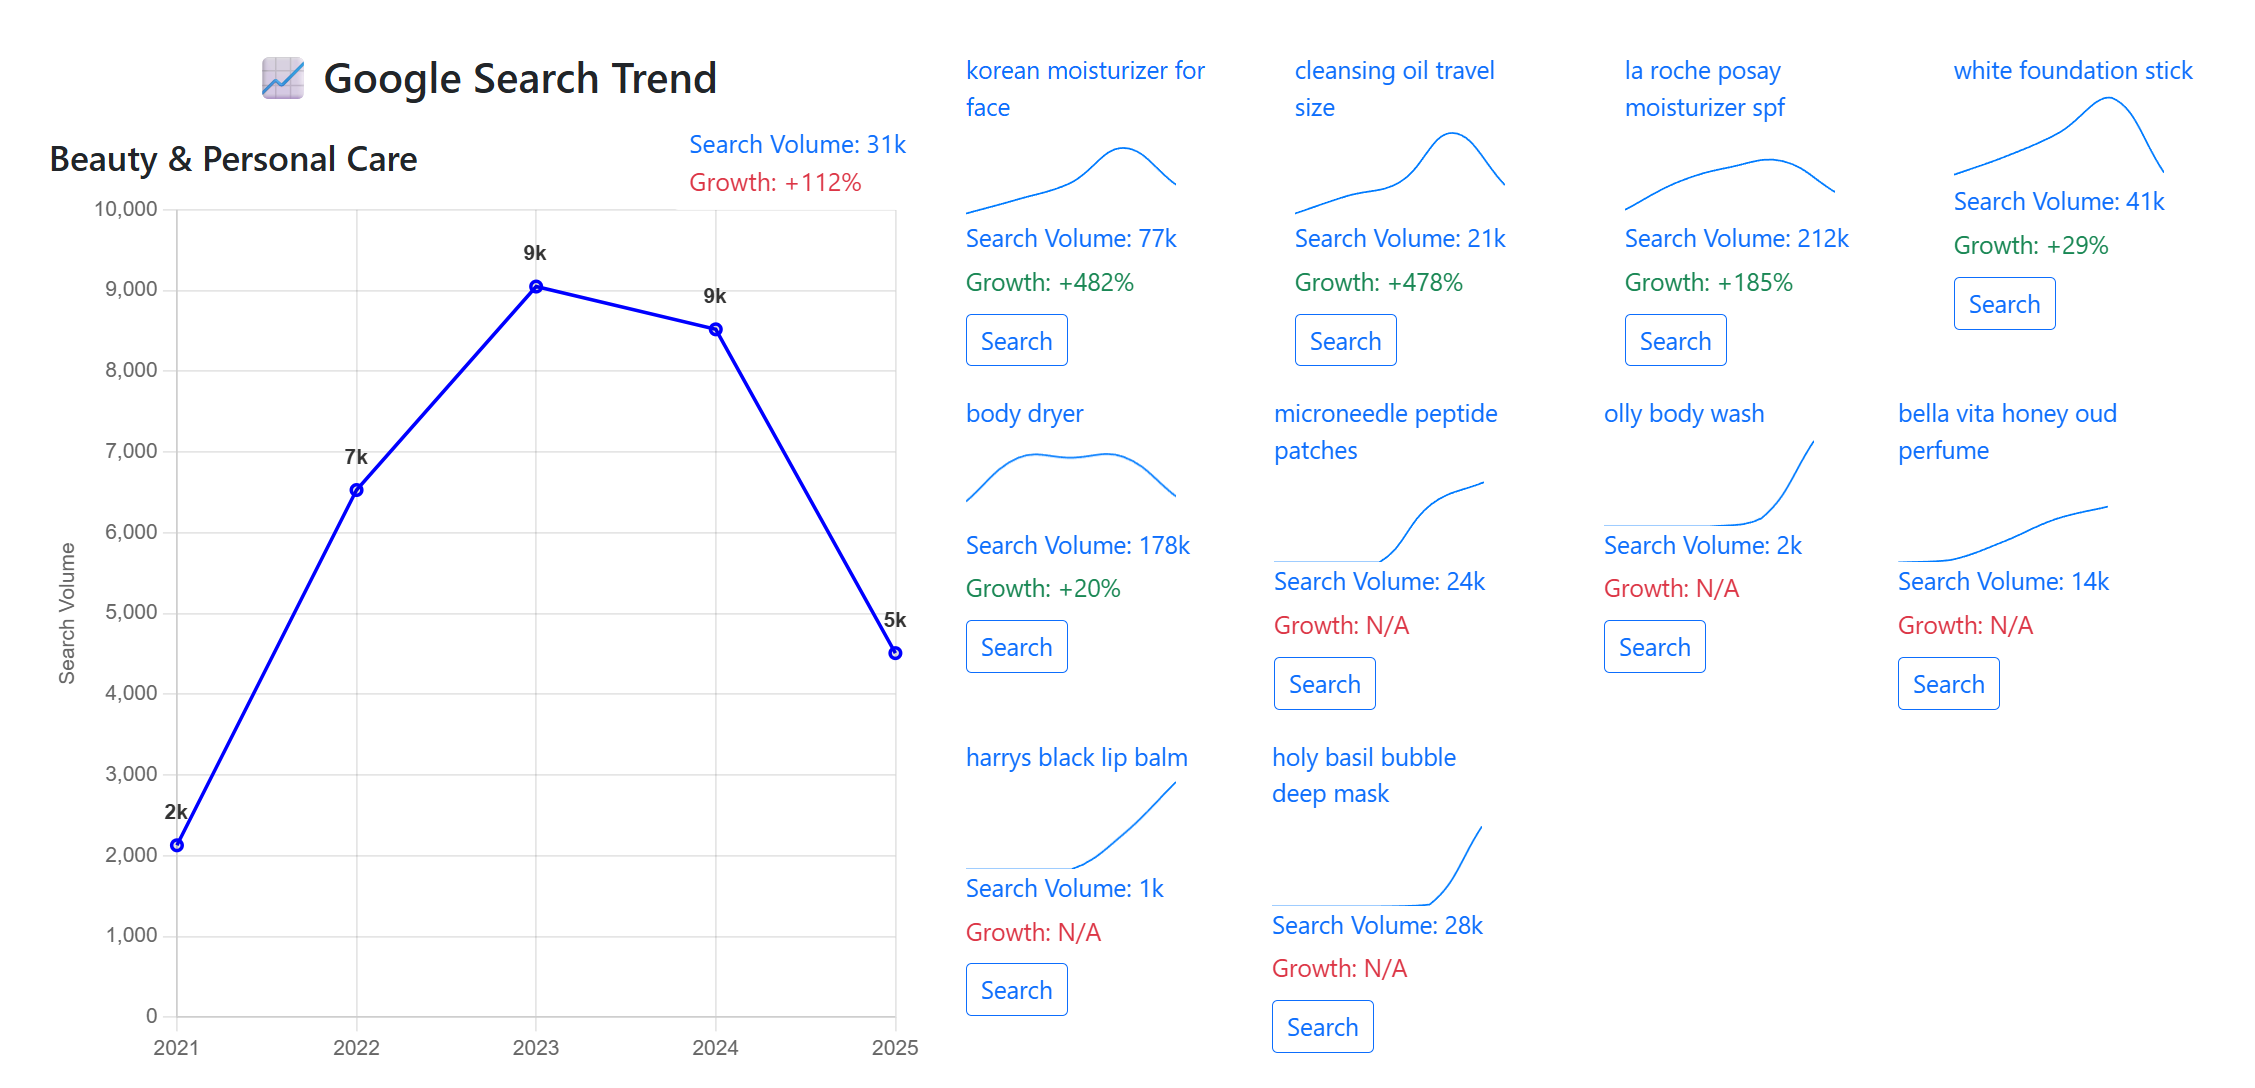
3-3. Analysis items
- Monthly Trend
- Quarterly Trend & seasonality
- Organic Search Volume & product counts
- Growth Sub-keywords & volume history
3-4. Generate a detailed report
Get global trends, growth rates, entry potential, and product planning tips.
3-5. Tips
- Prioritize keywords with clear rising curves
- Use fast-growth terms for sourcing/launch
- Enter niches early to capture share
Opportunity Finder goes beyond lookups to deliver actionable opportunities from category and keyword growth patterns.
4. Amazon Report Analyzer
Use two tools to work with Amazon Ads reports: filter keywords by query score and analyze search terms with clear actions.
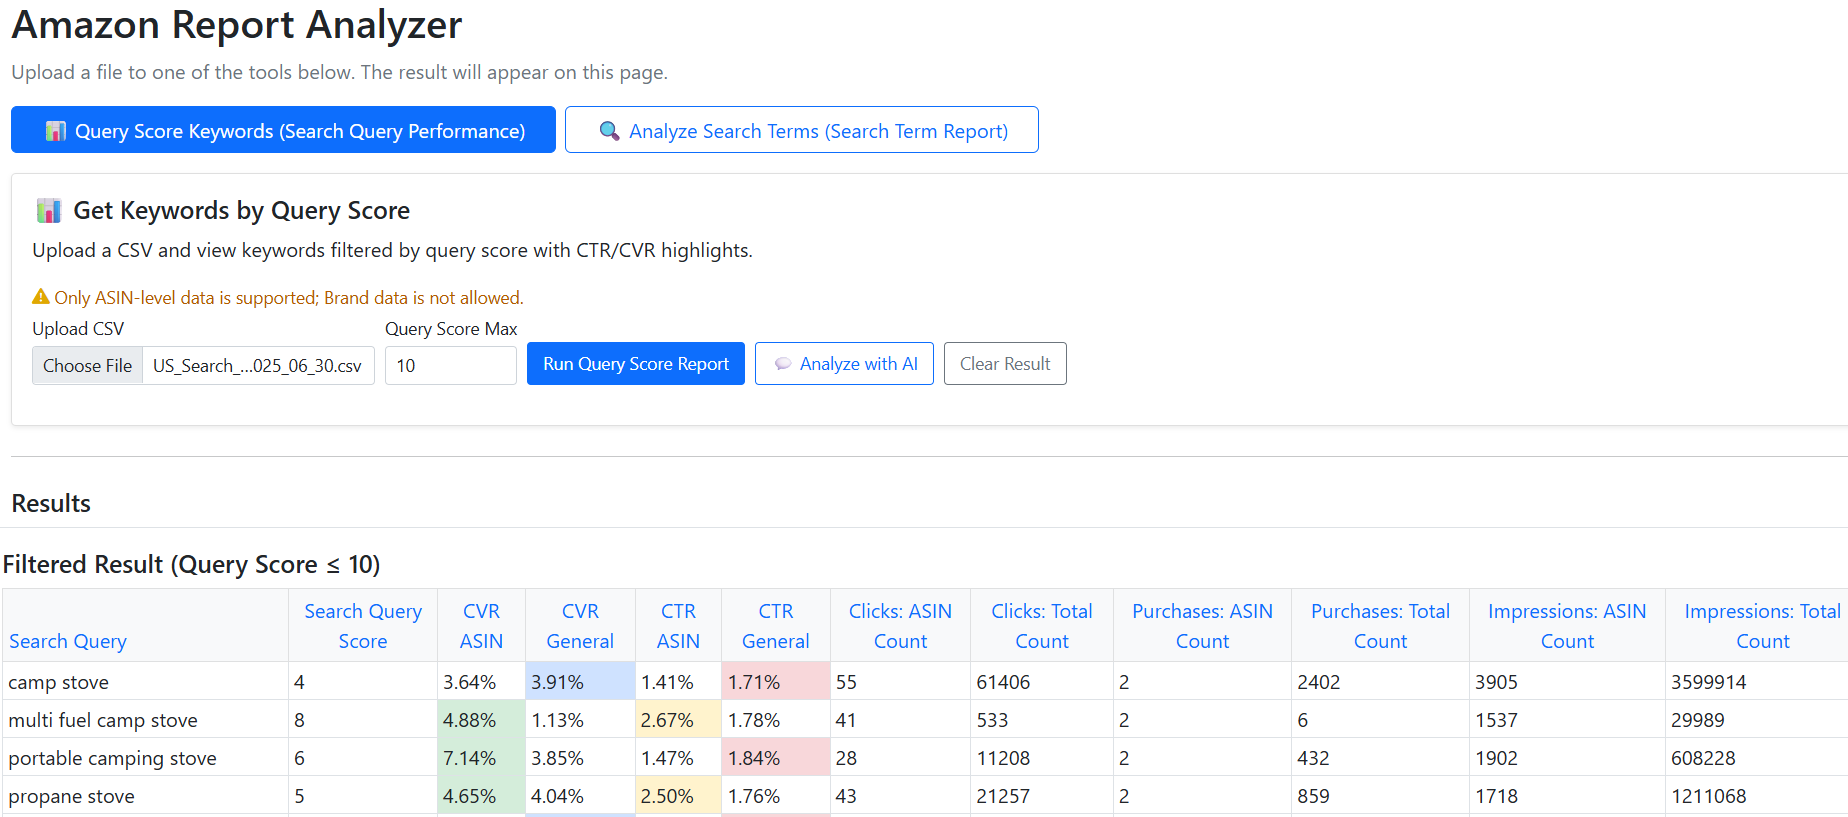
4-1. Query Query Performance (SQP)
Upload an ASIN-level SQP CSV, set a maximum query score, and review results with CTR/CVR highlights.
Watch Video: Query Score Keywords (SQP)
- Upload the SQP CSV (ASIN-level only; brand-level is not supported).
- Set "Query Score Max" and click Run.
- Review the result list with CTR/CVR highlights.
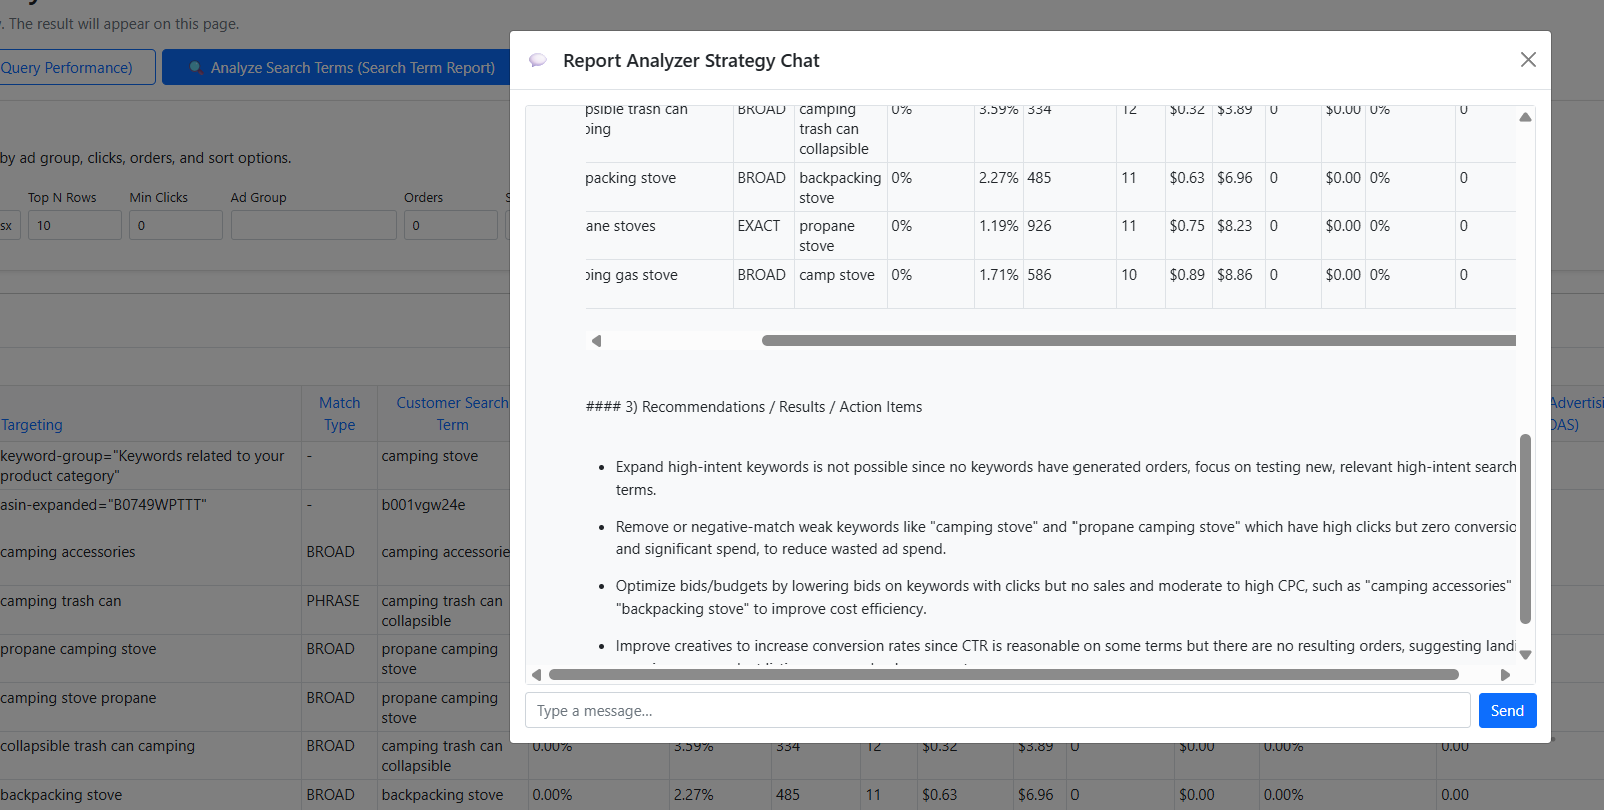
4-2. Analyze Search Terms (STR)
Upload your Search Term Report to split results into Good (orders >= 1) and Bad (orders = 0) and get recommendations.
Watch Video: Analyze Search Terms (STR)
- Upload the STR file (Excel XLSX or CSV).
- View two tables: Good Performance (orders >= 1) and Bad Performance (orders = 0).
- Read the Recommendation / Results / Actions section to decide next steps.

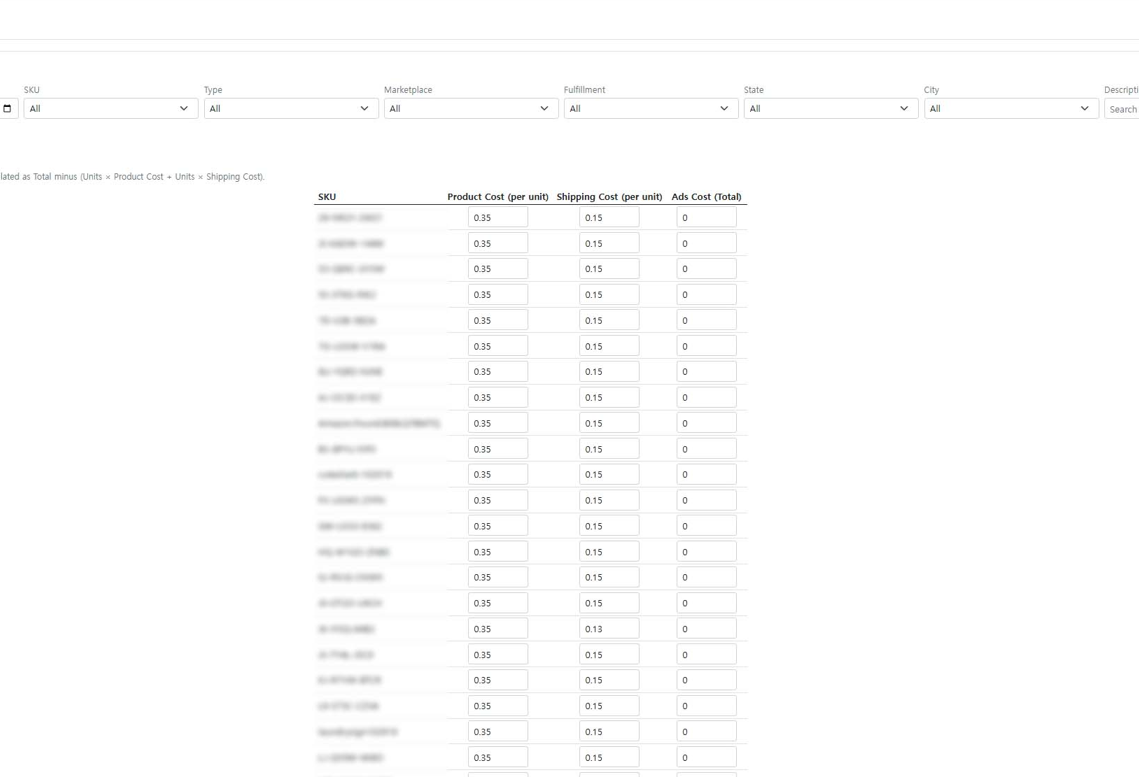
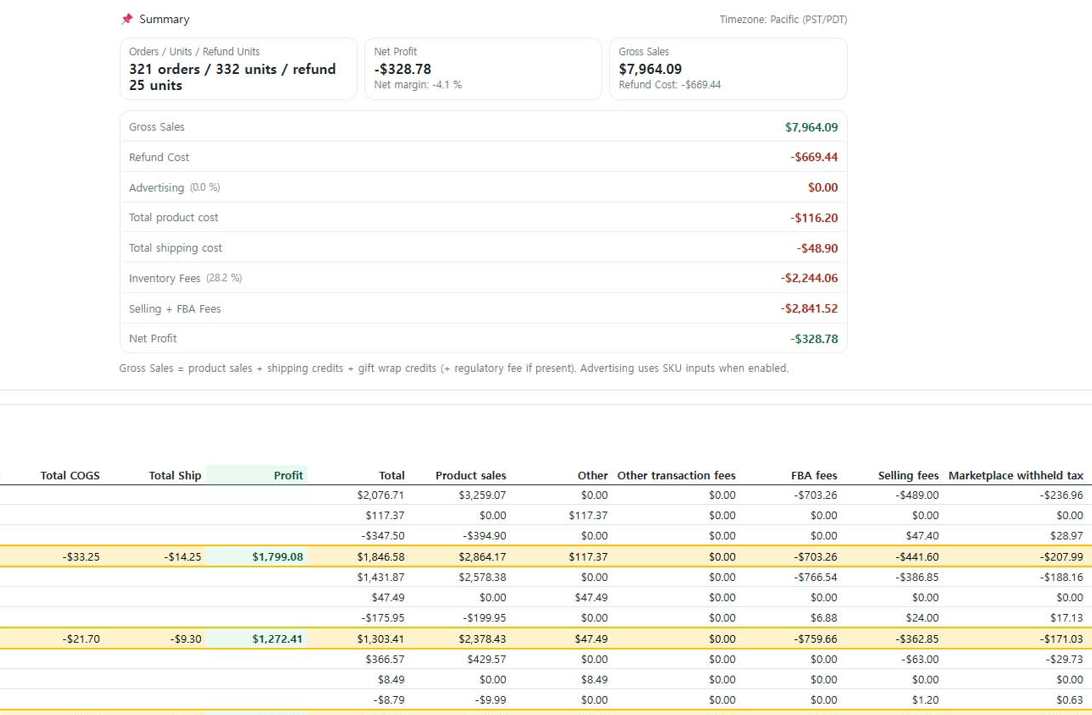
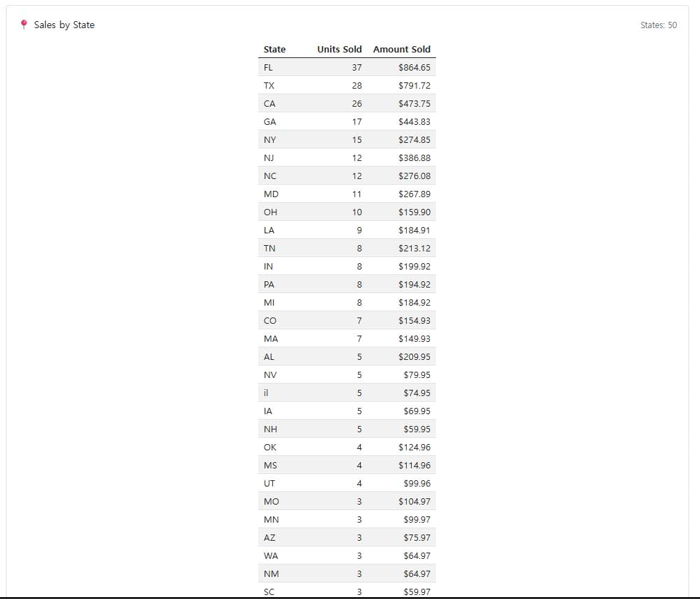
4-3. Payment Dashboard Report
Upload Amazon settlement reports and review true net profit with filters, cost inputs, summaries, state breakdowns, and an order heatmap.
Watch video: Payment Dashboard walkthrough
- Upload settlement files and open the Payment Dashboard table view
- Filter by date, SKU, marketplace, and fulfillment type, then enter product/shipping/ads cost per SKU
- Use summary cards, state-level analysis, and the weekday-hour heatmap to find profit drivers

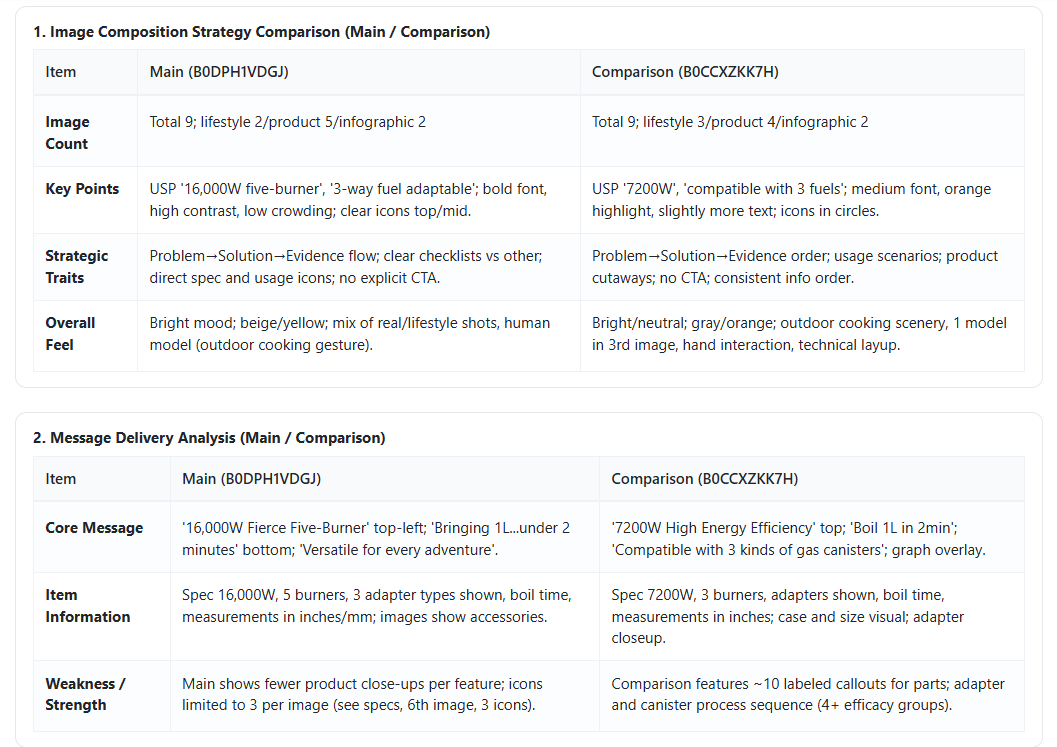
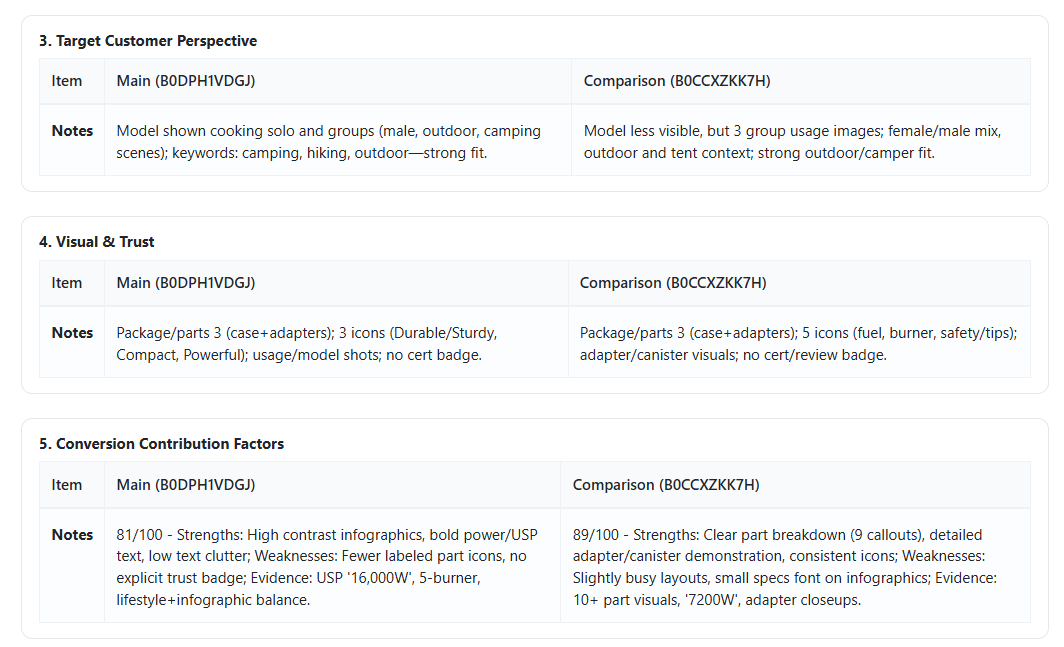
5. In-depth Listing Comparison Analysis
Walk through image quality, copy clarity, and sales signals to decide what to improve first.
5-1. Image Comparison Analysis
Review hero, lifestyle, and infographic images for clarity, consistency, and value communication.
- Check composition, legibility, and brand consistency across all images.
- Ensure angles and context shots answer buyer questions without extra text.
- When you change images, monitor Units and Revenue over time to confirm impact.
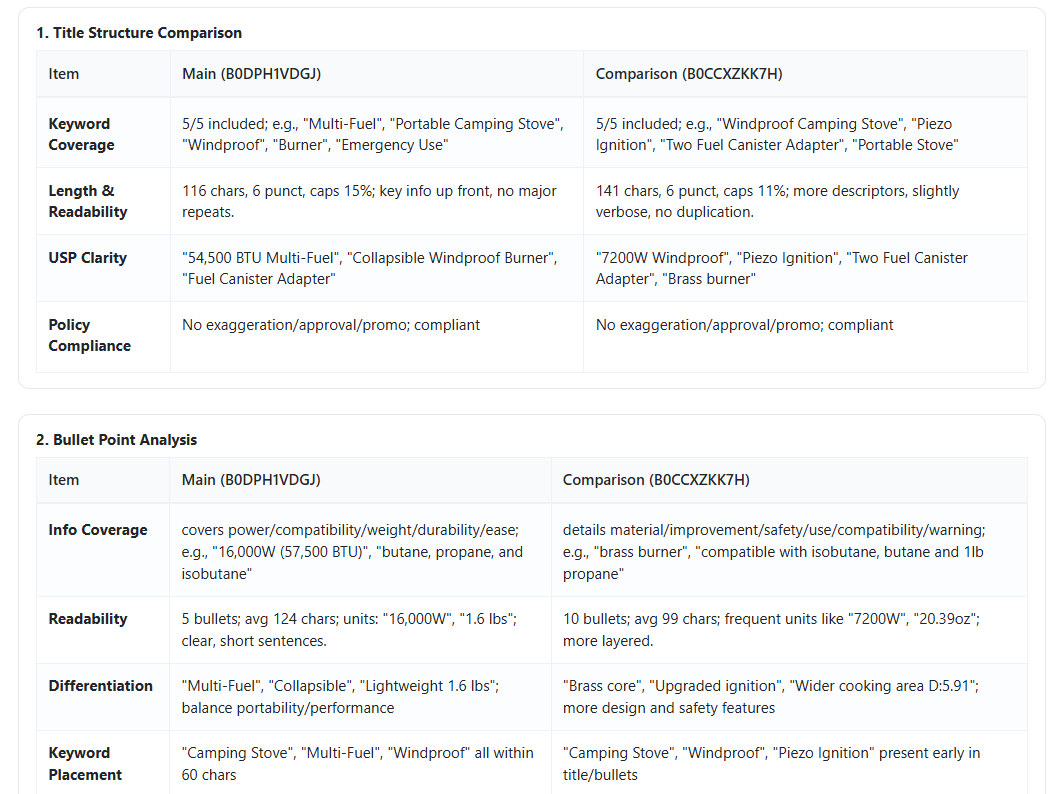
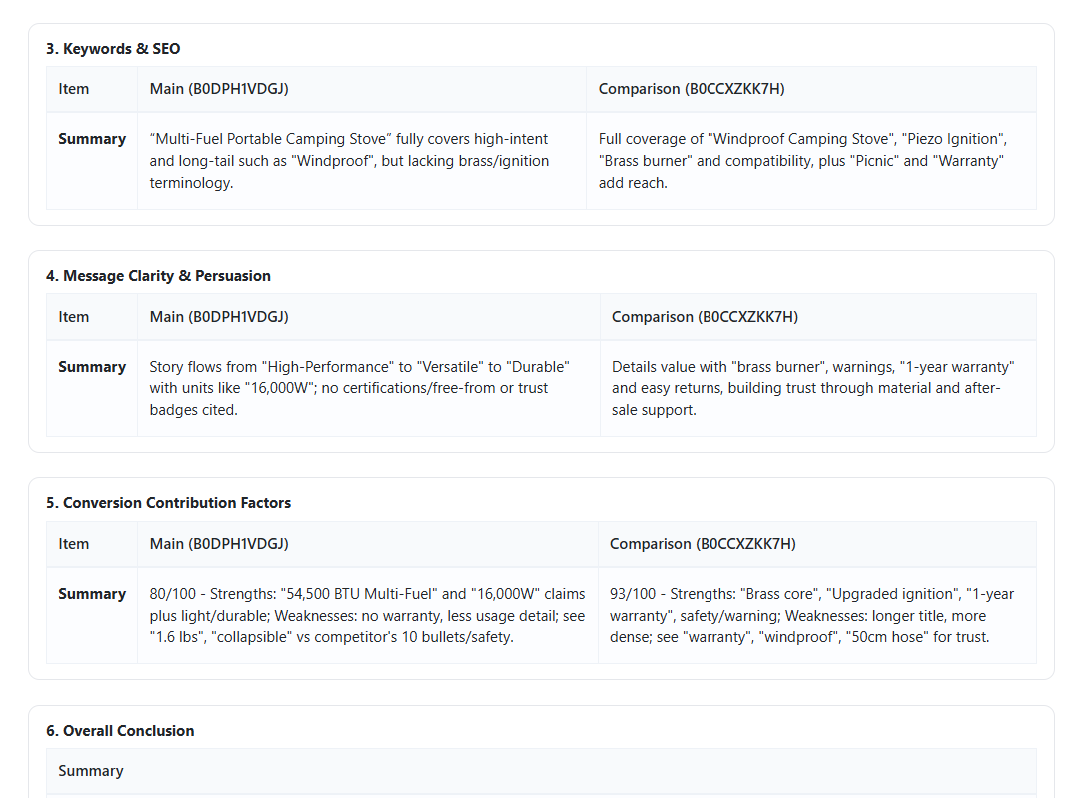
5-2. Title & Bullet Comparison Analysis
Make copy scannable and benefit-first while staying compliant.
- Put the main value prop early in the title; keep wording clean and precise.
- Use bullet structure: feature → benefit → short proof or spec.
- After edits, compare monthly Units and Revenue to the prior period.
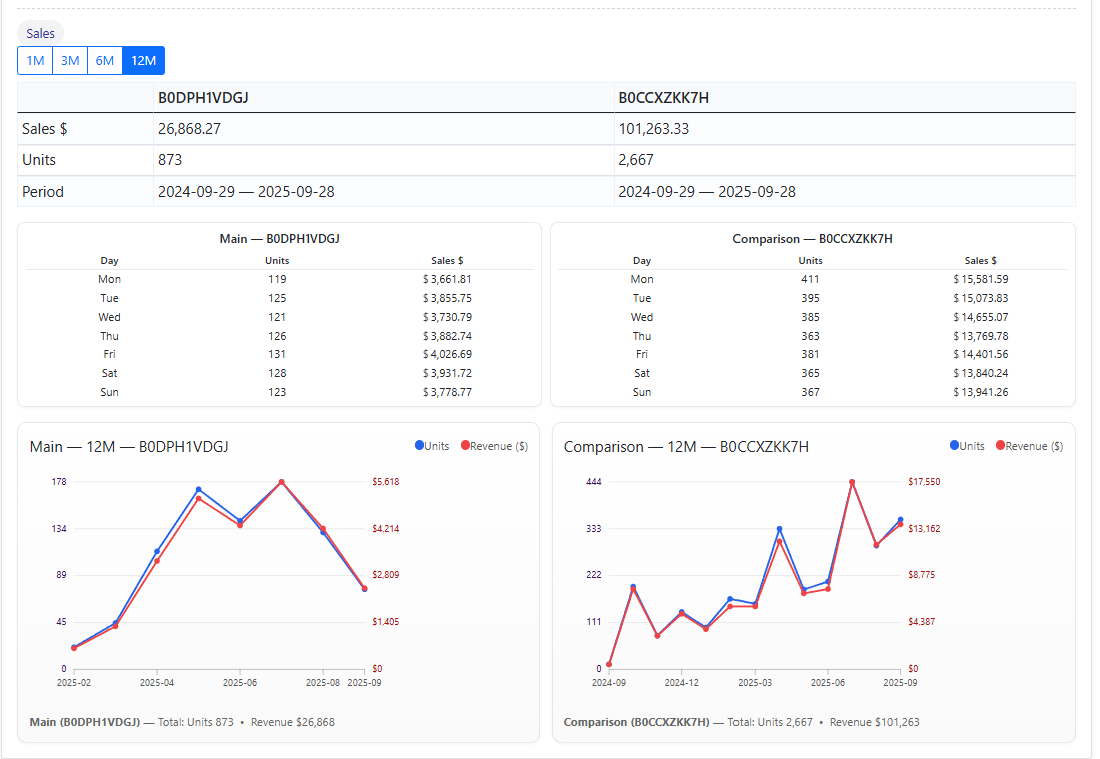
5-3. Revenue & Sales Comparison Analysis
Read core signals and trends like in the screenshot: Units and Revenue only.
- Use the day-of-week table to spot strong/weak days for the selected period.
- Track 12-month trends for Units (blue) and Revenue (red) to see seasonality.
- Compare Main vs Comparison ASIN to benchmark totals and growth.
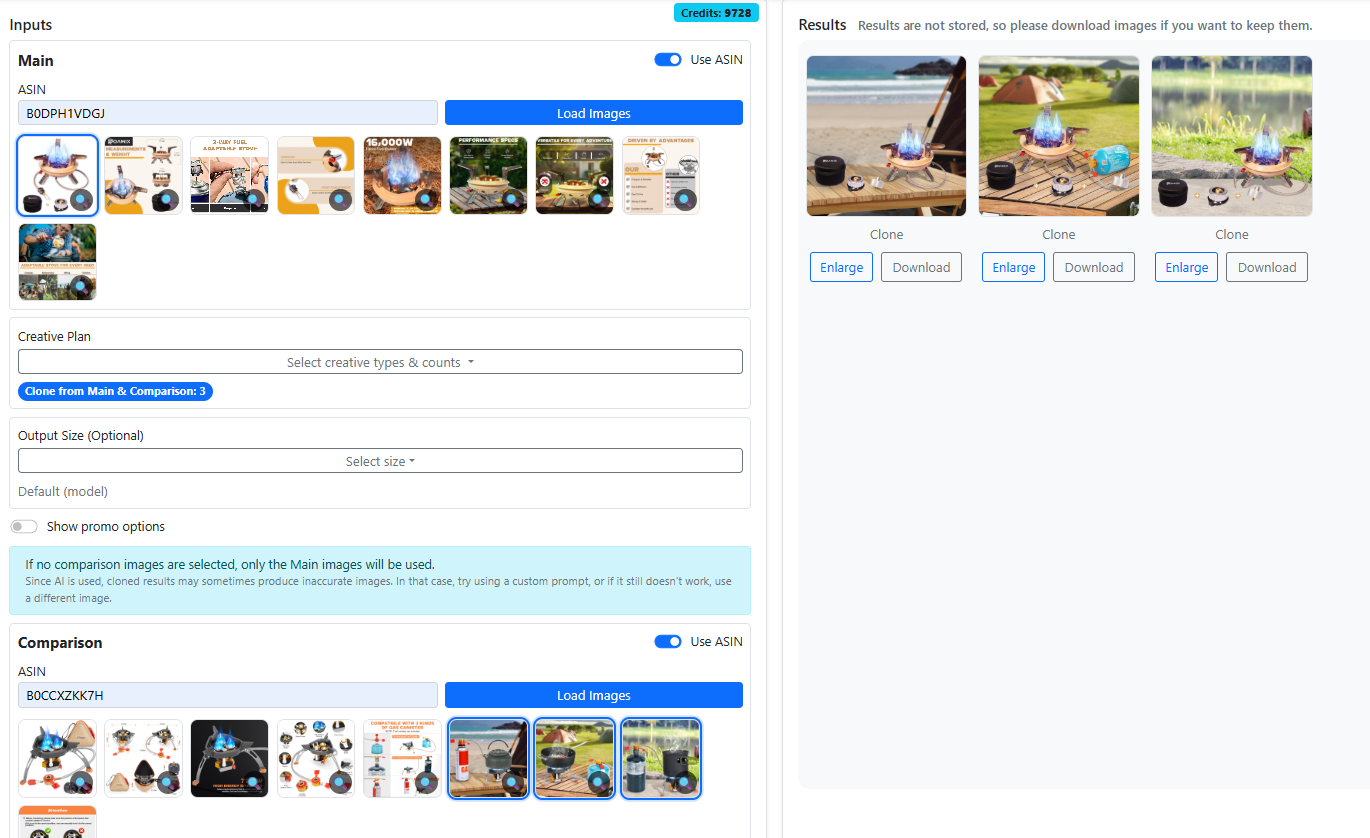
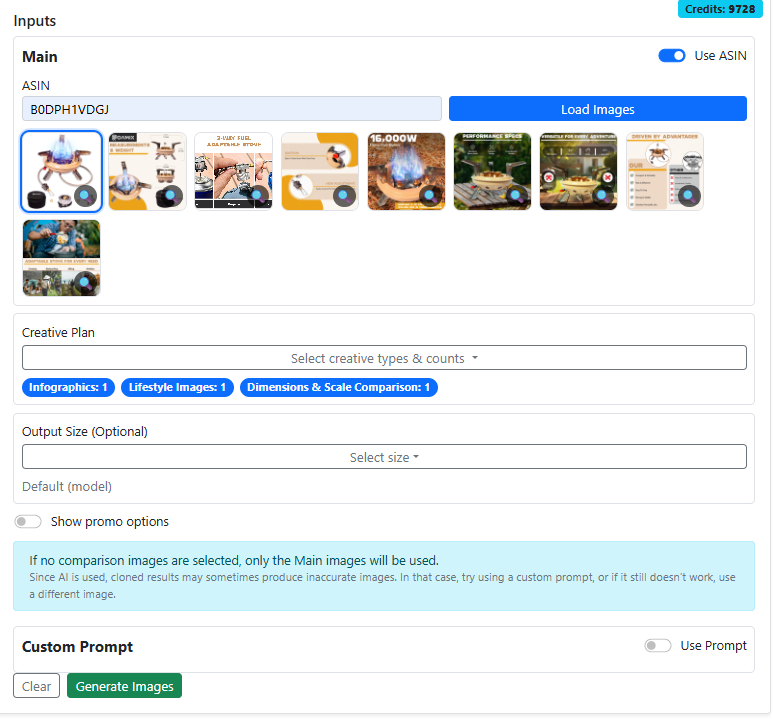
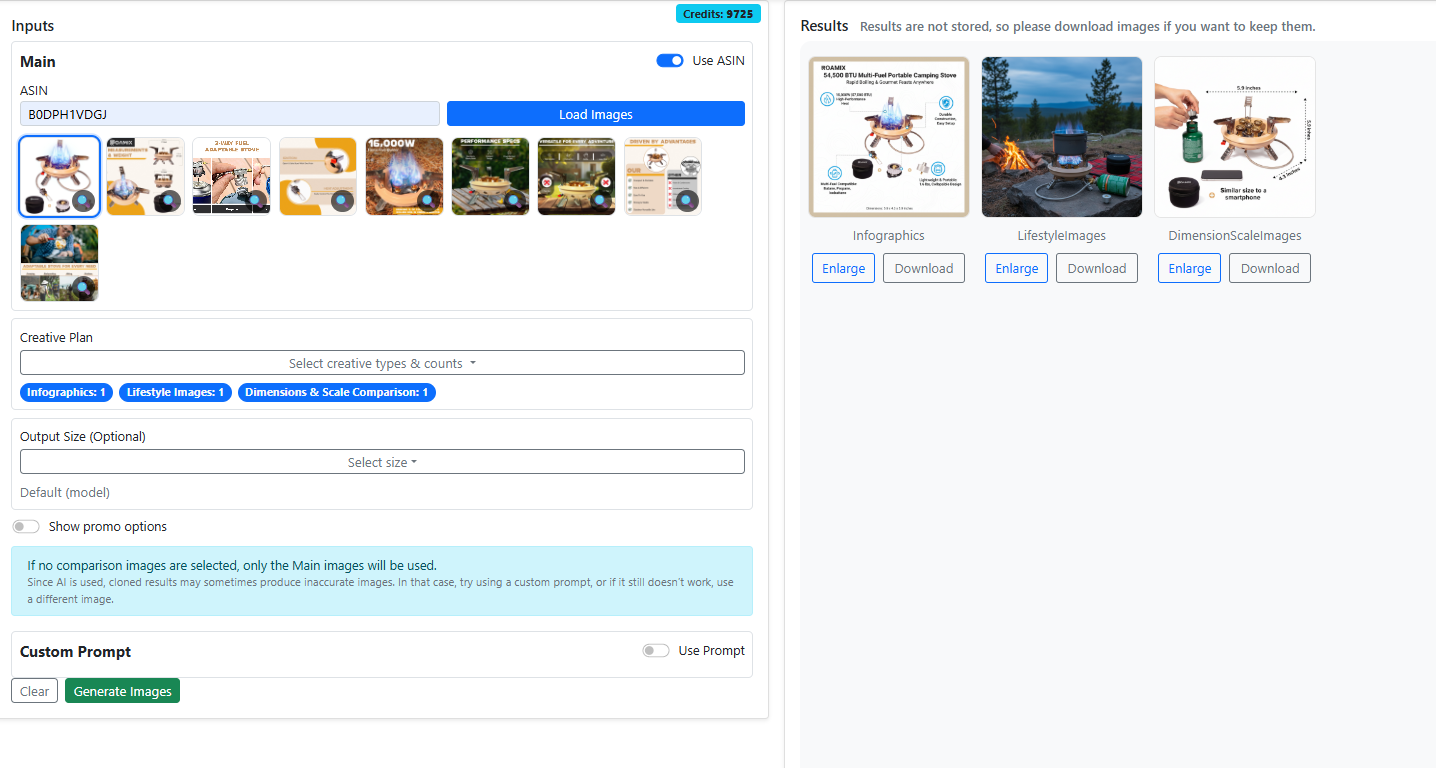
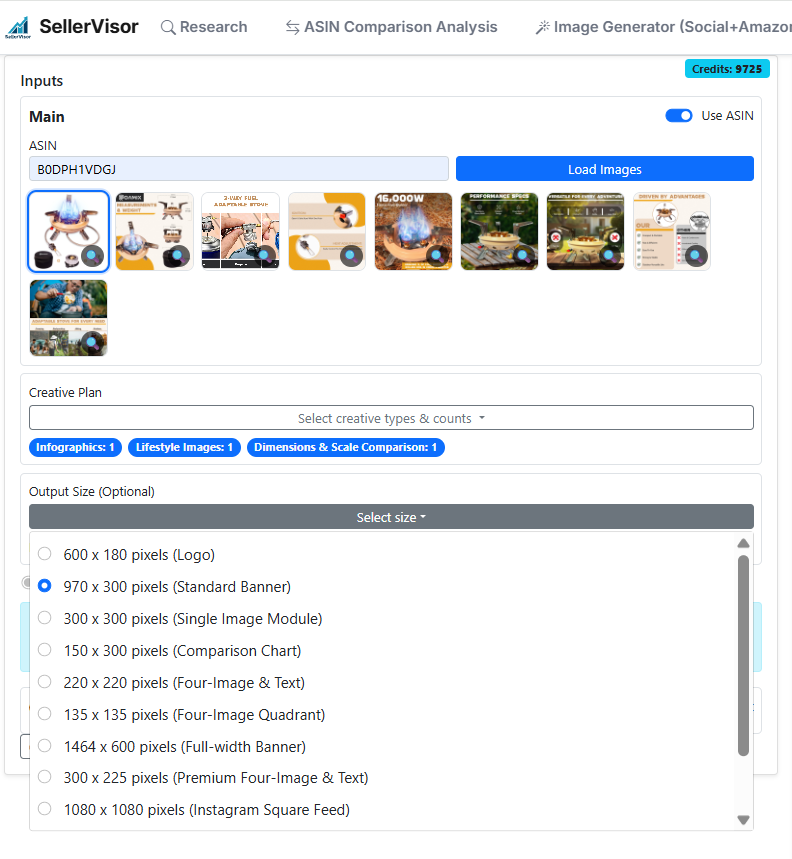
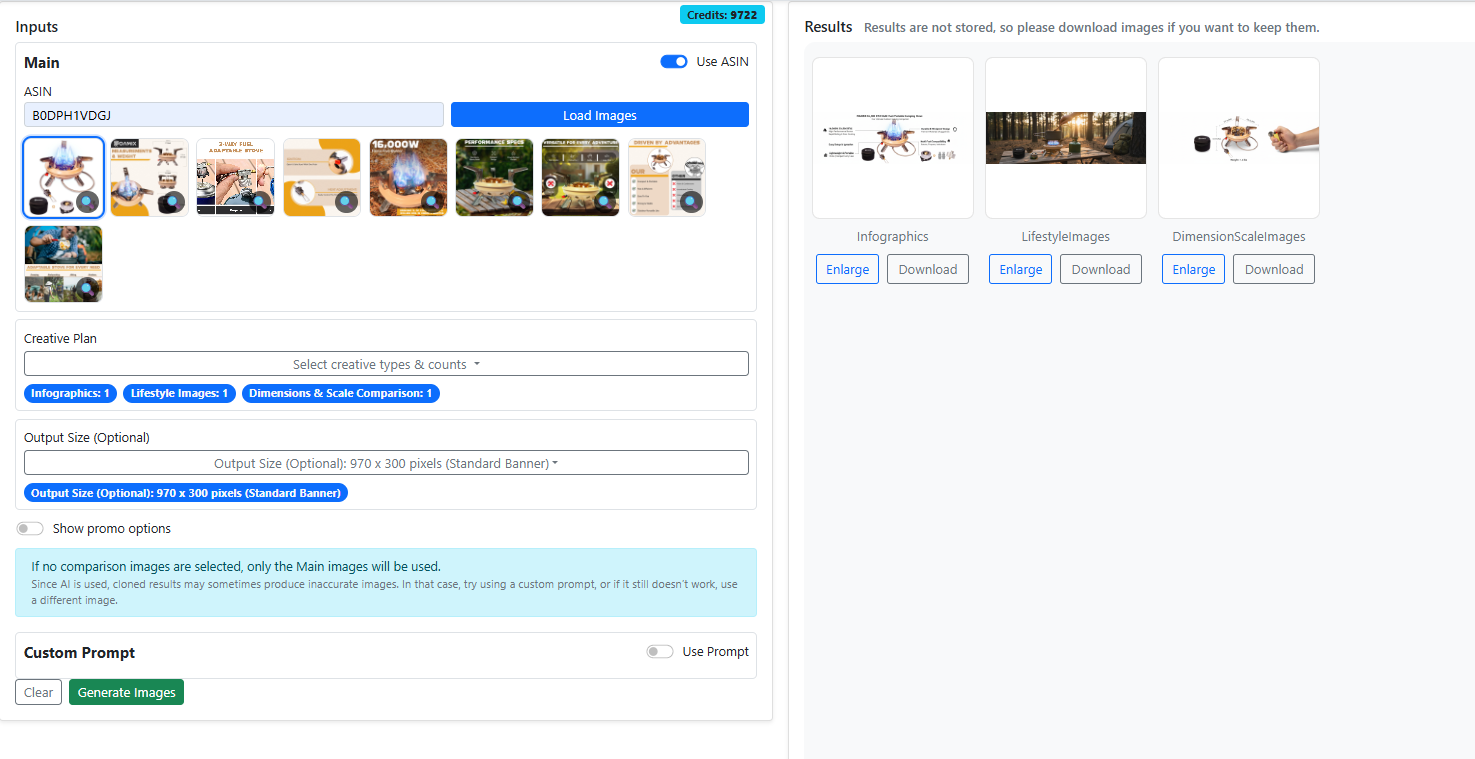
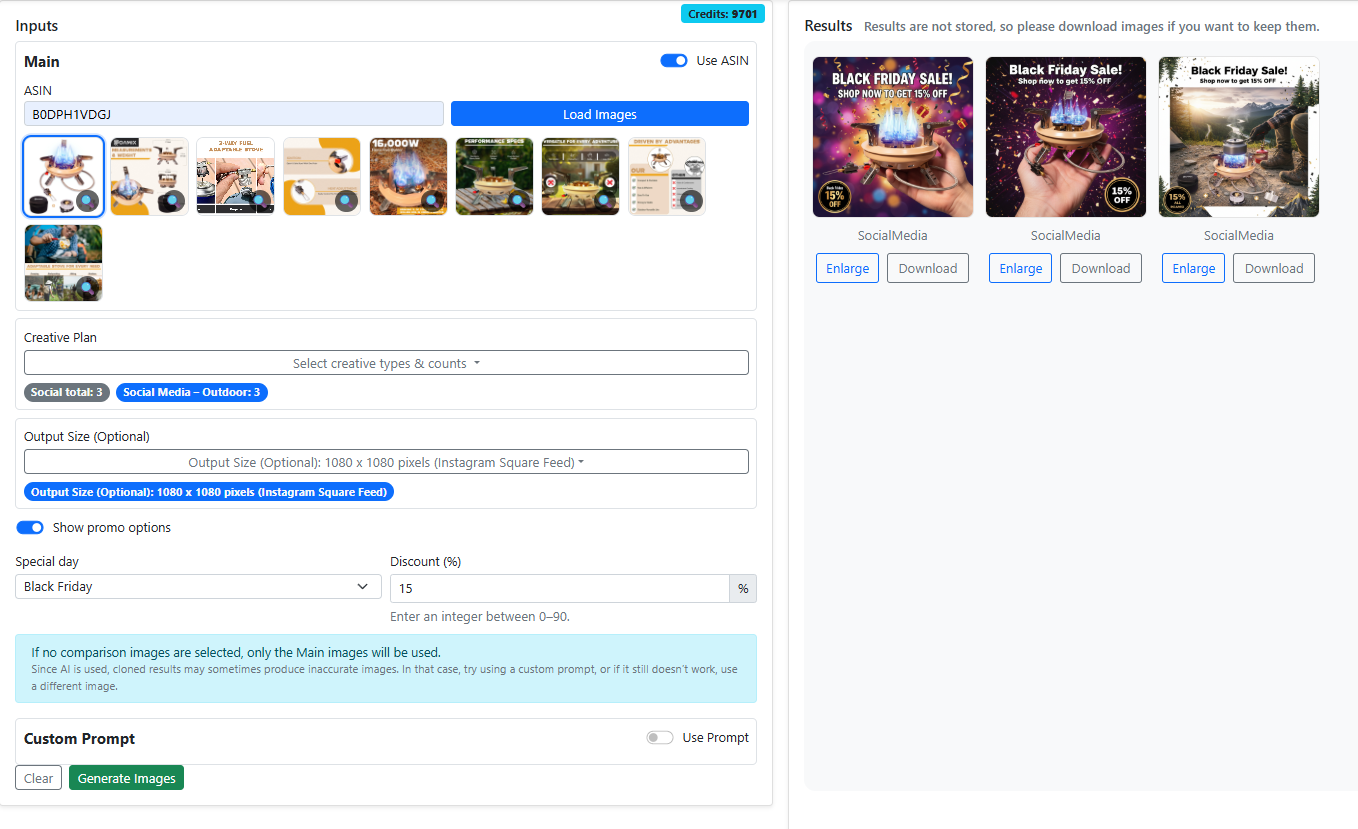
6. Image Generator (Social + Amazon)
Create listing-ready and social-ready images with cloning, multi-image sets, exact output sizes, social presets, and holiday promotions.
6-1. Clone
Replicate a style or mood while preserving your product identity.
- Use Dataset B only as abstract style reference; never copy logos or shapes.
- Keep colors, materials, and form true to Product A.
- Export clean, text-safe comps suitable for Amazon or social.
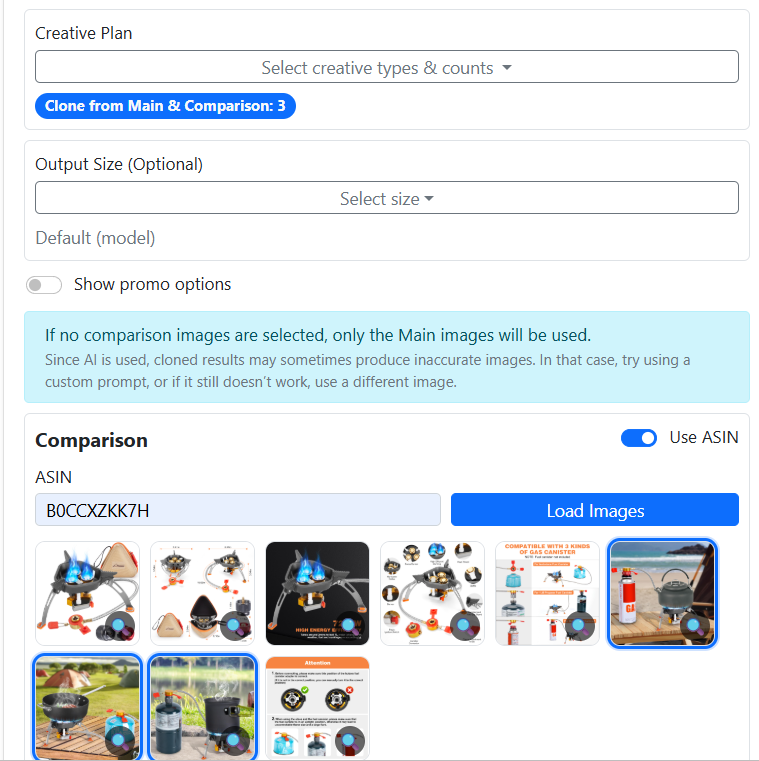
6-2. Other Listing Images
Generate hero, lifestyle, and infographic variants for your listing gallery.
- Plan a set that answers buyer questions visually.
- Balance context shots with clean product close-ups.
- Keep typography minimal and legible when used.
6-3. Output Size Adjusting
Choose exact canvas sizes or aspect ratios to match placement.
- Pick from presets (e.g., 1080×1080, 1464×600) or enter custom size.
- Ensure key subjects stay inside safe areas for crops.
- Use a blank aspect-canvas if your workflow requires it.
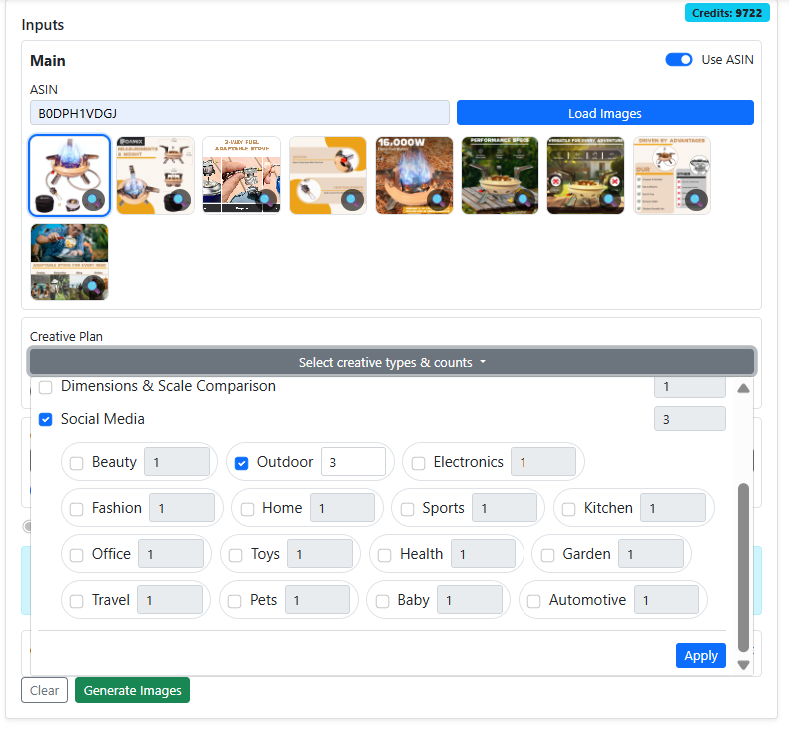
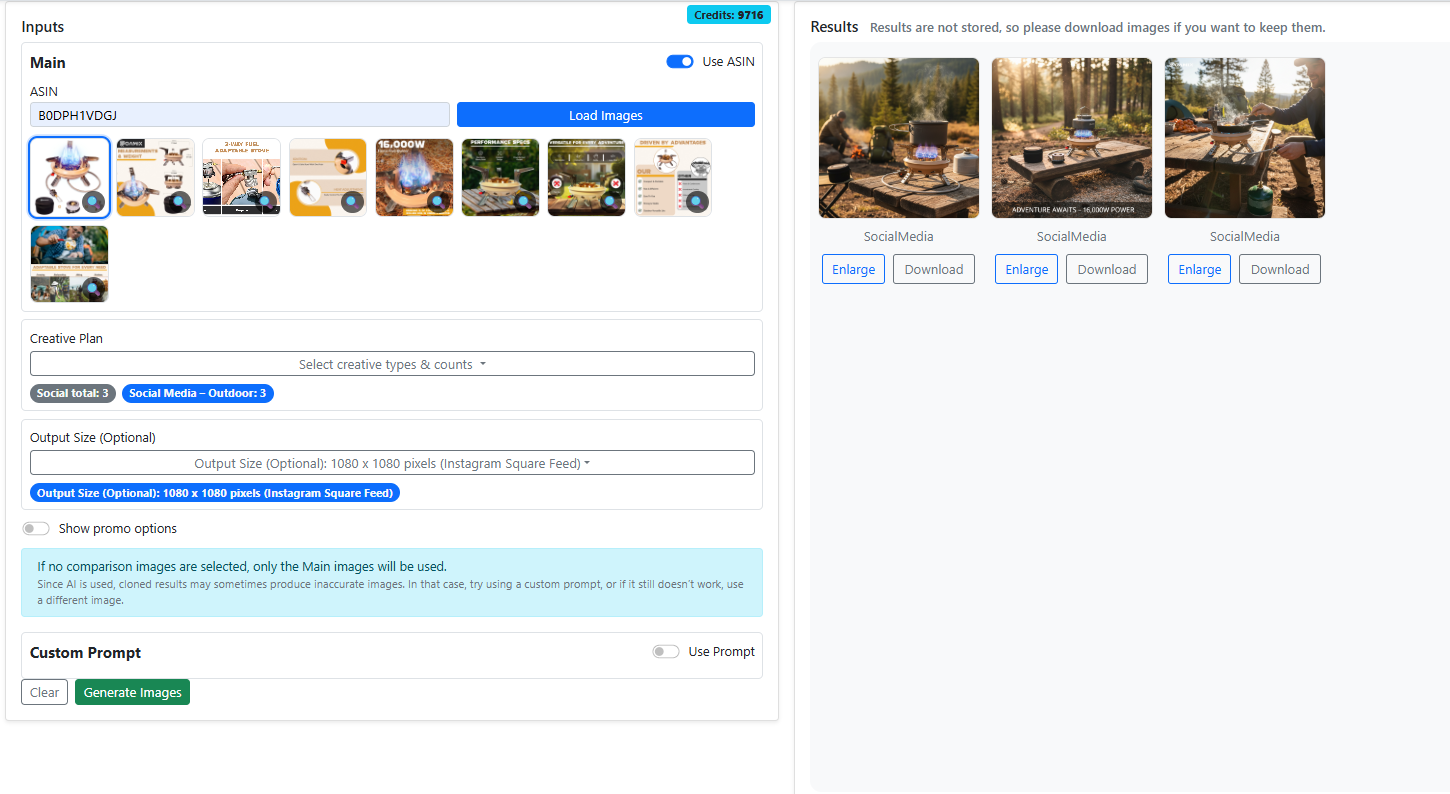
6-4. Social Media
Generate platform-fit images with category presets for faster, on-brand posts.
- Select target platform/aspect (feed, story, banner).
- Apply category styling (Beauty, Outdoor, Electronics, etc.).
- Export multiple variations to A/B test engagement.
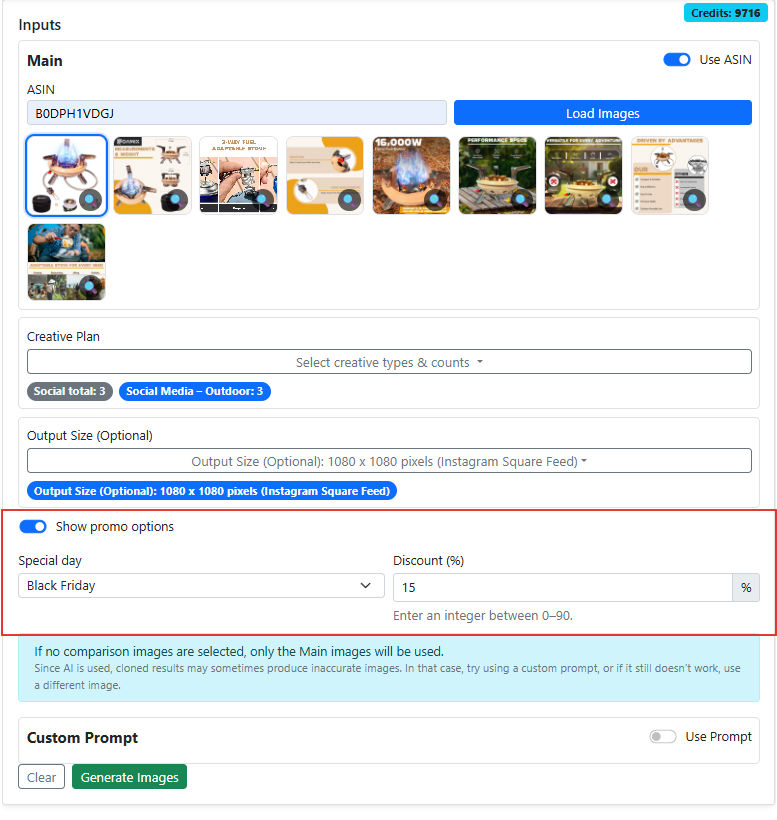
6-5. Promotion (Seasonal & Holidays)
Add seasonal promotions and discount overlays in seconds.
- Toggle promotion, pick the event (e.g., Black Friday).
- Enter a discount percentage; preview safe text placement.
- Generate multiple sizes for marketplace + social in one flow.
7. Ads Management (Beta) — Full Tutorial
This section summarizes all Ads Management (Beta) features added so far, so you can master setup, optimization, and automation in one place.
7-1. Set Up Ads Management (Beta)
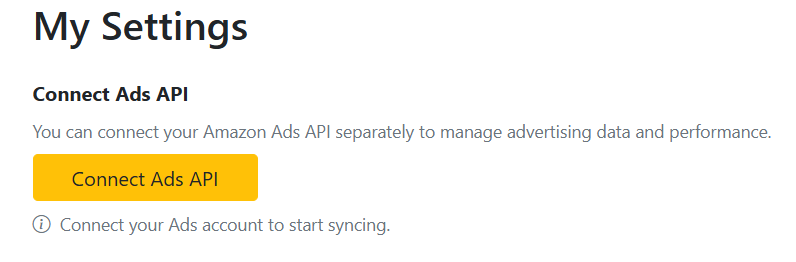
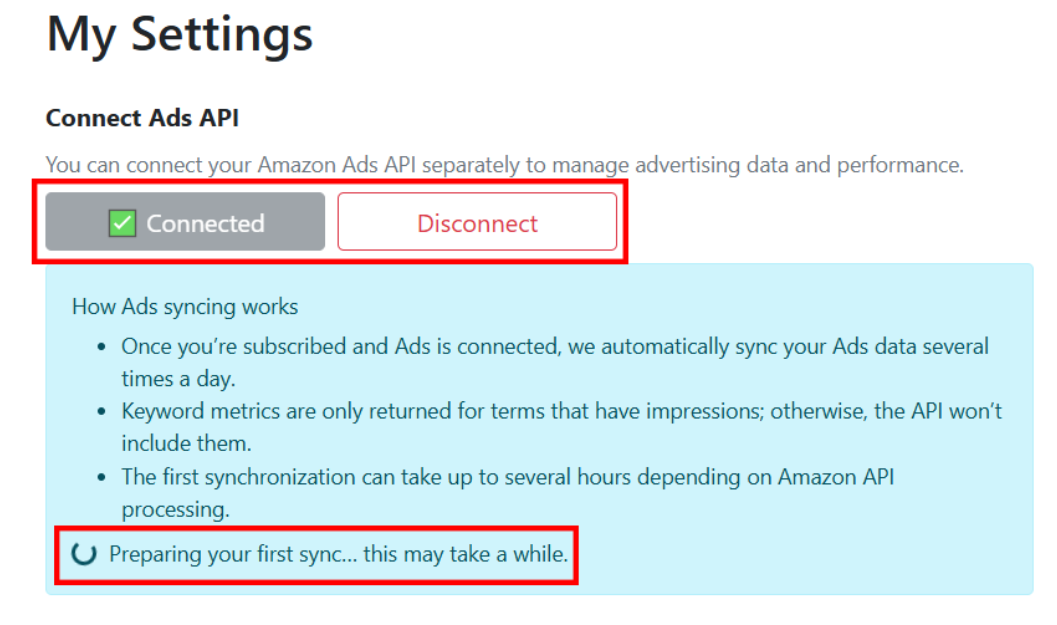
Connect the Amazon Advertising API in Settings to enable Ads Management features.
- Go to Settings from the top-right gear menu.
- Click “Connect Advertising API” and sign in to Amazon Seller Central.
- After connection, the system begins the first sync (this can take time).
- Ads Management menus become available once the data sync is complete.
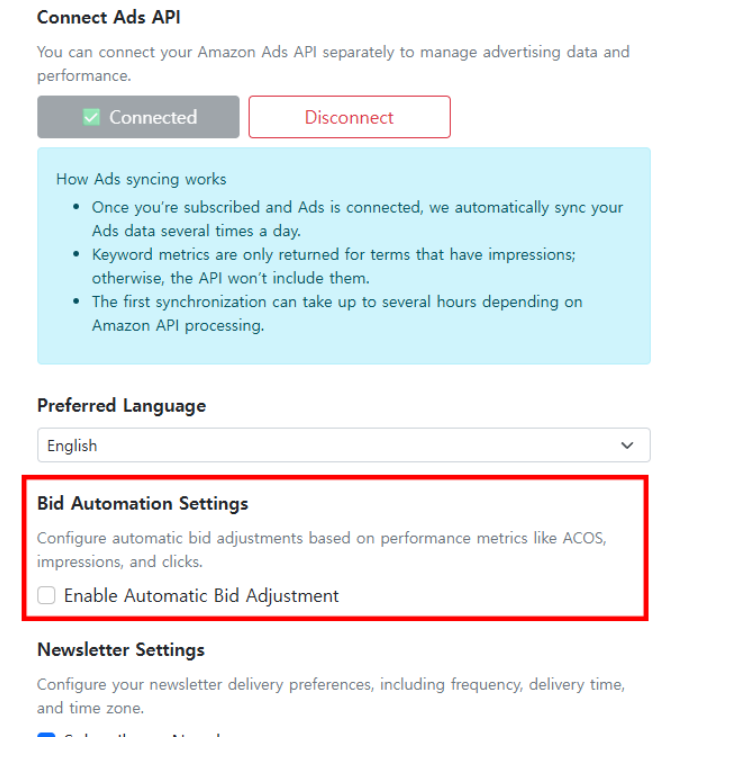
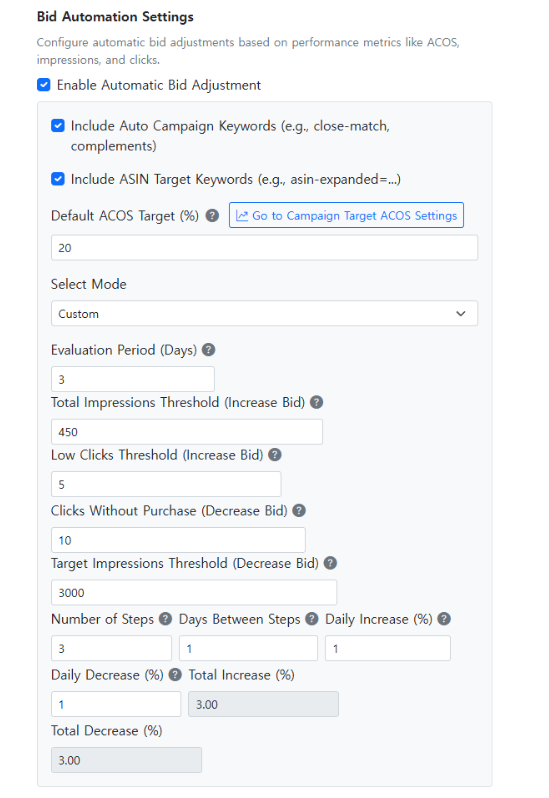
7-2. Bid Automation Settings
Choose what to include, set a base ACOS target, and define the evaluation period used to calculate Avg Cost, Clicks, and RPC for automatic bid adjustments.
Key options
- Include Auto Campaign Keywords (e.g., close-match, complements).
- Include ASIN Target Keywords (e.g., asin-expanded=...).
- Default ACOS Target (%).
- Sets a base ACOS target used when no manual campaign-level value is defined.
Evaluation rules
- Evaluation Period (Days): uses ad data from the selected period to evaluate bids using Avg Cost, Clicks, and RPC. Recommended: 30 days. Maximum: 60 days.
- Based on your Target ACOS, the system calculates Avg Cost, Clicks, and RPC to evaluate performance and automatically adjust bids.
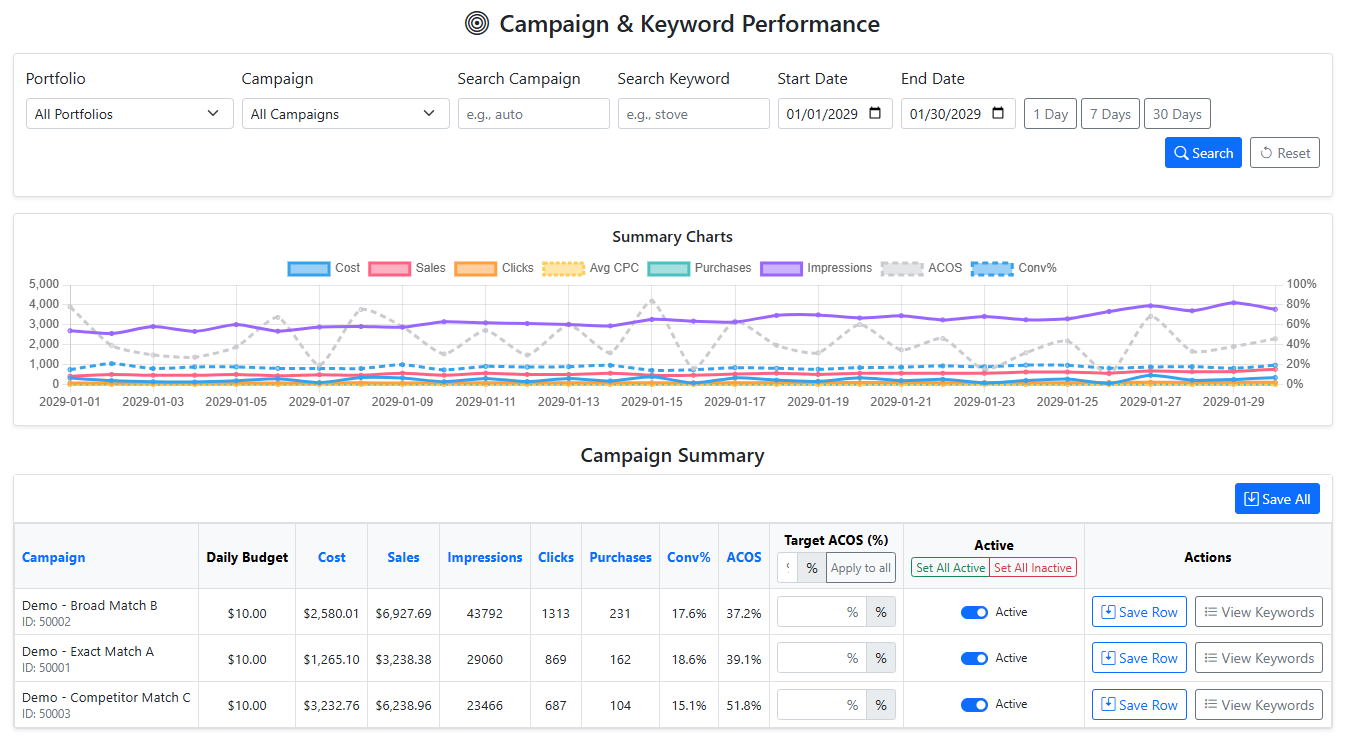
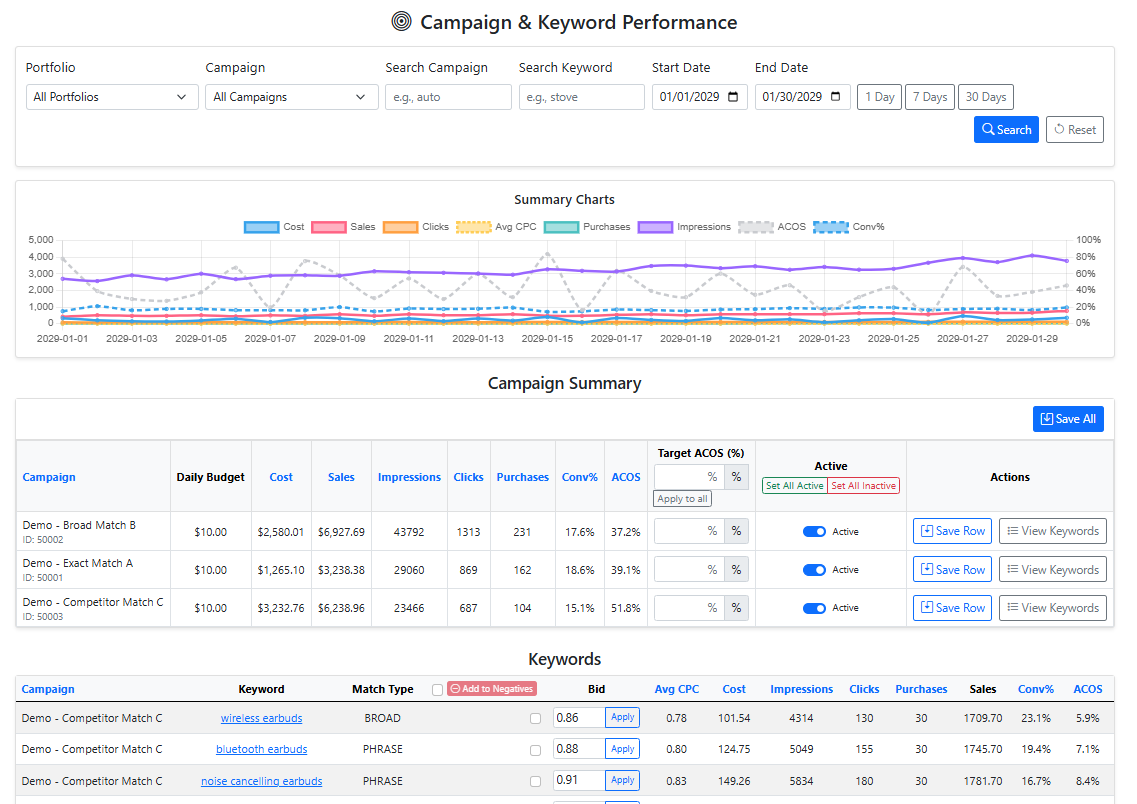
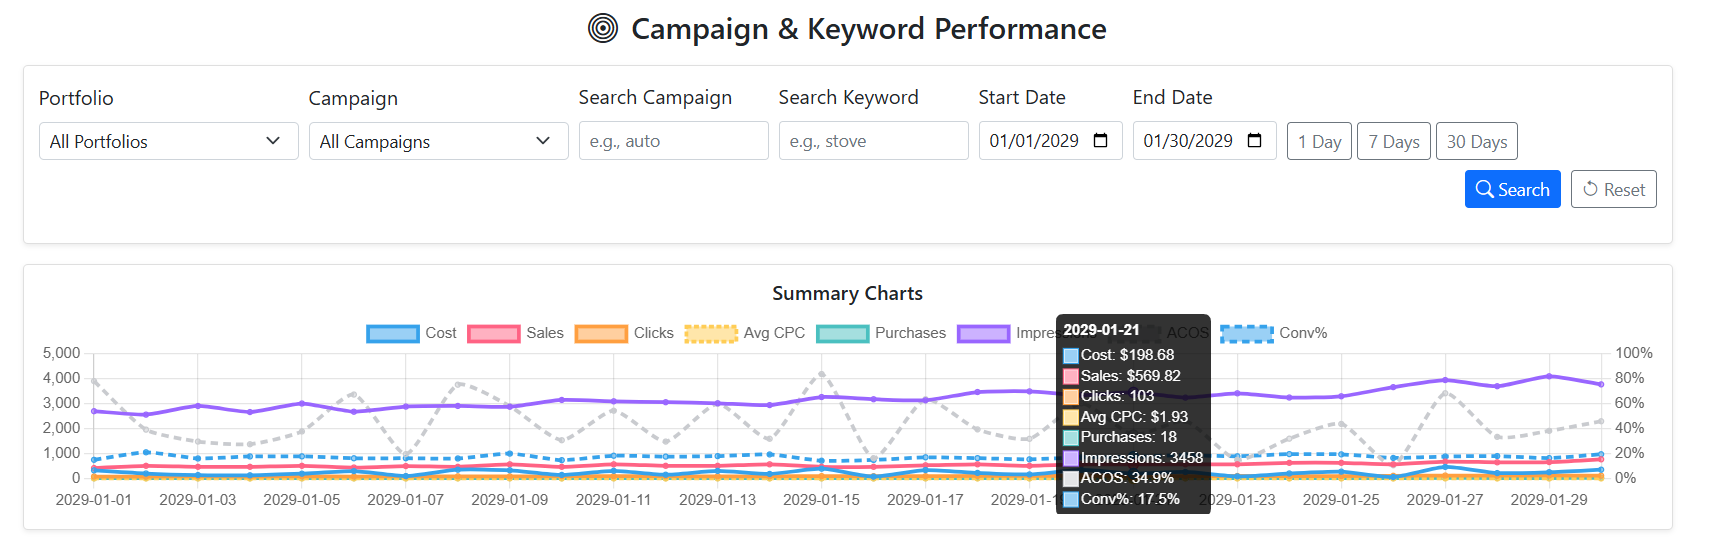
7-3. Campaign & Keyword Bid Optimization
Review performance by campaign and keyword, filter by dates, and manage bid automation per campaign.
- Search campaigns by name/keyword and filter by date range (1 / 7 / 30 days).
- Toggle chart metrics (Cost, Sales, Clicks, Purchases, Impressions, ACOS, Conversion Rate).
- Set Target ACOS and enable/disable automation per campaign.
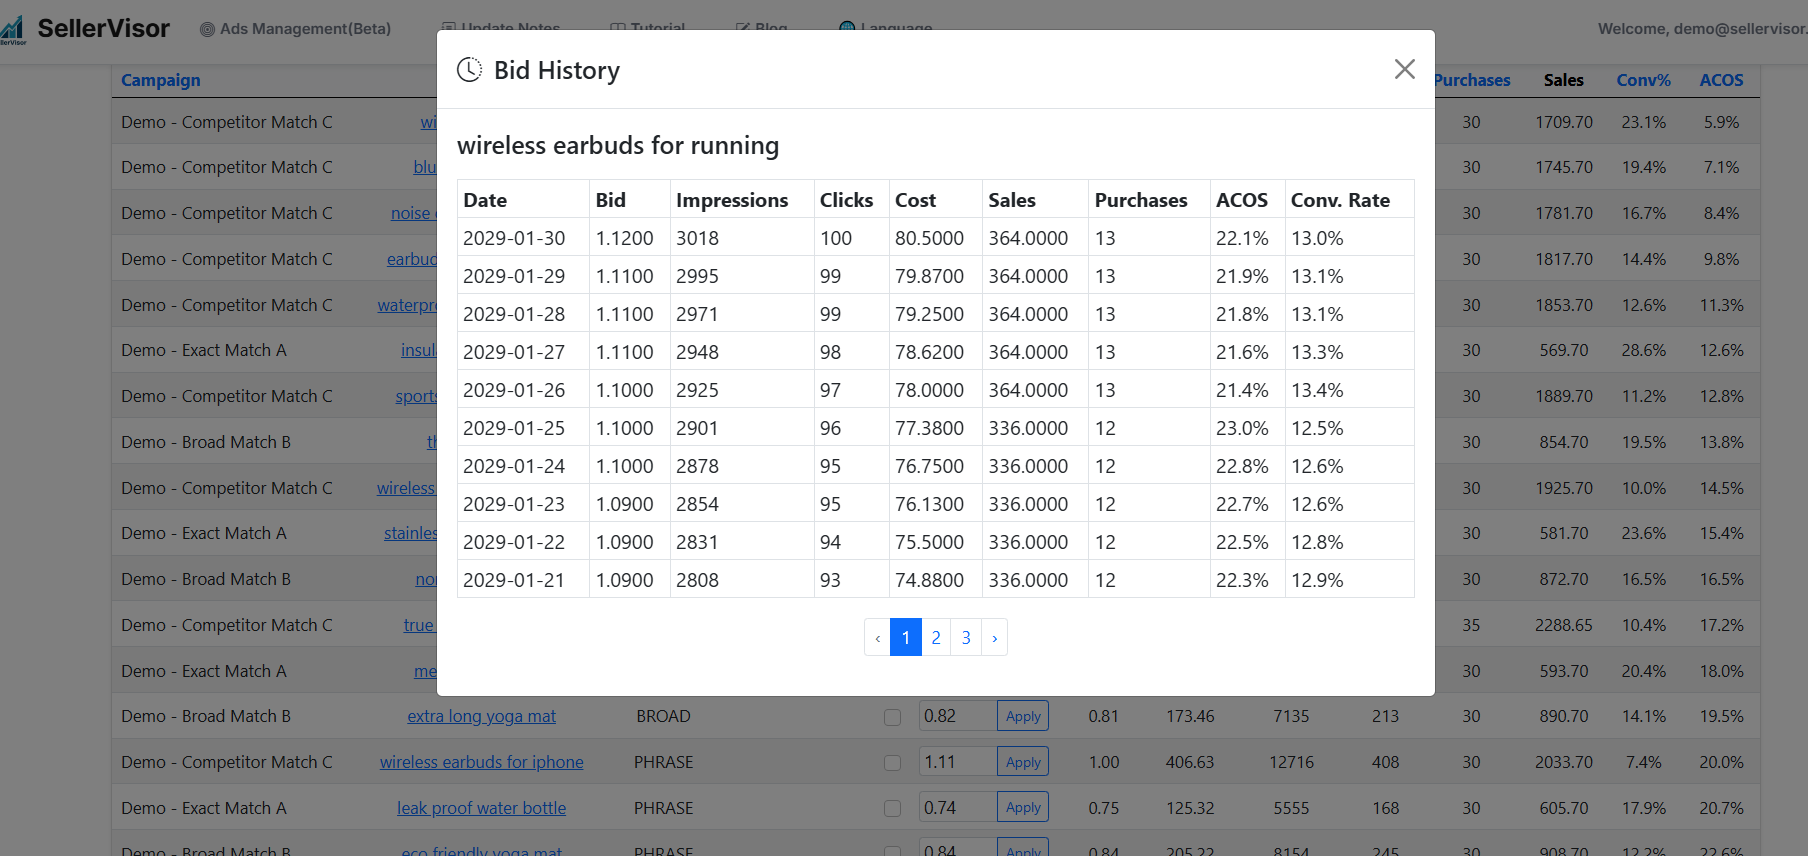
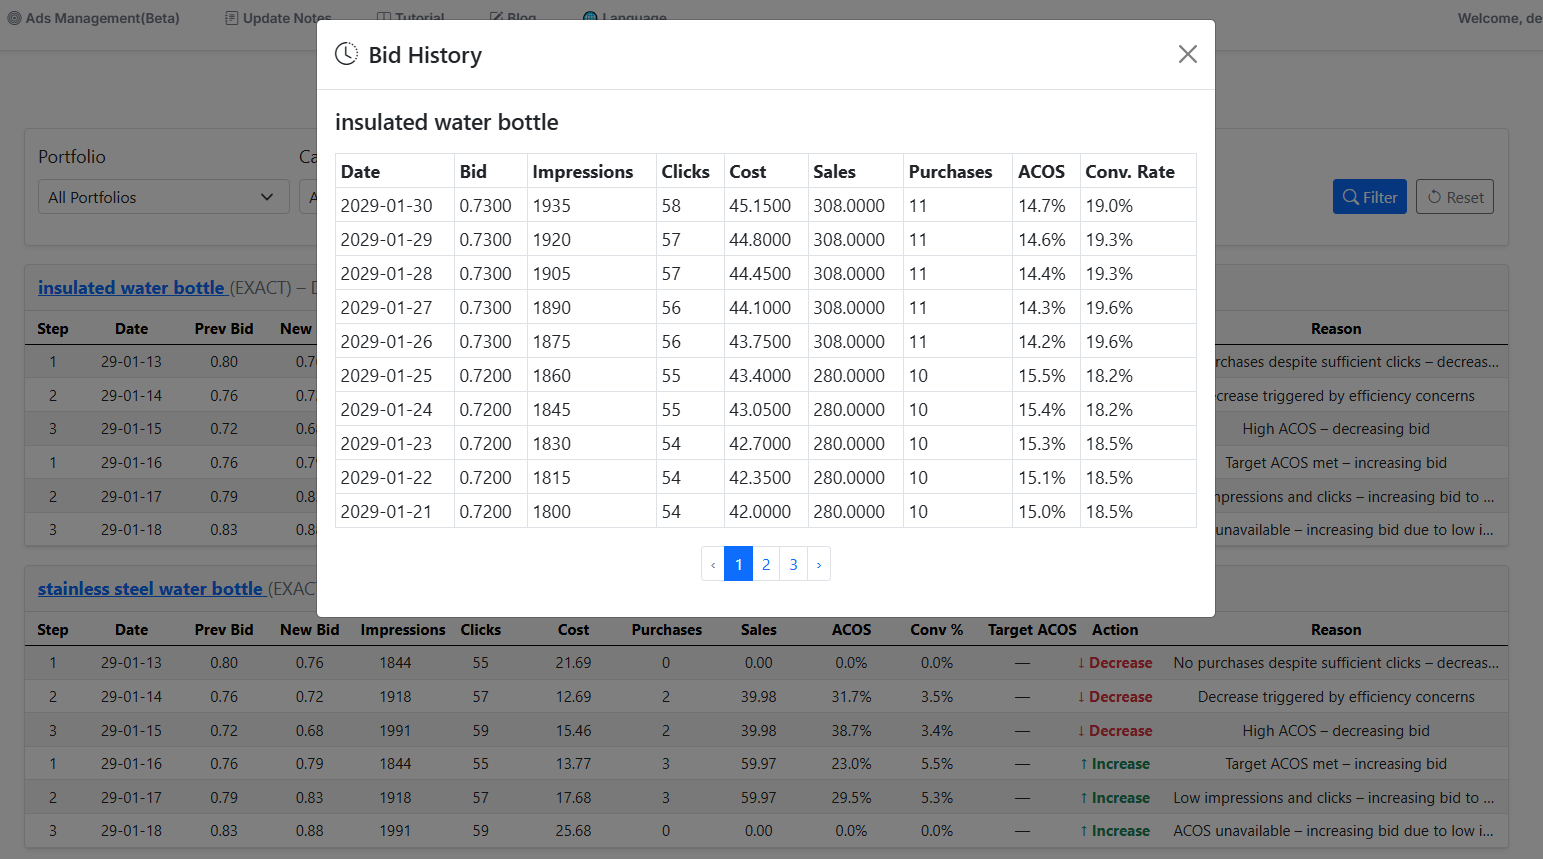
- Click a keyword to view bid history and understand changes over time.
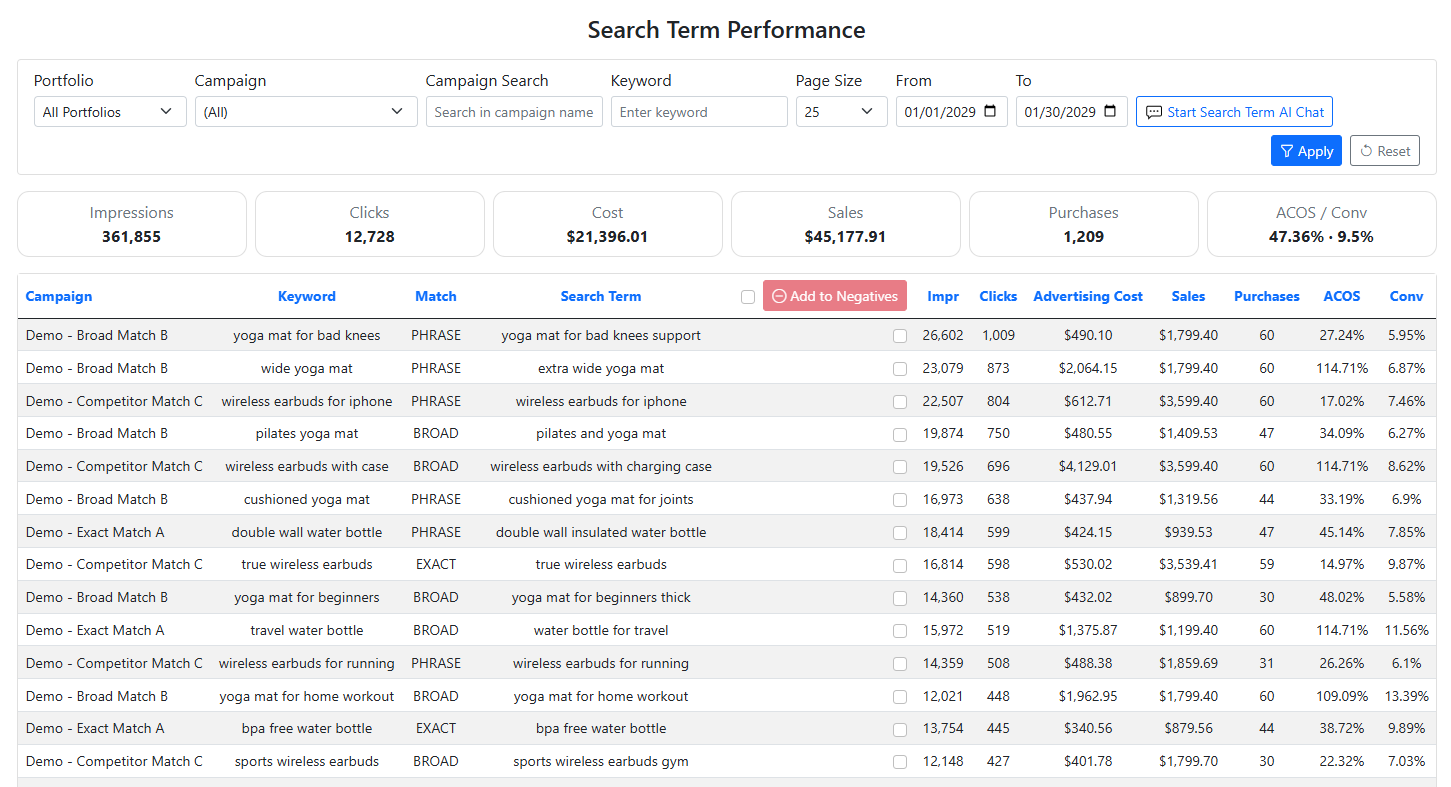
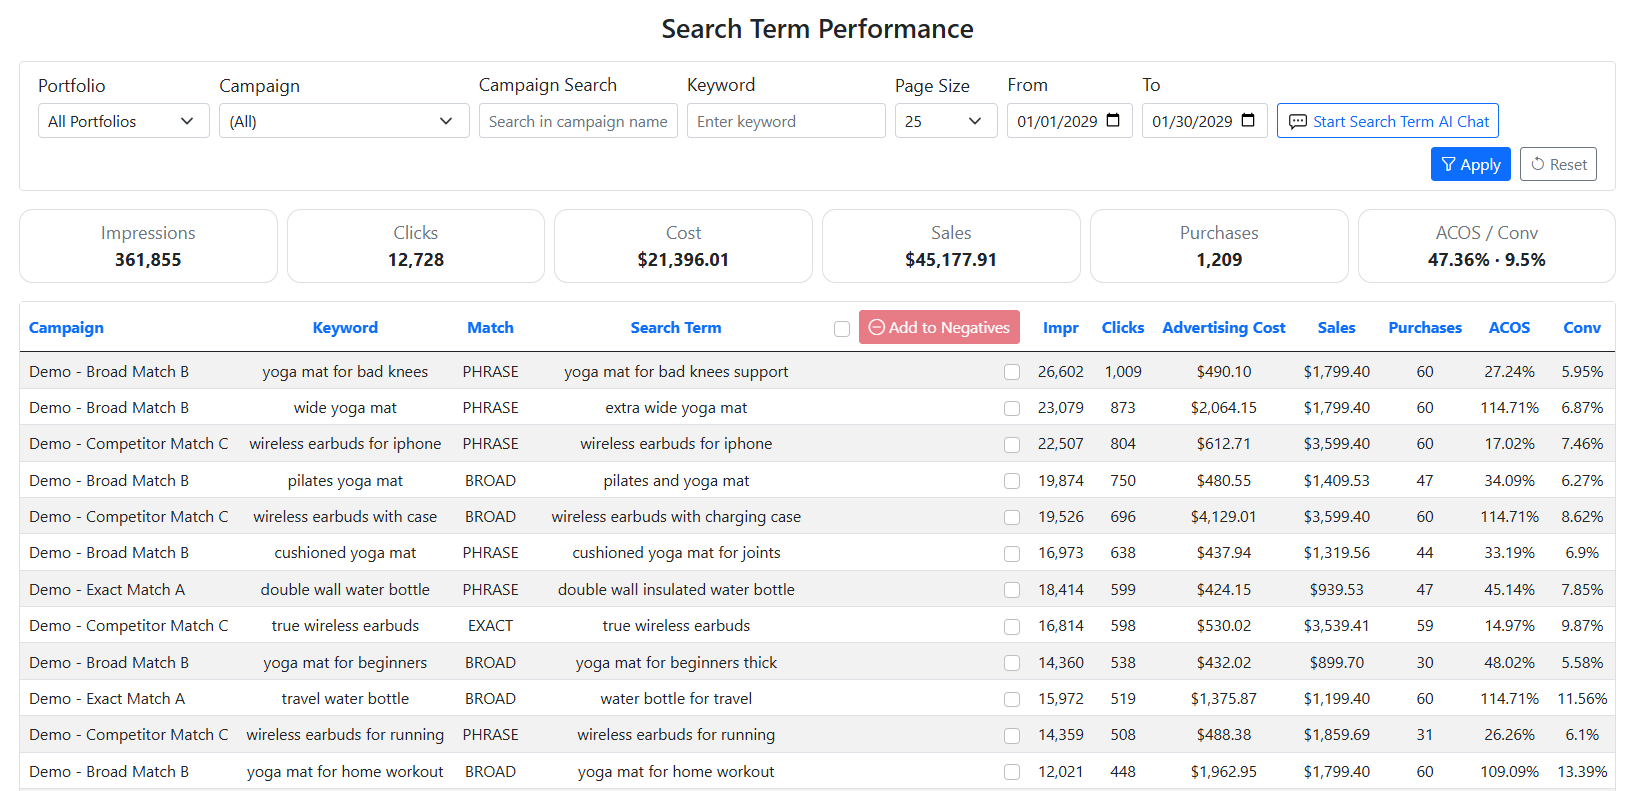
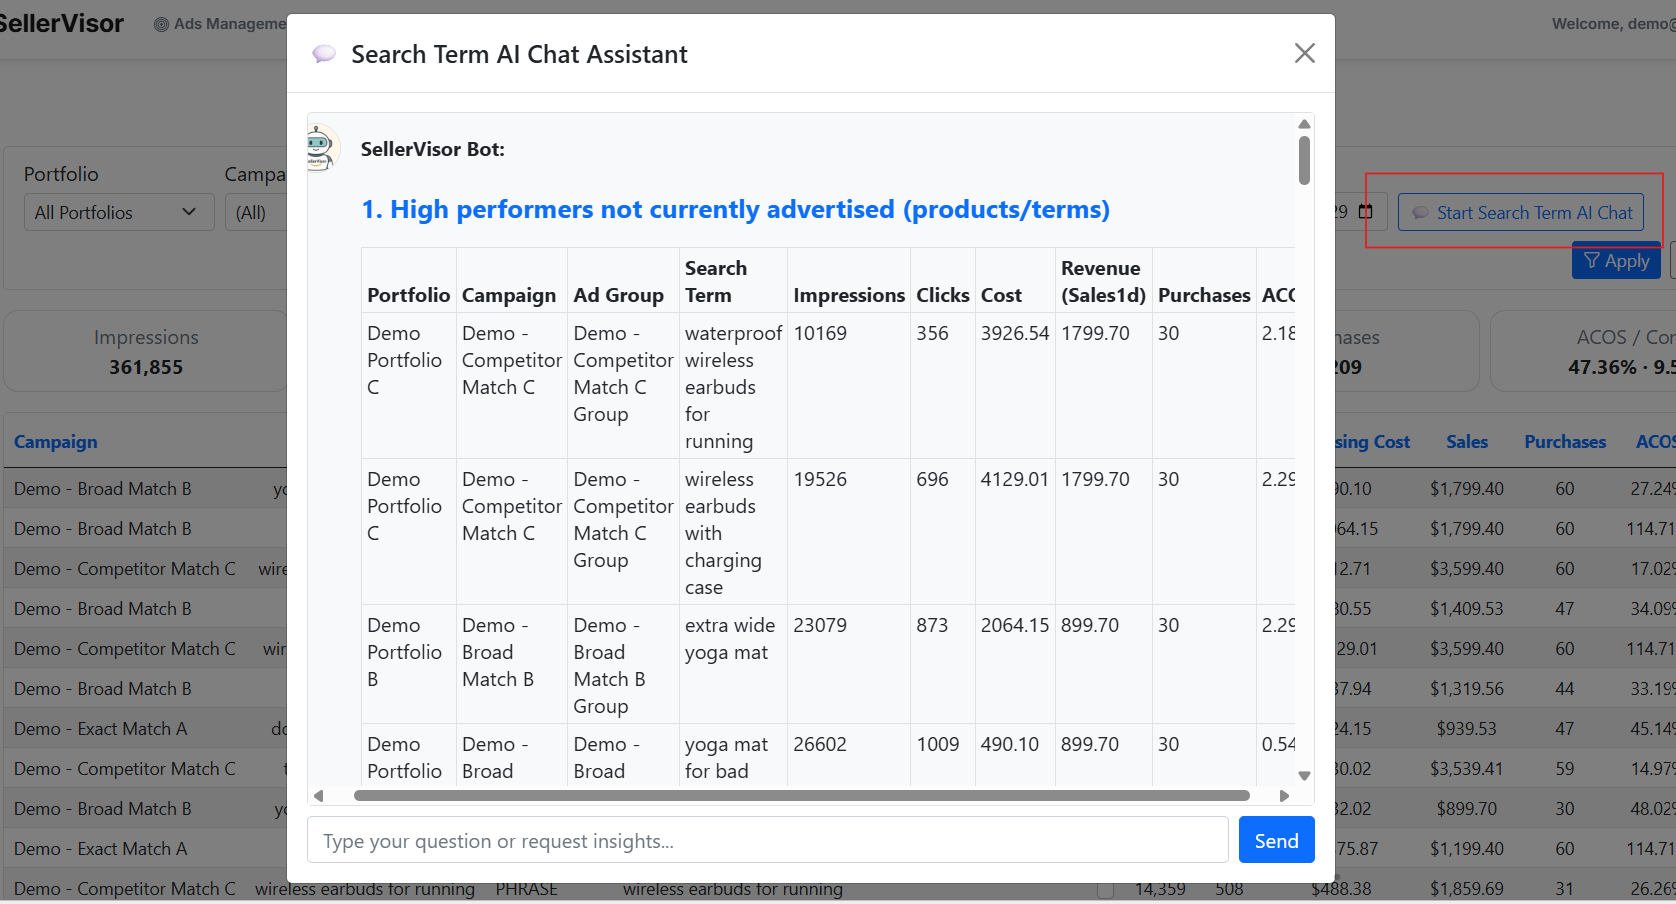
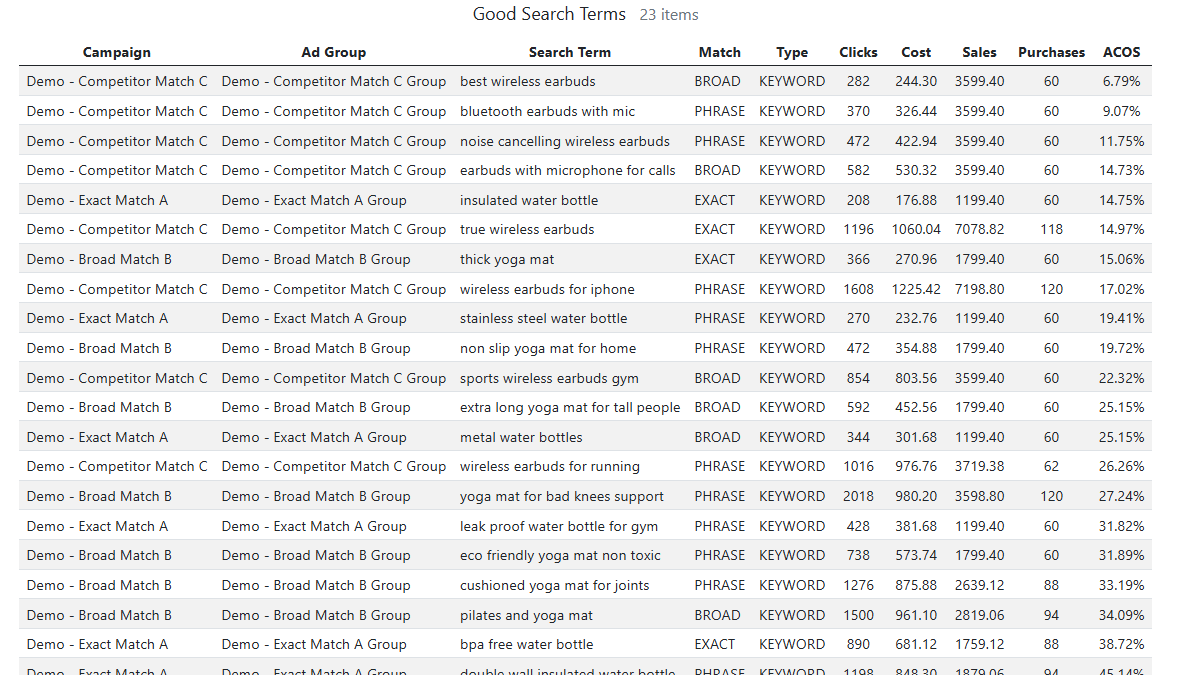
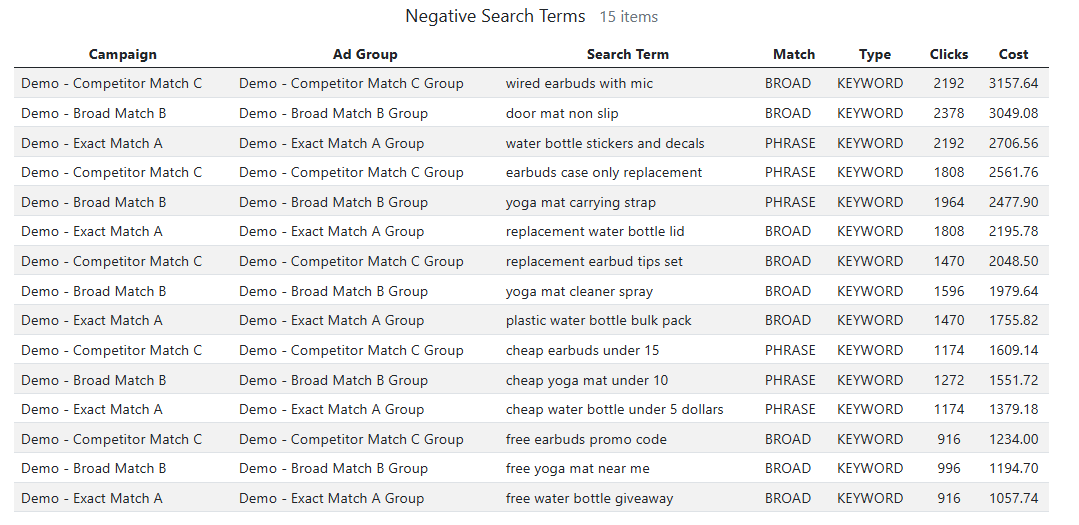
7-4. Search Term Performance & AI Chat
Analyze search term reports across campaigns and quickly identify winners and negative keyword candidates.
- See good vs. bad search terms without opening each campaign report.
- Add inefficient search terms as negatives (Exact/Phrase) directly.
- All added negatives are consolidated in the Negative Keywords page.
- Use AI Chat to surface high-opportunity terms and reduce wasted spend.
What AI Chat can highlight
- High performers not currently advertised.
- Negative keyword candidates to add now.
- Search terms with highest conversion rate.
- Zero-purchase terms with the largest spend.
- Efficiency changes vs. previous period and new term discovery.
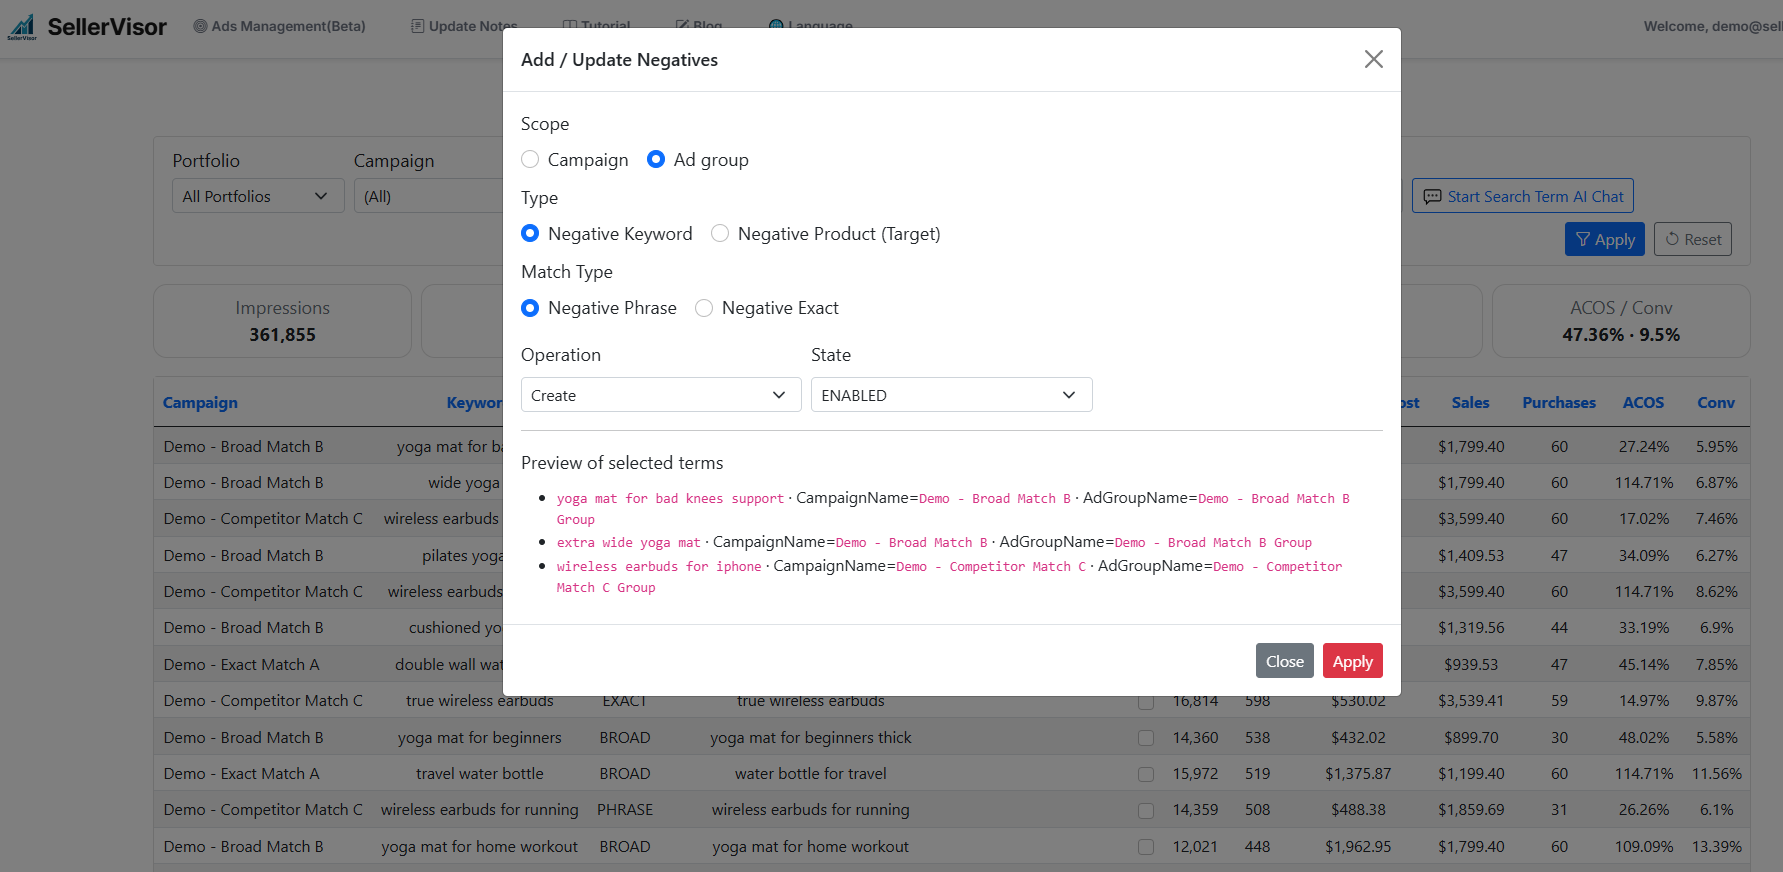
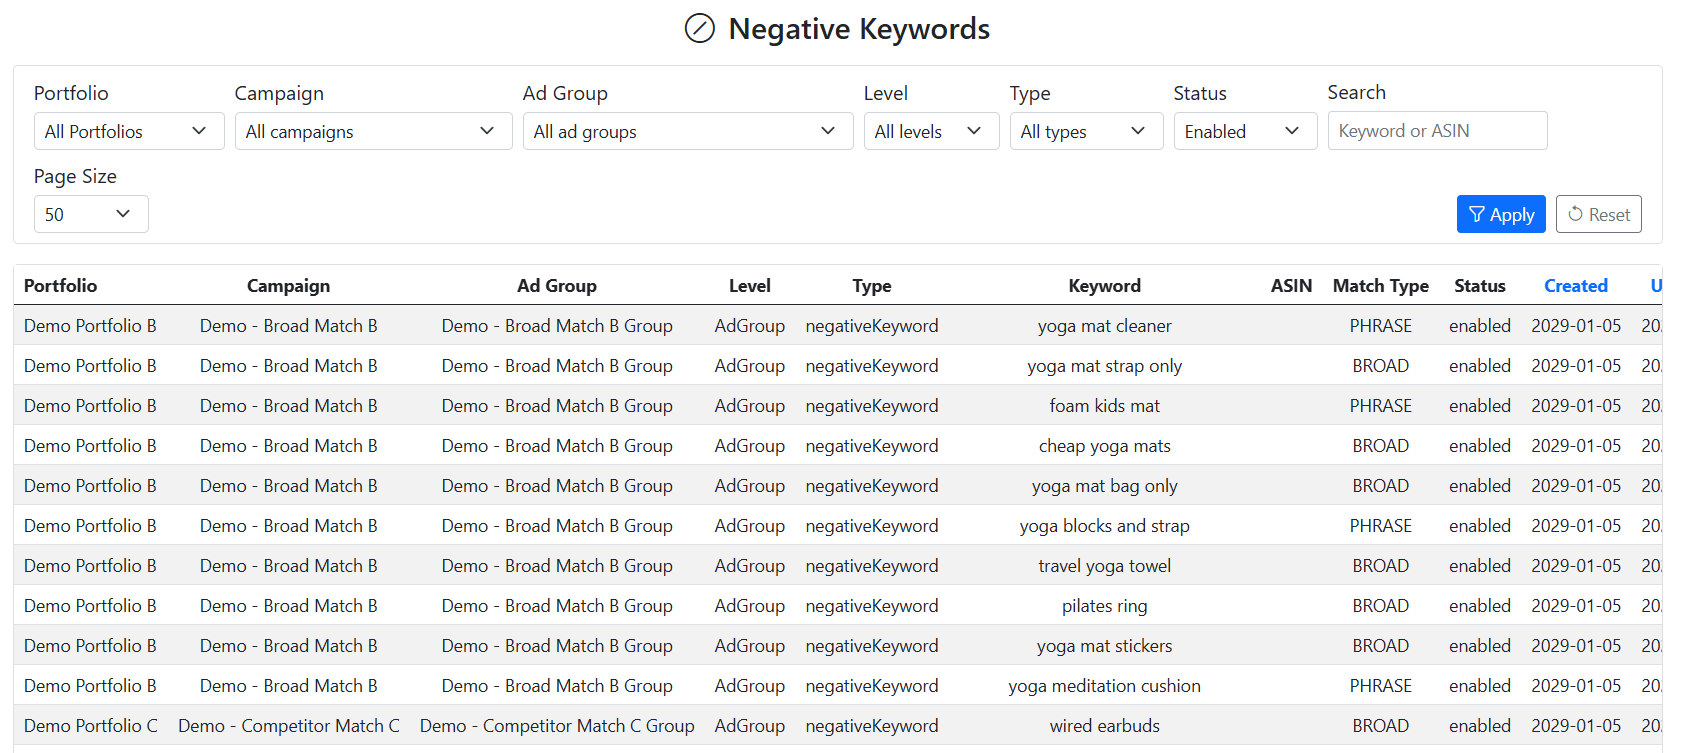
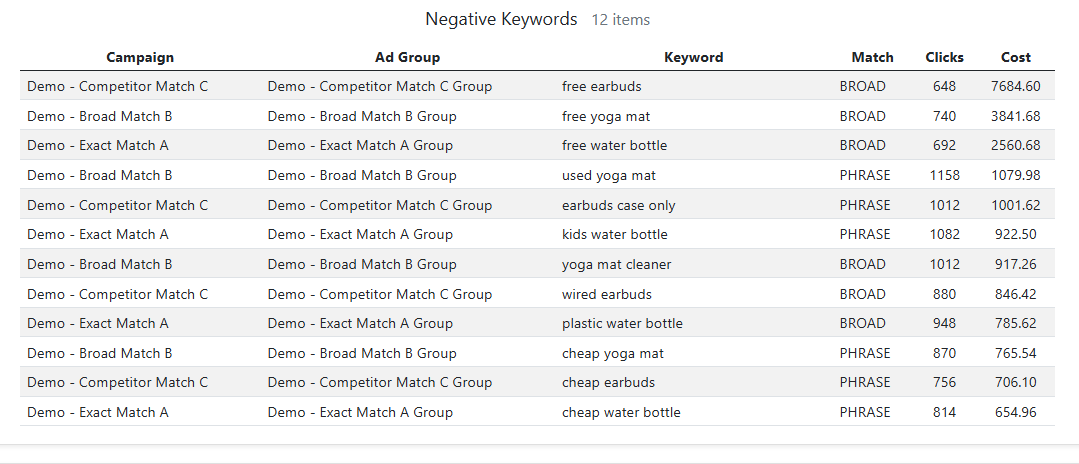
7-5. Negative Keywords Management
Manage all newly added negatives in one place instead of switching between campaigns.
- Review negatives created from Search Term Performance actions.
- Track match type (Exact/Phrase) and apply to the correct scope.
- Clean up or refine the list regularly to keep campaigns efficient.
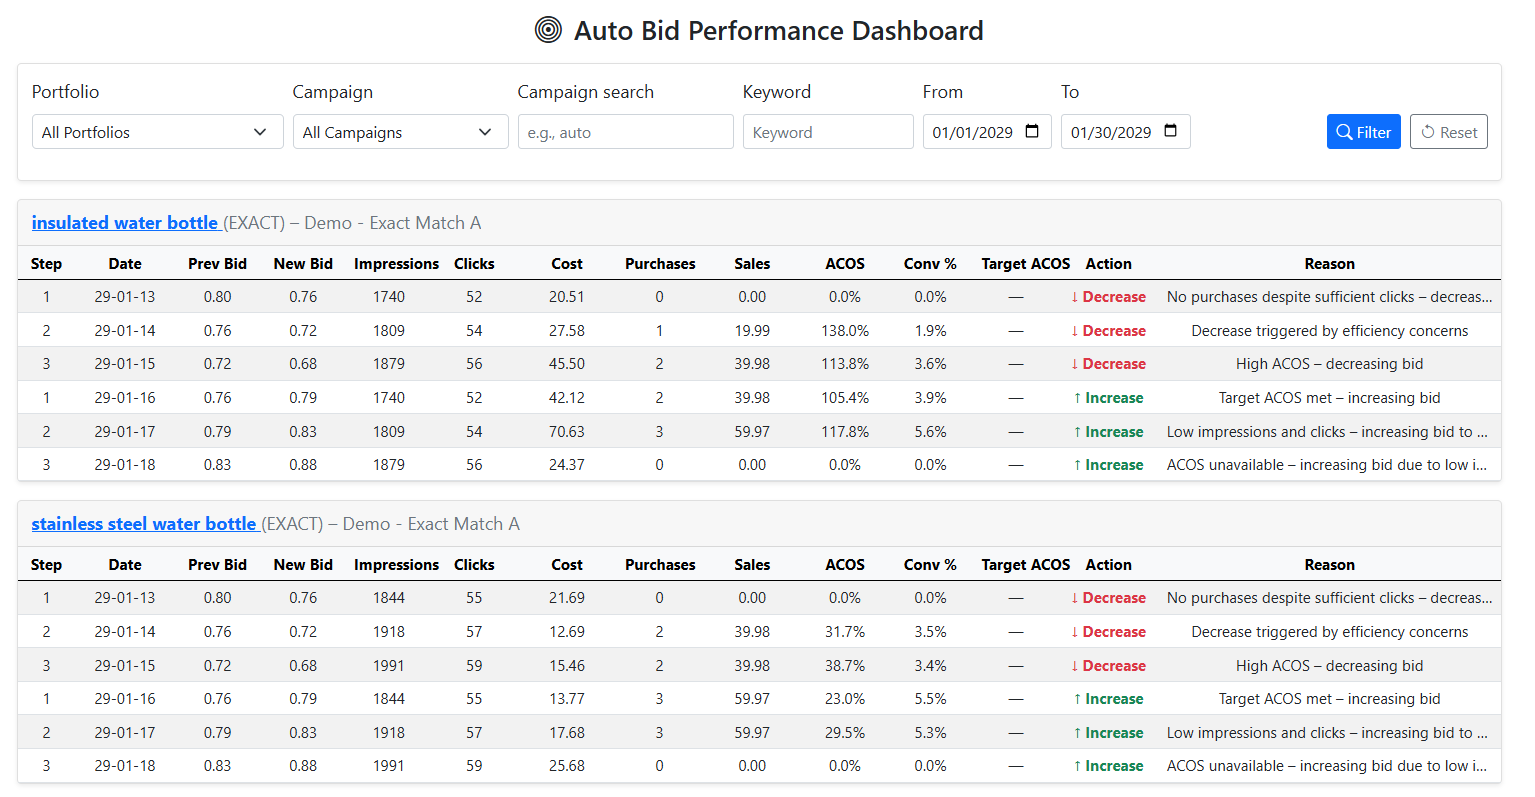
7-6. Bid Automation Performance Dashboard
Review how bid automation adjusted bids and placements based on RPC performance, and inspect detailed bid history to understand the impact on conversions.
- See why bids and placements were adjusted by reviewing RPC, average cost, clicks, and resulting performance.
- Open bid history for each keyword or target to track exact bid and placement changes over time.
- Use historical results to validate that RPC-driven bid and placement adjustments improved efficiency.
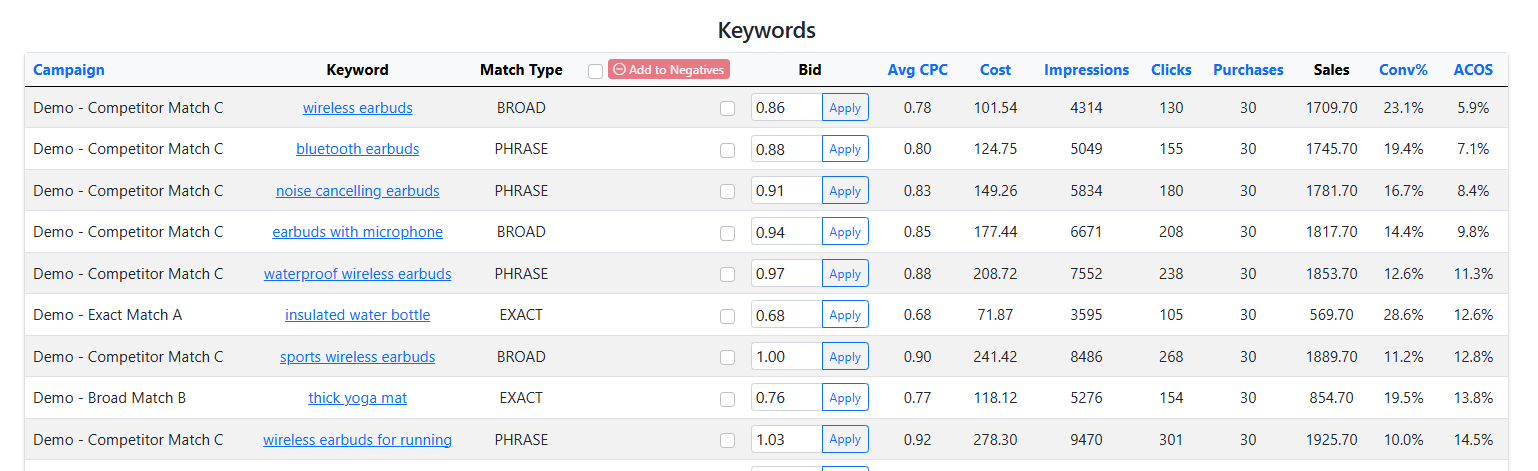
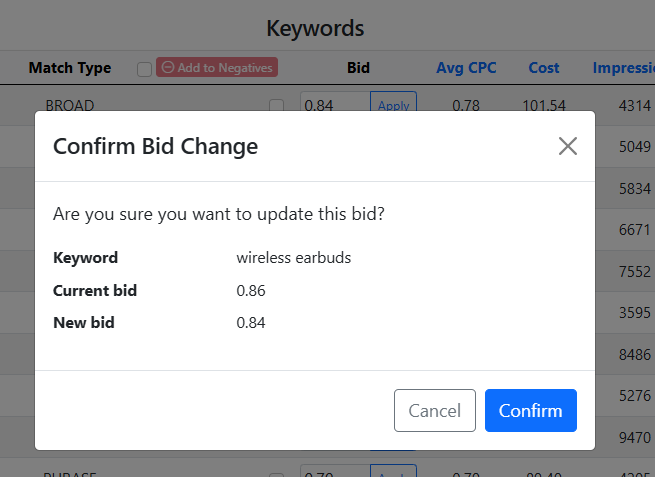
7-7. Direct Bid Adjustments (Sync to Amazon Ads)
Update keyword bids inside SellerVisor and apply changes directly to Amazon Ads without switching screens.
- Adjust bids quickly with the right context (Avg CPC, Cost, Sales, ACOS).
- Prevent wasted spend by reacting faster to performance shifts.
- Reduce “opportunity cost” by reallocating budget to winners sooner.
Tip: If anything feels complex, start with Moderate mode, verify results in the automation dashboard, then fine-tune thresholds over time.
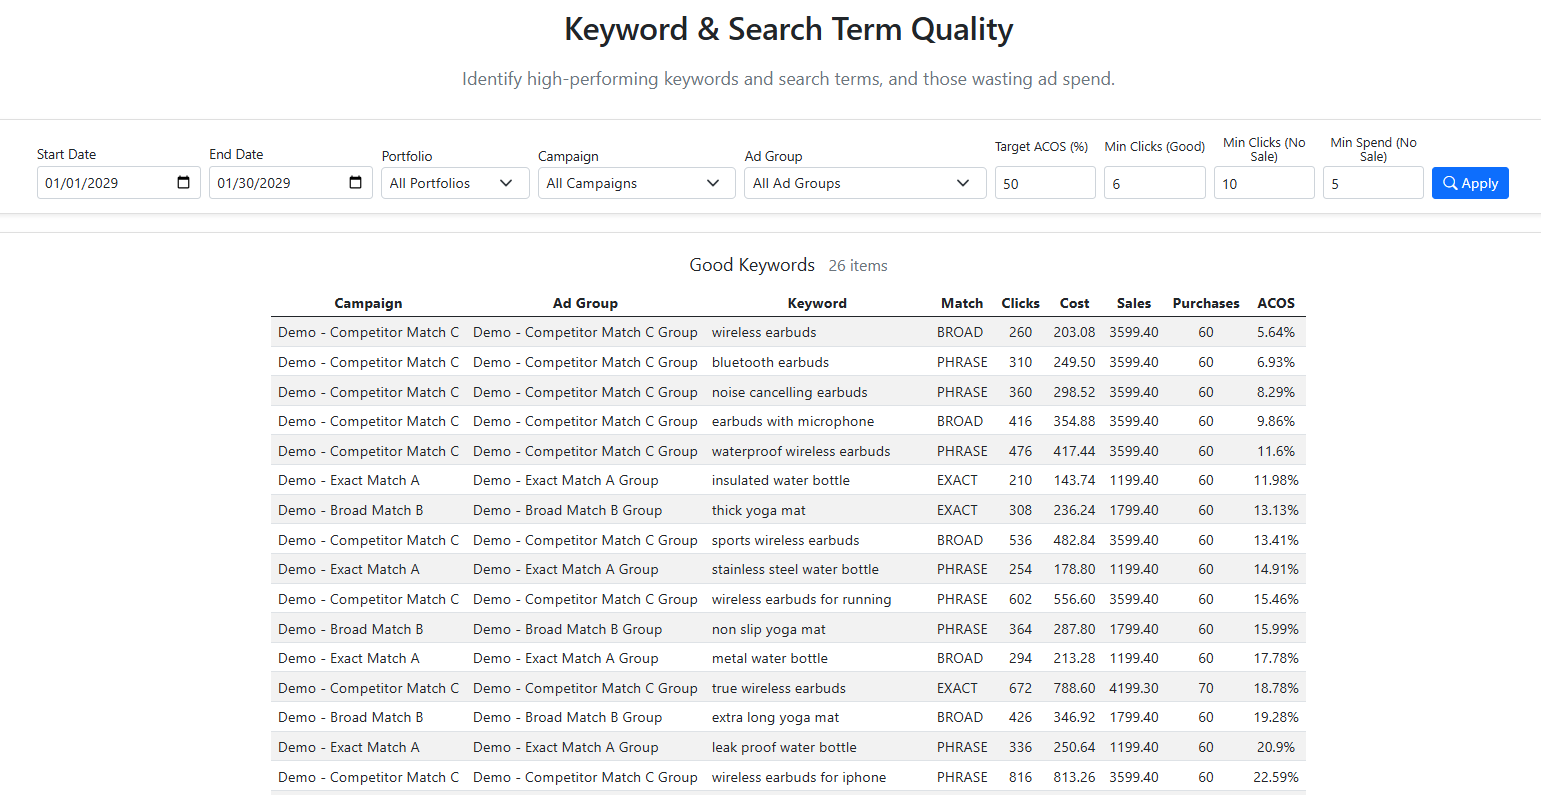
7-8. Keyword & Search Term Quality View
Separate strong keywords and search terms from those that only consume spend without generating sales, so you can improve targeting health.
- Filter by date range to identify keywords and search terms that generated sales vs. those with zero orders
- Review “good” terms to scale winners: increase bids, add exact/phrase keywords, and reinforce listing copy
- Turn wasteful terms into action: lower bids, pause, or add negative keywords to block unprofitable traffic
You're ready to explore
Jump back to Settings or start a Market Research analysis.