
It has been about a month since the launch of SellerVisor's Ads Management feature. During this time, continuous new features have been added, so in this page, we would like to provide an overview of all the updated Ads Management functions so far. By reading this page, you will master the overall usage of SellerVisor's Ads Management (Beta) feature and optimize Amazon ads through it.
1. How to Set Up Ads Management (Beta)
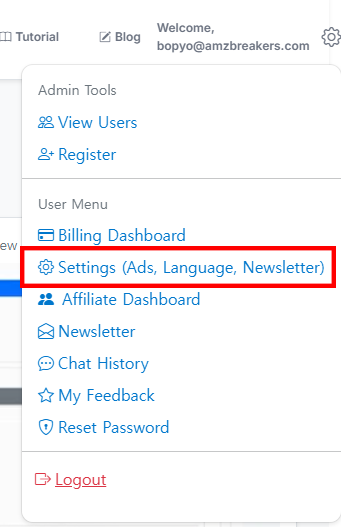
1. Log in to SellerVisor with your ID. After logging in, click on the gear icon in the top right corner, and select Settings as shown in the image above (the menu inside the red box).
Note: This function can only be used if you are registered and subscribed to SellerVisor. When you subscribe for the first time, you get 14 days of free usage, during which you can also use the advertising features, so you need to subscribe and use.
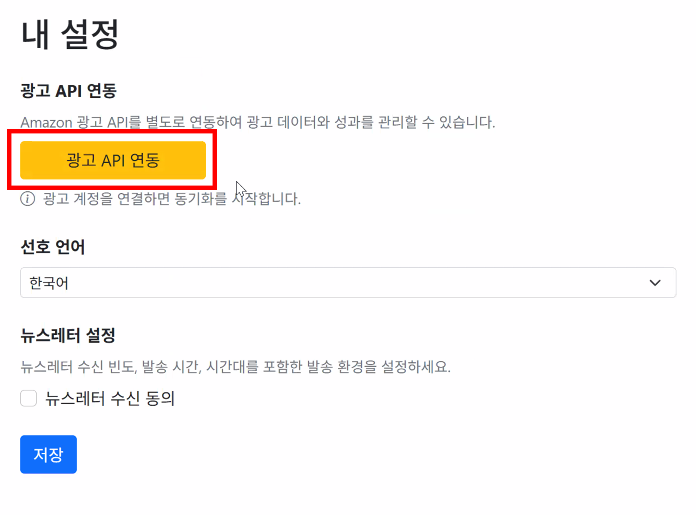
When you select the Settings menu, the screen above appears. You need to connect the ad API. Click the yellow button 'Connect Advertising API'. This will redirect you to the Amazon Seller Central login page, making integration easy. Proceed to connect it.

After connecting the Amazon Seller Central ad API, the screen will display 'Connected' as shown above, and below it, the message 'Preparing your first sync... this may take a while' will appear. Connecting Amazon advertising data takes some time, so please wait. It typically takes up to 10 hours for the initial setup.
*Note: You can only use SellerVisor's Ads Management features after the Amazon ad data connection is complete.
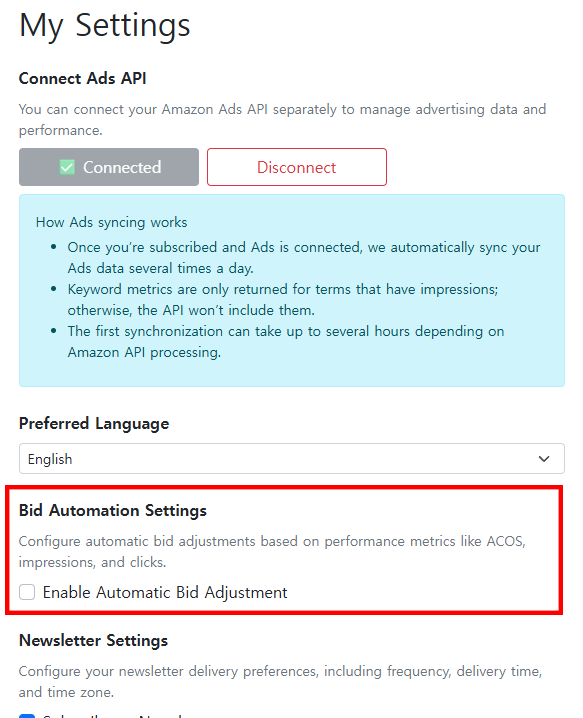
If connected, the lower menu will display 'Bid Automation Settings,' and you will be able to check the box for Enable Automatic Bid Adjustment. Activating this feature is necessary to use it. Once enabled, the setup screen appears as in the image below. It may look complex, but it’s very simple. Please read the explanation carefully.
We will now review each option separately.
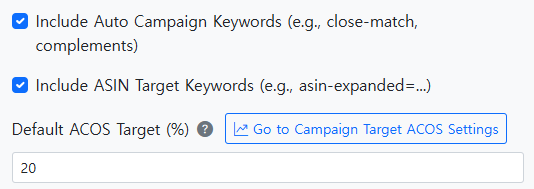
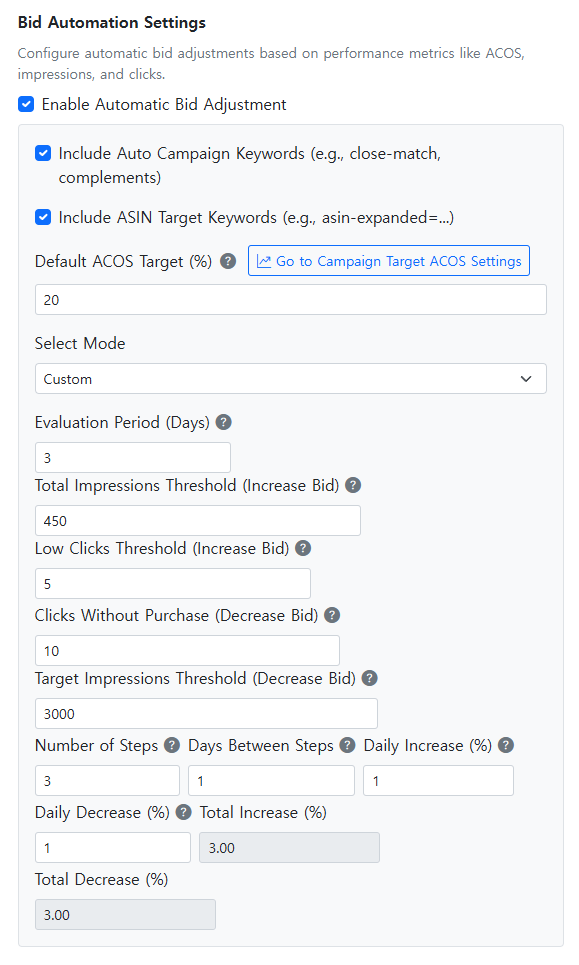
4-1) The Include Auto Campaign Keywords (e.g., close-match, complements) option determines whether auto advertising is included in the automatic bidding adjustments. Checking this box means auto ads will also be affected by these settings. If you operate auto ads, it is recommended to check this box.
4-2) The Include ASIN Target Keywords (e.g., asin-expanded=...) option determines whether product targeting ads are included. If you run product targeting ads, checking this box to include them is recommended.
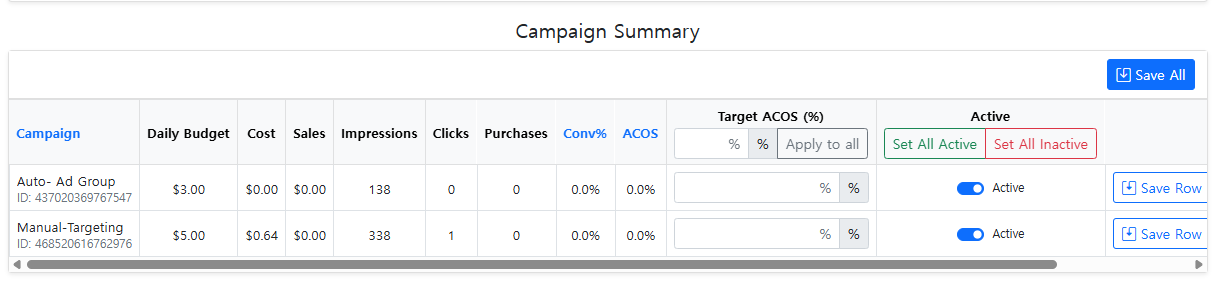
4-3) The Default ACOS Target (%) sets the overall ACOS percentage that you aim for with your ads. For example, entering '20' will automatically adjust bids to target 20% ACOS across your campaigns. If you want to set different target ACOS per campaign, select ‘Go to Campaign Target ACOS Settings’. Clicking on it allows you to set specific ACOS targets per campaign, as shown in the images below. Please refer to this.
Note: If 'Go to Campaign Target ACOS Settings' is not visible, it means the ad data has not been fully linked yet, or there are no running campaigns.
Returning to Settings, let’s explore the remaining settings starting with 'Select Mode'.
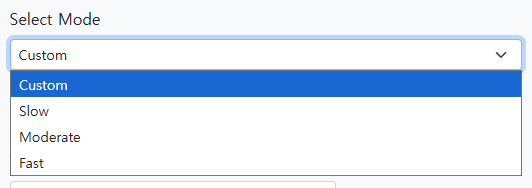
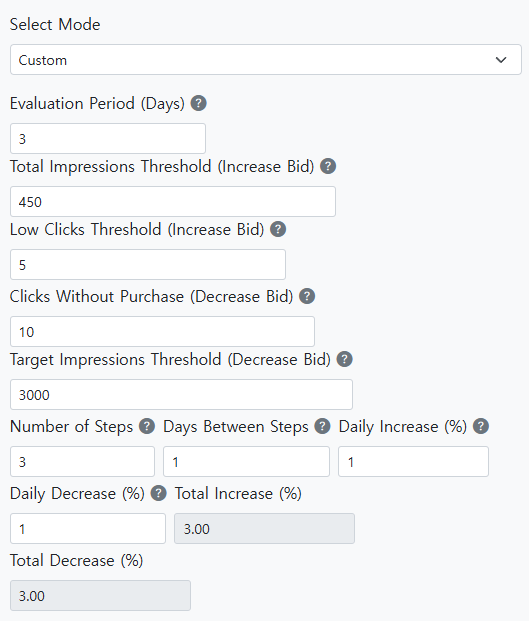
4-4) Select Mode determines how often the Bid Automation operates. The modes are 'Slow,' 'Moderate,' and 'Fast,' each with preset default settings. For example, choosing 'Moderate' will set the values as shown below.
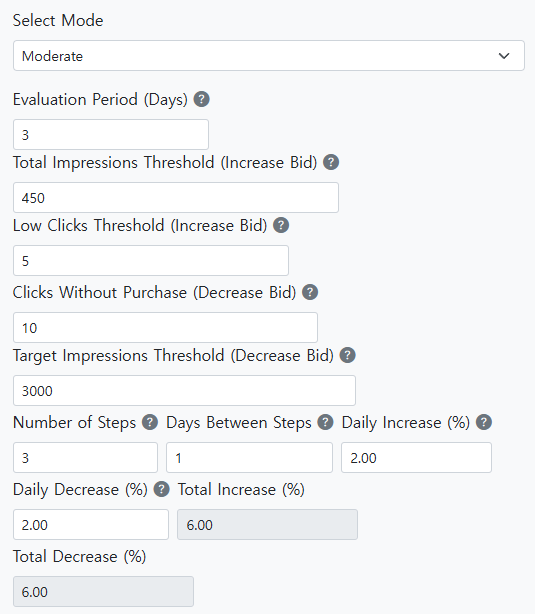
Let’s explain the above settings. If you have followed so far, you are almost there—just a little more to go. This section explains how the setup varies according to different conditions, which you can think of as setting specific parameters to understand different scenarios more easily.
First condition
Evaluation Period (Days): This is the fundamental condition, currently set to 3. It means adjusting based on data from the last 3 days. For example, if you enter 450 impressions as a target, and the campaign has fewer than 450 impressions, bids will be increased to reach 450. If the impressions are higher than 450, no change will be made. Here, the question is: over what period? It’s the period defined by 'Evaluation Period (Days)'. When set to 3, if the total impressions over this period are below 450, bids are increased; if above, no change. Do you understand?
Second condition
Total Impressions Threshold (Increase Bid): This value relates to impressions. For example, if set to 450, and impressions are below 450 (say 200), bids will be increased to reach higher impressions. If impressions exceed 450, no change occurs.
Third condition
Low Clicks Threshold (Increase Bid): This value sets the click threshold for bid increases. For example, if set to 5, and clicks over the evaluation period are fewer than 5 (say 3), bids will be increased to reach 5. If clicks are 7, no change occurs. This is to ensure you gather enough clicks to optimize your campaigns.
Fourth condition
Clicks Without Purchase (Decrease Bid): This automatically decreases bids when a number of clicks occur without any conversions. For example, if set to 10, and there are 10 clicks over the period but no purchases, bids are lowered to prevent wasteful ad spend. The period is based on the first condition, which is currently 3 days. So, if over 3 days, 10 clicks happen without purchases, bids will be decreased. This stops wasting budget on non-converting ads.
Fifth condition
Target Impressions Threshold (Decrease Bid): If set to '3000', then once impressions surpass 3,000 in 3 days, bidding is lowered to prevent overexposure and excessive costs. It sets a limit on impressions over the period, automatically adjusting bids downward if exceeded.
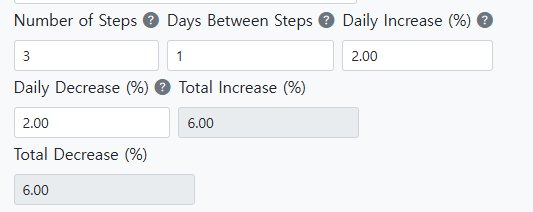
6. Conditions for Step Adjustment
- Number of Steps: a value like '3' indicates bid adjustments are made in three stages.
- Days Between Steps: entering '1' indicates daily adjustments.
- Daily Increase (%): sets the percentage increase per day.
- Daily Decrease (%): sets the percentage decrease per day.
- Total Increase (%): automatically calculated, indicating the maximum total bid increase possible.
- Total Decrease (%): also automatically calculated, indicating the maximum total bid decrease possible.
In short: based on this setup, bid adjustments are made in up to three steps, once each day over three days.
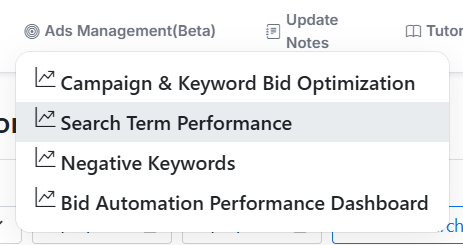
This covers the Settings menu for Ads. Once all the account settings are linked, the top nav menu of SellerVisor will show the Ads Management (Beta) feature activated, as pictured below.
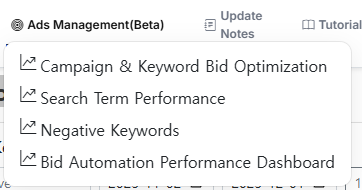
There are four menu items in this menu:
- Campaign & Keyword Bid Optimization
- Search Term Performance
- Negative Keywords
- Bid Automation Performance Dashboard
Next, I will explain these menus.
2. Campaign & Keyword Bid Optimization Dashboard
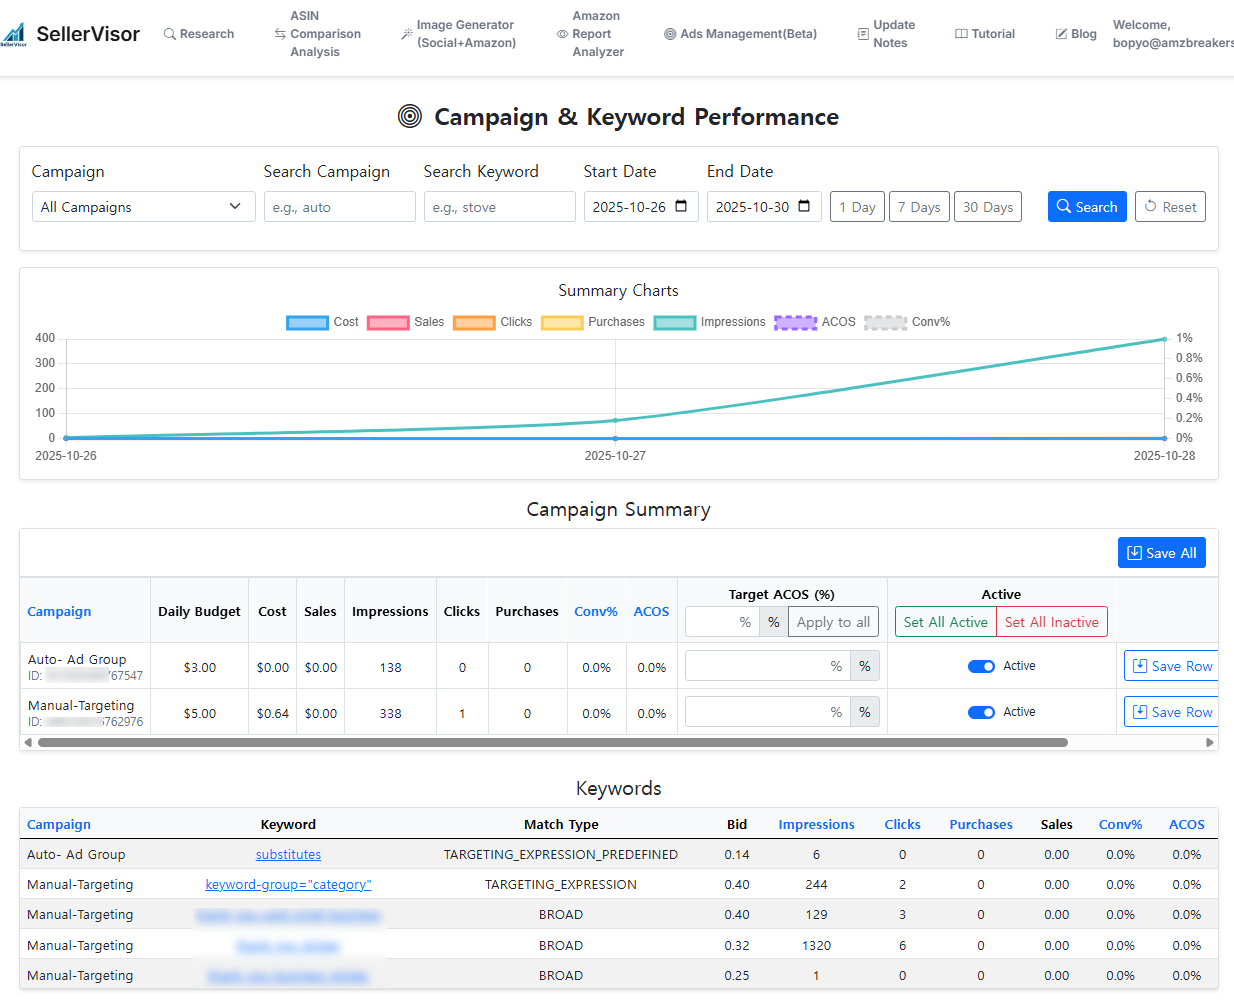
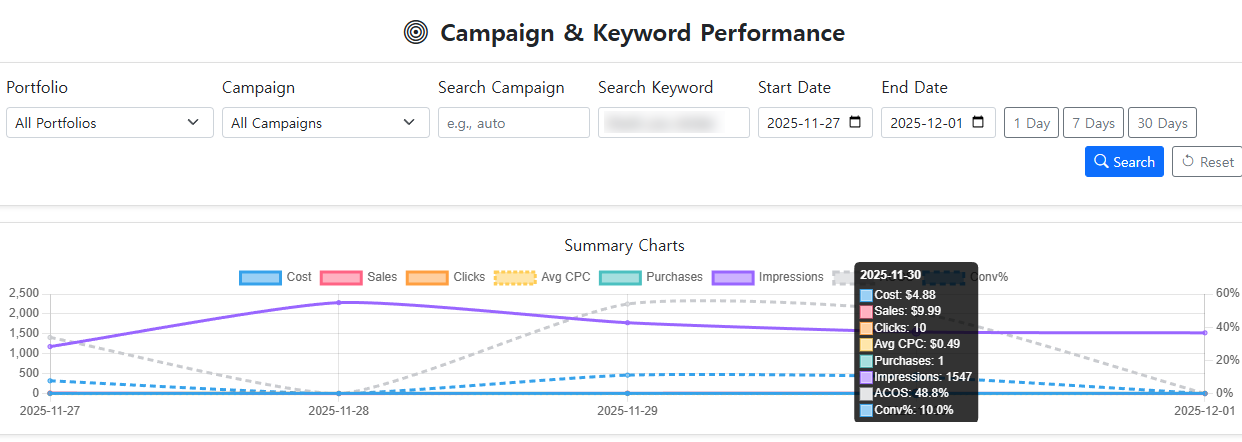
The first menu in Ads Management is 'Campaign & Keyword Bid Optimization.' This screen shows overall campaign performance, as you can see.
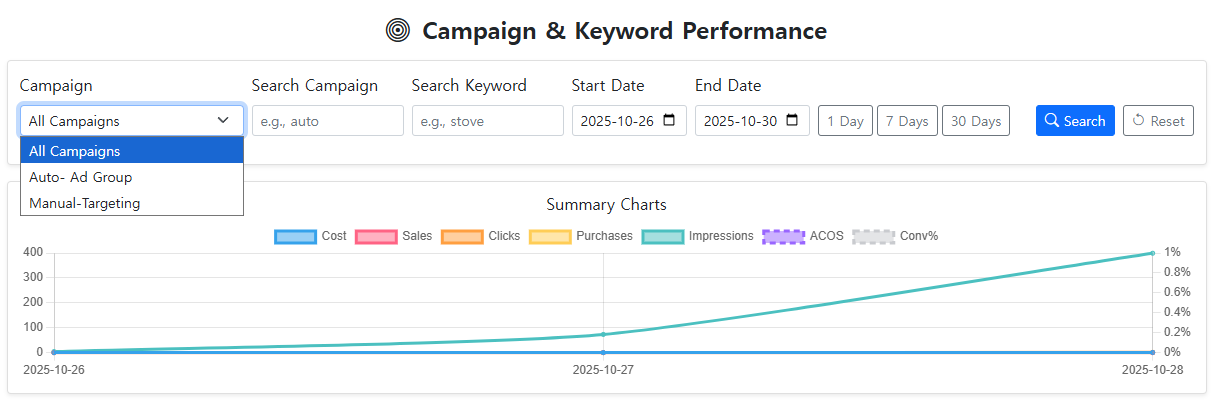
The graph in the center displays campaigns listed by name, synchronized with Seller Central data, including automatic, manual, and other campaigns. Selecting a specific campaign allows you to view detailed data.
You can search campaigns by name or keyword, and filter by start and end dates. Data can be viewed over 1 day, 7 days, or 30 days.
The graph below shows metrics like Cost, Sales, Clicks, Purchases, Impressions, ACOS, and Conversion rate, which can be toggled on and off by clicking. Refer to the image below.
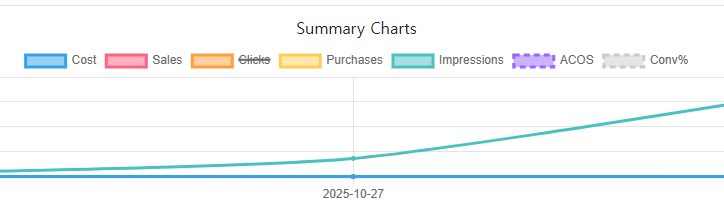
Clicking 'Clicks' will overlay or hide the clicks graph, helping you focus on relevant data.
You can also view keyword-specific performance graphs, making it easier to analyze efficiency by keywords.
Next, let’s look at the Campaign Summary at the bottom.
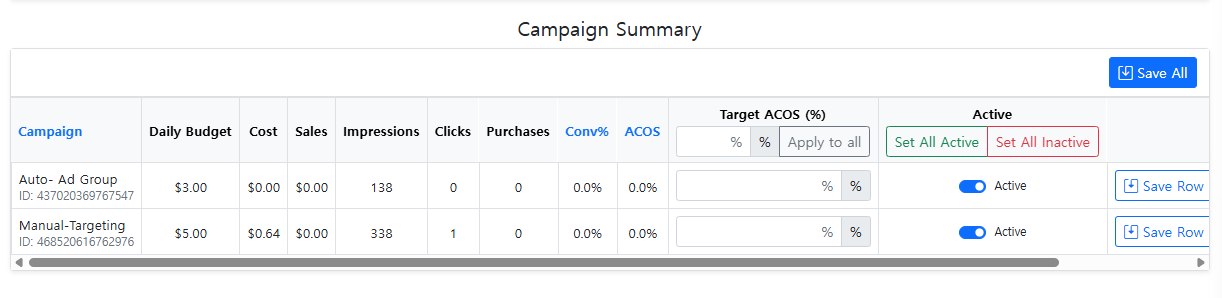
This section shows performance per campaign, with options to set Target ACOS and activate/deactivate automatic bid adjustments specific to each campaign. If automatic bidding is not desired for a campaign, simply deactivate it.

Below, the Keyword tab displays performance data by keywords. For auto campaigns, it shows targeting info; for manual campaigns, it shows specific keywords with match types, bid amounts, impressions, clicks, and other data.
Clicking on a keyword reveals its bid history, helping you understand how bids are adjusted over time.

This feature is very useful for Amazon sellers, allowing immediate insight into bid adjustments. That completes the Campaign & Keyword Bid Optimization overview. If you have questions, feel free to email me; the address is at the bottom of this page.
Now, let’s move on to the second menu, Search Term Performance.
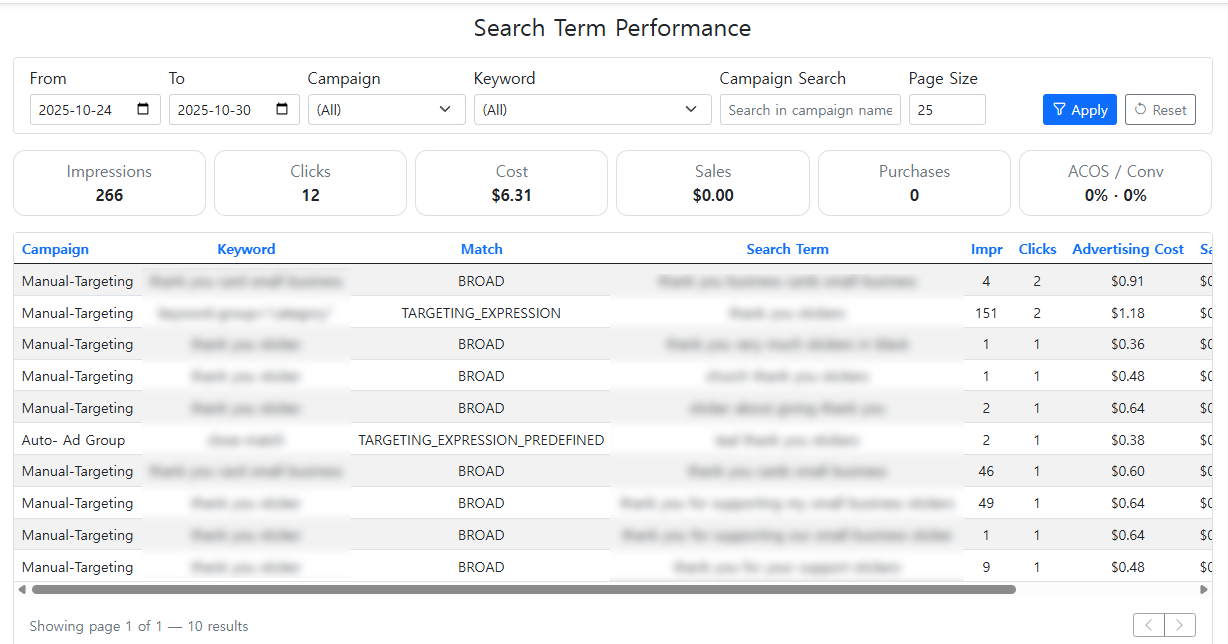
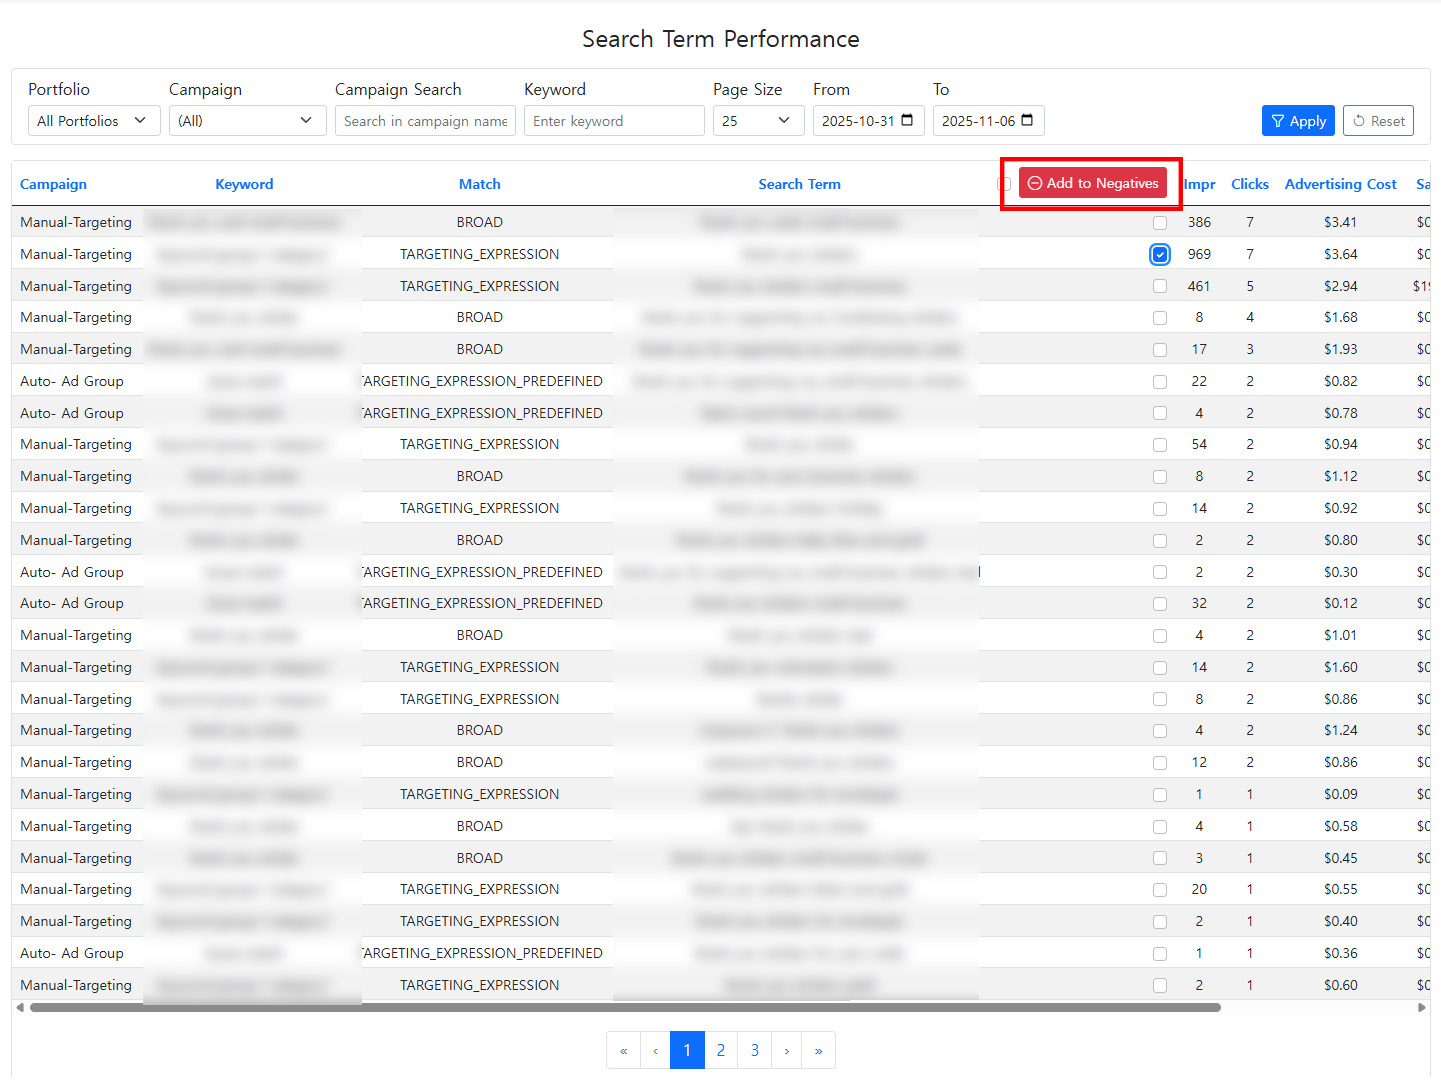
Search Term Performance is straightforward. It allows viewing search term reports for each campaign, making it easy to analyze wasted and efficient keywords at once, without toggling between campaign reports.
This helps identify negative keywords, optimizing your campaigns more effectively.

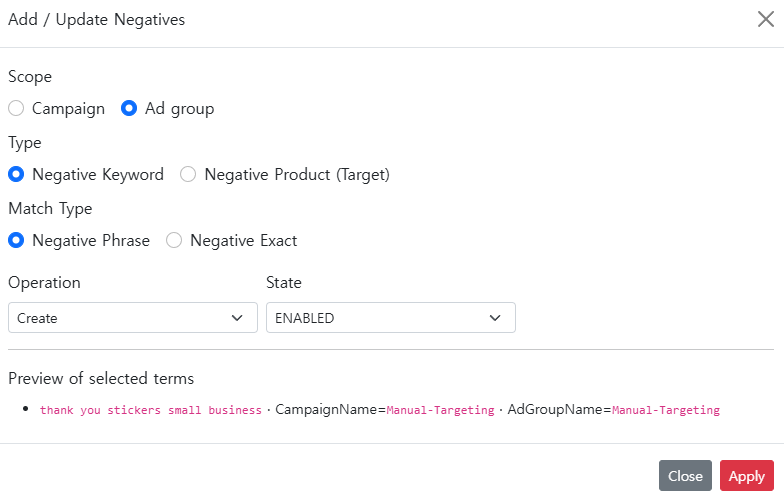
It allows selecting Exact or Phrase match types, and changes are applied directly to each campaign.
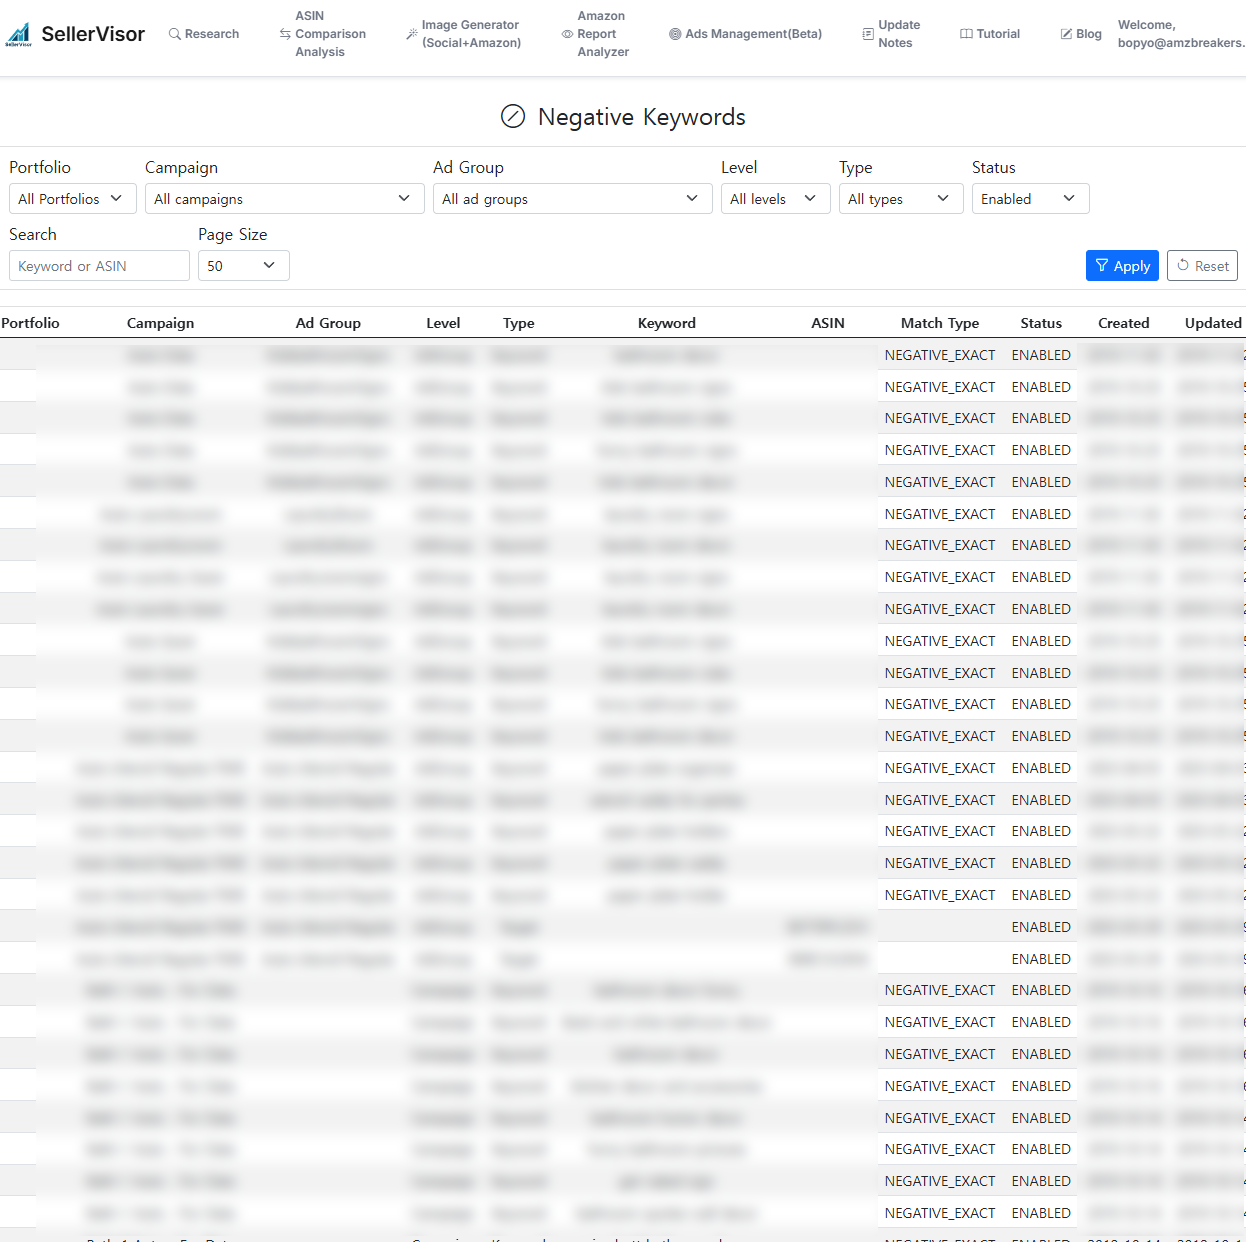
The added negative keywords can be gathered in the 'Negative Keyword Page', eliminating the need to browse individual campaigns.
All added negative keywords can be viewed in the 'Negative Keyword Page' for easy management, no need to navigate campaign by campaign anymore. Manage everything in SellerVisor.
Try it now.
- Go to SellerVisor's Ads Management (Beta) menu
- Click Search Term Performance
- Immediately add inefficient keywords as negatives
- Check the 'Negative Keyword Page' for all newly added negatives
3-1. How Amazon Sellers Can Use SellerVisor’s Search Term AI Chat for Optimization
What is the most concerning issue for Amazon sellers running ads? It’s when advertising costs are incurred but sales are not generated. If you’ve ever experienced this situation, please read to the end. I will guide you on how to optimize ads using SellerVisor's Search Term Performance AI Chat feature.
1. If you are a SellerVisor subscriber and have connected the ad API in setup, click the top menu Ads Management (Beta) > Search Term Performance.
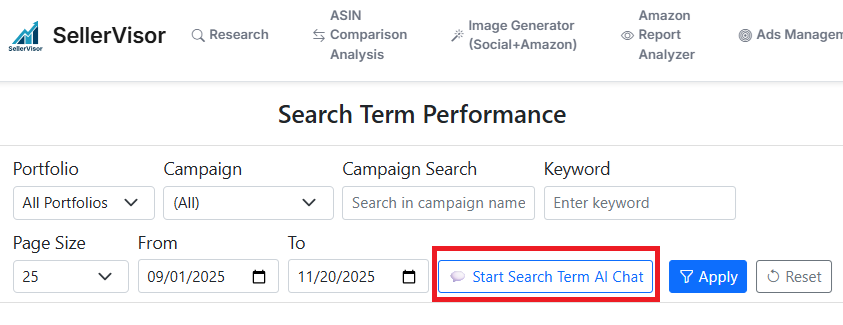
2. In Search Term Performance, select 'Start Search Term AI Chat' inside the red box.
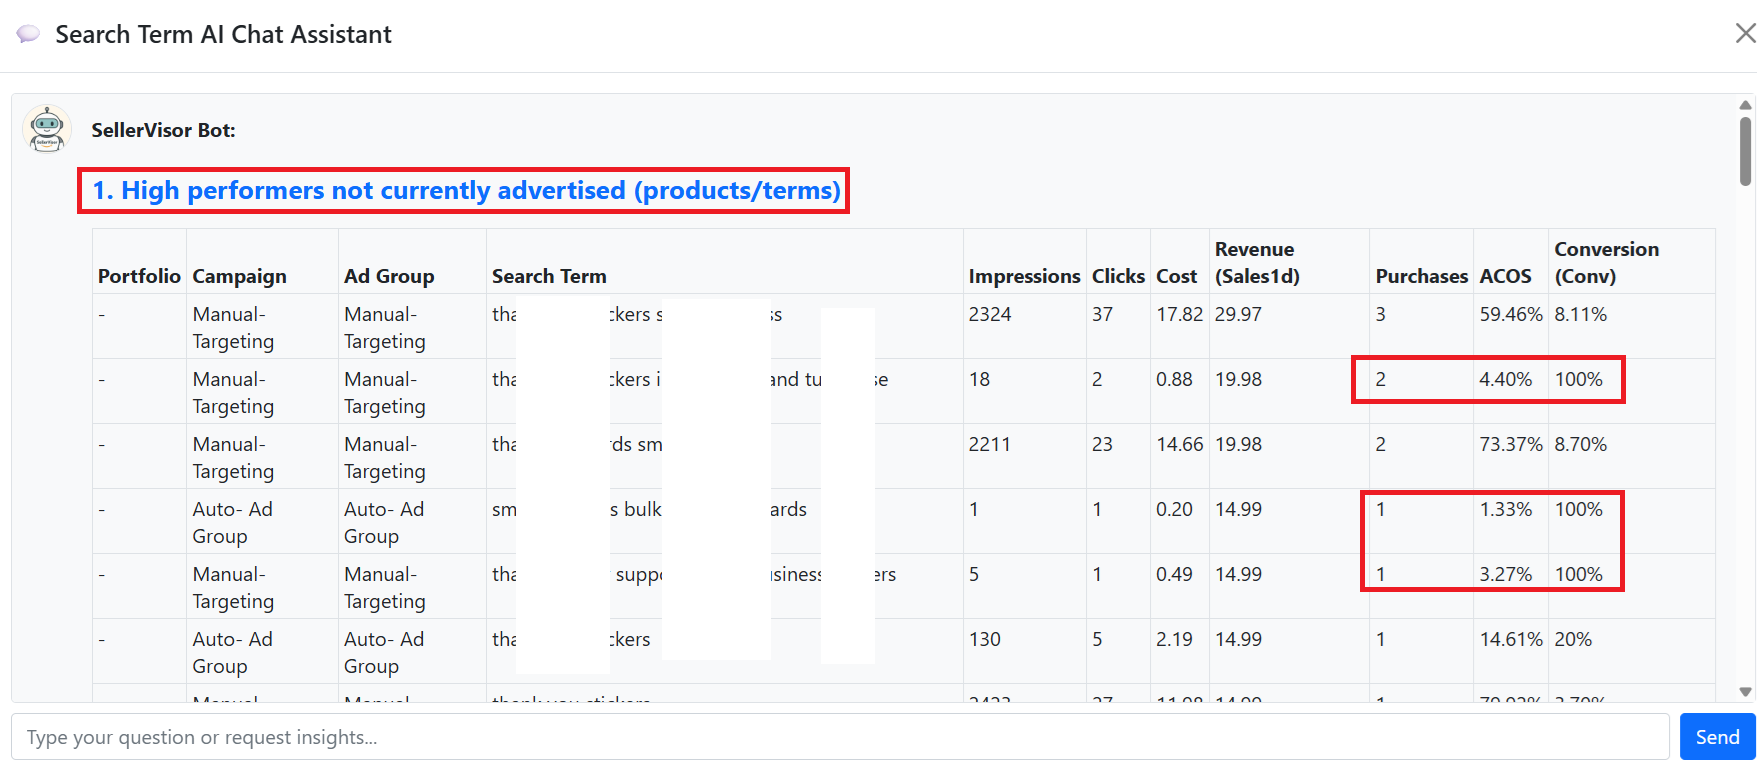
The 'High performers not currently advertised (products/terms)' section tells you which keywords are performing well with SellerVisor’s smart AI assistant. Previously, you had to click each campaign to check search terms, but now you can get this information instantly—saving time.
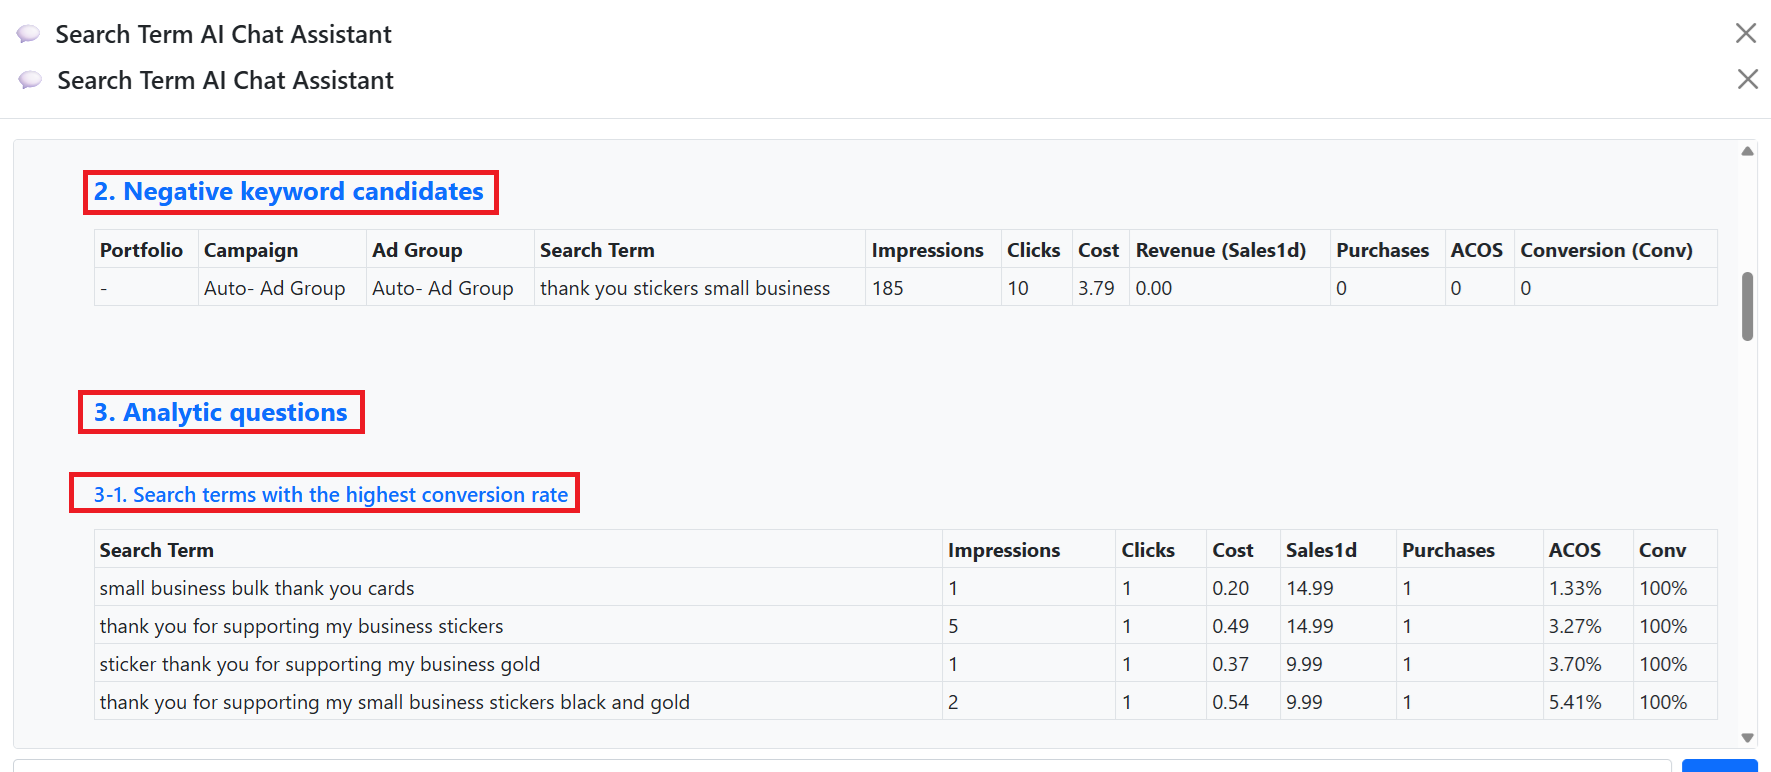
'Negative keyword candidates' section shows which keywords should be added as negatives. It simplifies the process of finding negatives, saving sellers a lot of time.
'Search terms with the highest conversion rate' directly shows which keywords have high purchase conversion rates. Quickly identify these golden keywords to set up and improve your campaigns.
'Search terms with zero purchases and the largest spend' shows keywords that incur costs but no sales, helping you consider negatives.
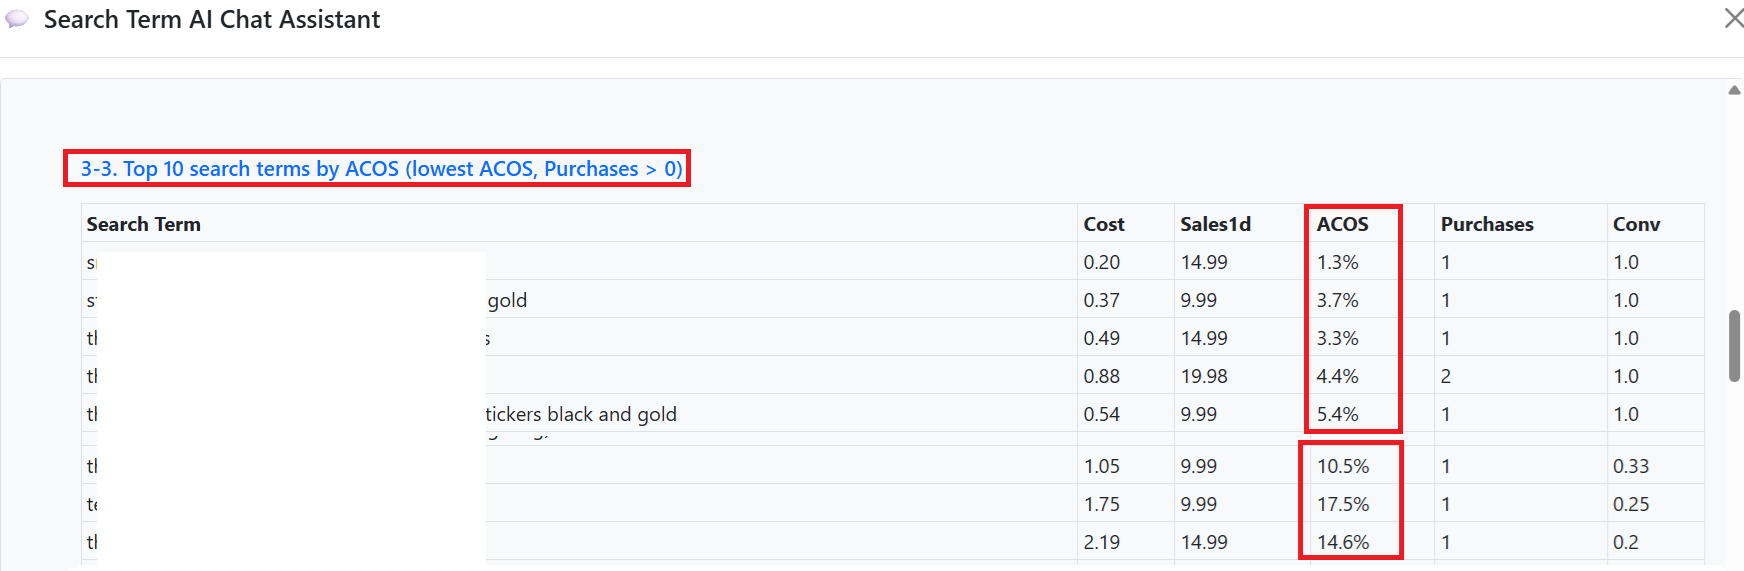
'Top 10 search terms by ACOS (lowest/highest efficiency excluding zero sales)' prioritizes the best-performing keywords, showing their ACOS percentages like 1.3%, 3.7%, etc., allowing quick assessment of efficiency.
Additionally, you can explore other areas for optimization:
Search terms with sharply higher CTR vs. previous period
- Keywords with significantly increased click-through rates
Search terms with significantly worse efficiency vs. previous period
- Keywords with decreased efficiency
Search terms with high impressions but very low clicks
- Keywords with many impressions but few clicks
Search terms newly appearing from 2025-09-01 to 2025-11-20 that generated purchases
- New high-potential keywords for that period
Negative keyword candidates to add now
- Recommended negatives
Manual campaign structure based on high-efficiency terms
- Campaigns built around high-ROAS keywords
Common traits of high-ROAS search terms
- Characteristics of successful keywords
Keywords expandable into new campaigns
- Keywords for potential campaign expansion
Keywords that need more budget based on current data
- Suggestions for budget increases
By utilizing SellerVisor’s Search Term AI Chat, you can save time, increase efficiency, and boost sales. Since this is a currently Beta feature, many users might not be aware of it. If you are reading this, check it out now via the link below.
https://www.sellervisor.com/AdsManagement/SearchTermPerformance
3-2. Bid value adjustment for Amazon Ads campaigns now possible with SellerVisor!
Now, adjusting your bid values in SellerVisor
will be immediately reflected in Amazon Ads.
will be immediately reflected in Amazon Ads.
We are excited to announce this new feature to all users.
- No need to toggle between Seller Central anymore
- Adjust bids immediately based on performance
- See how your adjustments directly impact ad performance instantly
This is not just about saving time—it fundamentally enhances ad efficiency.
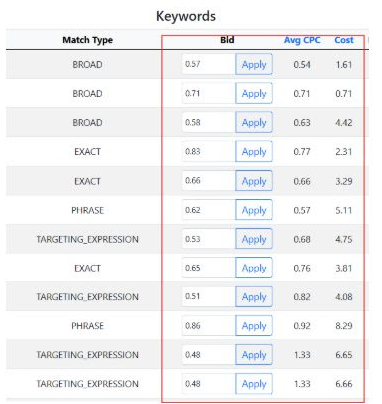
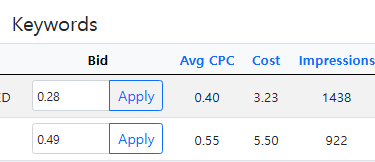
Go to Ads Management (Beta) in SellerVisor, then click Campaign & Keyword Bid Optimization. You can directly manage all campaign bid values here, without needing to go into Seller Central for each campaign. (See image below)
SellerVisor's bid adjustment feature
is not just about a more convenient UI.
Its true value lies in these two benefits:
Its true value lies in these two benefits:
Point 1. Eliminates Psychological Fatigue from Bid Management
Repeating the process of switching screens and manually adjusting bids
is eliminated, allowing sellers to focus on strategic decision-making.
This is much more than convenience—it removes the 'pain' of bid management.
is eliminated, allowing sellers to focus on strategic decision-making.
This is much more than convenience—it removes the 'pain' of bid management.
Point 2. Smarter Bidding, Faster Results
By adding Avg CPC + Cost data,
you can quickly review necessary information, adjust bids instantly, and immediately reflect changes in Amazon Ads.
This cycle builds a competitive advantage by improving ad efficiency faster than others.
you can quickly review necessary information, adjust bids instantly, and immediately reflect changes in Amazon Ads.
This cycle builds a competitive advantage by improving ad efficiency faster than others.
Adjusting bids without SellerVisor vs. Using SellerVisor
When you control bids with SellerVisor:
- Immediately prevents wasted ad spend
- Quickly reallocates budget to high-performing keywords
- Early stop of unnecessary CPC increases
Without SellerVisor:
- Delayed adjustments lead to unnecessary expenses
- Failure to boost high-performing keywords timely results in missed opportunities
The biggest loss in advertising is ‘Opportunity Cost’.
This loss is difficult to recover from.
This loss is difficult to recover from.
The bid adjustment feature in SellerVisor
is not just about making bid changes more easily, but also
is not just about making bid changes more easily, but also
- preventing ad spend leakage
- streamlining bid rhythms
- accelerating ad optimization speed
It is more like a strategic weapon.
Your Amazon ads
should now be managed through SellerVisor, not Seller Central.
should now be managed through SellerVisor, not Seller Central.
The fastest way to improve efficiency is
using ‘truly effective tools’.
using ‘truly effective tools’.
4. Bid Automation Performance Dashboard
Next, I will explain the final feature of Ads Management (Beta): Auto Bid Performance Dashboard.
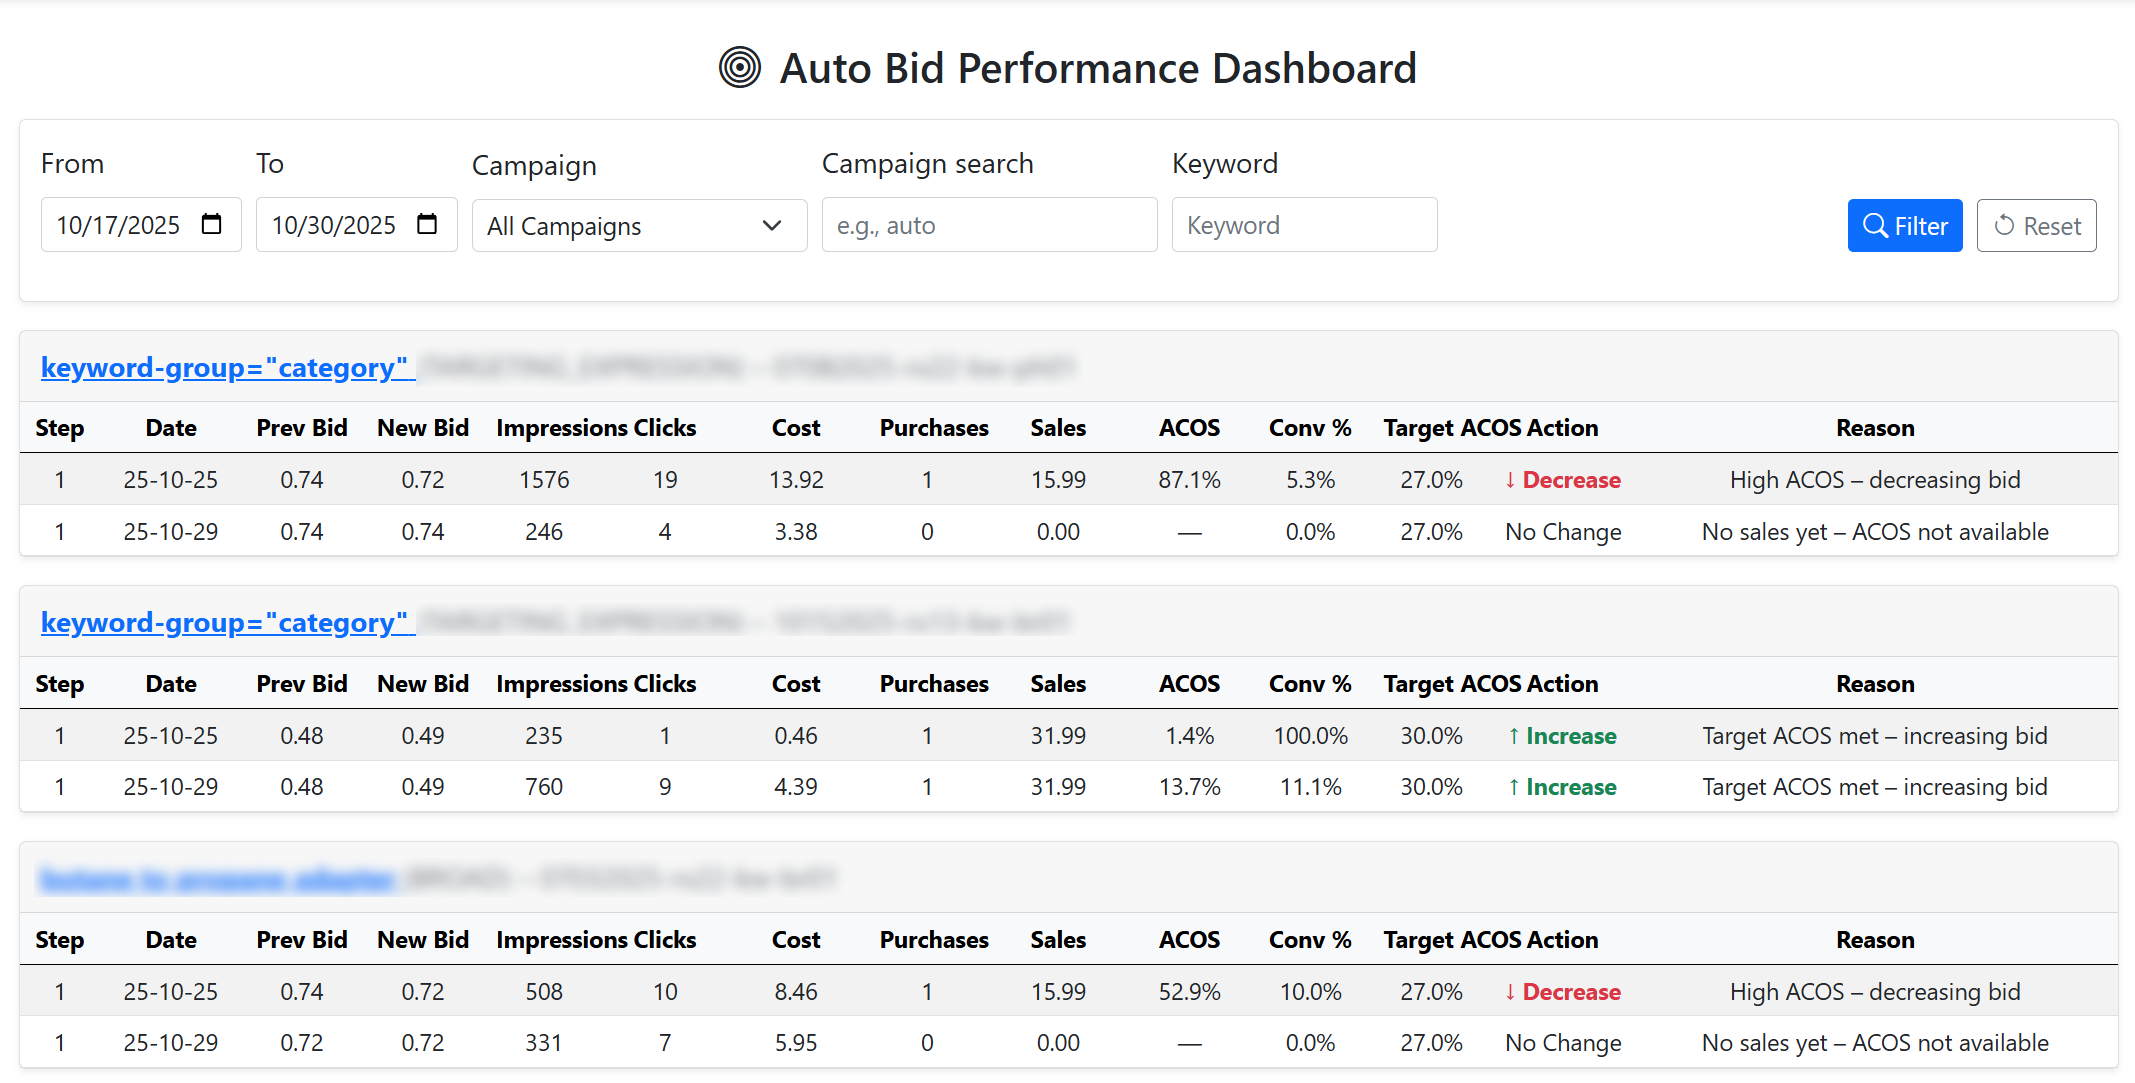
As shown in the screen above, you can quickly see how auto bid adjustments have been applied to each campaign, the reasons for bid increases or decreases, bid history, and whether conversions occurred. It’s a place where you can easily grasp the performance of auto bid adjustments at a glance.
In Conclusion
That concludes the explanation of SellerVisor’s Ads Management (Beta) features. These functions were developed by our team based on hands-on experience managing Amazon ads, aiming to automate only the necessary features and eliminate unnecessary ones. Although currently in beta, we look forward to continuous improvements and updates.
Feedback is always welcome. Please send your comments to the email below.
Thank you for reading this long message, and we sincerely appreciate your use of SellerVisor. Please try out the Ads Management features. Thank you.