
SellerVisor AI Video Workflow Part 2
For Amazon sellers, product images are no longer assets used only within the product detail page.
Product images are now ad creatives, social media content, short videos, and the starting point for videos that tell a brand story.
But in reality, it is not easy for small brands or solo sellers to shoot product videos every time.
You need to hire models, secure locations, and have filming equipment and lighting.
After shooting, it continues with editing, subtitles, music, and post-production.
After shooting, it continues with editing, subtitles, music, and post-production.
So at SellerVisor we have been continuously testing one workflow.
A method that creates a storyboard for ads from a single product photo, and based on that storyboard produces a 15-second vertical AI ad video.
In Part 1 we introduced a method that used ChatGPT to generate the storyboard first, and then produced the video based on that storyboard.
This Part 2 is a bit different.
This time the storyboard generation is done in SellerVisor, and the video production is also carried out in SellerVisor.
In other words, starting from a single product image
the flow from storyboard → video production continues entirely within SellerVisor.
the flow from storyboard → video production continues entirely within SellerVisor.

Watch the video above
Core of this workflow
This method is not simply “put in a product photo and make a video.”
If you do that, the AI video output is likely to be random.
The product’s size may become strange, the logo may change, the product name may be wrong, or you may get only pretty scenes without an ad flow.
So in this workflow we go through two steps.
Step 1. Generate a storyboard based on the product image in SellerVisor
Step 2. Generate a video in SellerVisor based on the product image + storyboard
Step 2. Generate a video in SellerVisor based on the product image + storyboard
The reason this workflow is important is simple.
The product image is the standard that fixes the product identity.
The storyboard is the standard that defines the scene composition and directorial direction of the video.
The storyboard is the standard that defines the scene composition and directorial direction of the video.
In other words, roles must be divided.
Product image = what to show
Storyboard = how to show it
Storyboard = how to show it
These two being separated makes AI video outputs much more stable.
Why is a storyboard needed first?
The most common mistake in AI video generation is this.
“Make a pretty ad video.”
If you only instruct like this, the video will look plausible but often with many product distortions and you can’t control the ad.
A good 15-second ad needs a short but clear flow.
A good 15-second ad needs a short but clear flow.
- A scene that grabs attention within the first 2 seconds
- A scene that shows what the product is
- Detail or usage scenes of the product
- Emotional satisfaction or lifestyle scene
- Final product hero cut and CTA
This flow is needed for the video to look like an “ad” rather than a simple collection of images.
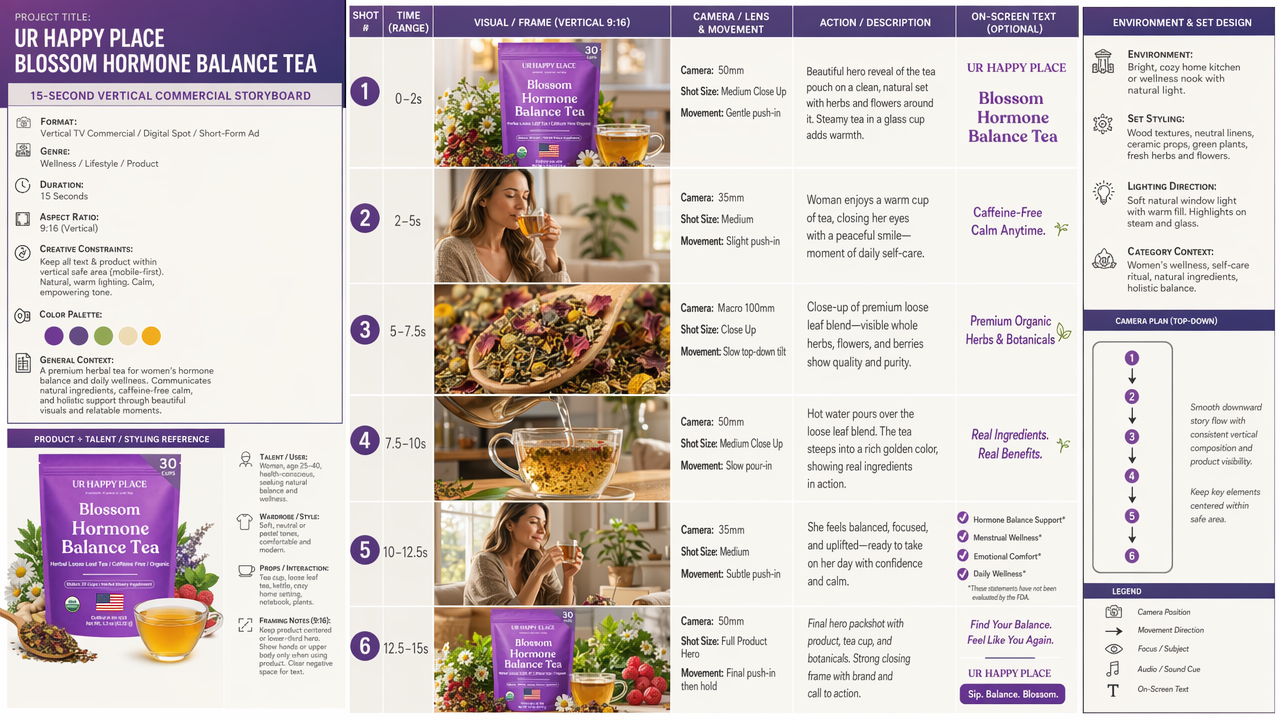
Therefore, SellerVisor first generates a 15-second vertical ad storyboard based on the product image.
And that storyboard is used as the standard for video generation in the second step.
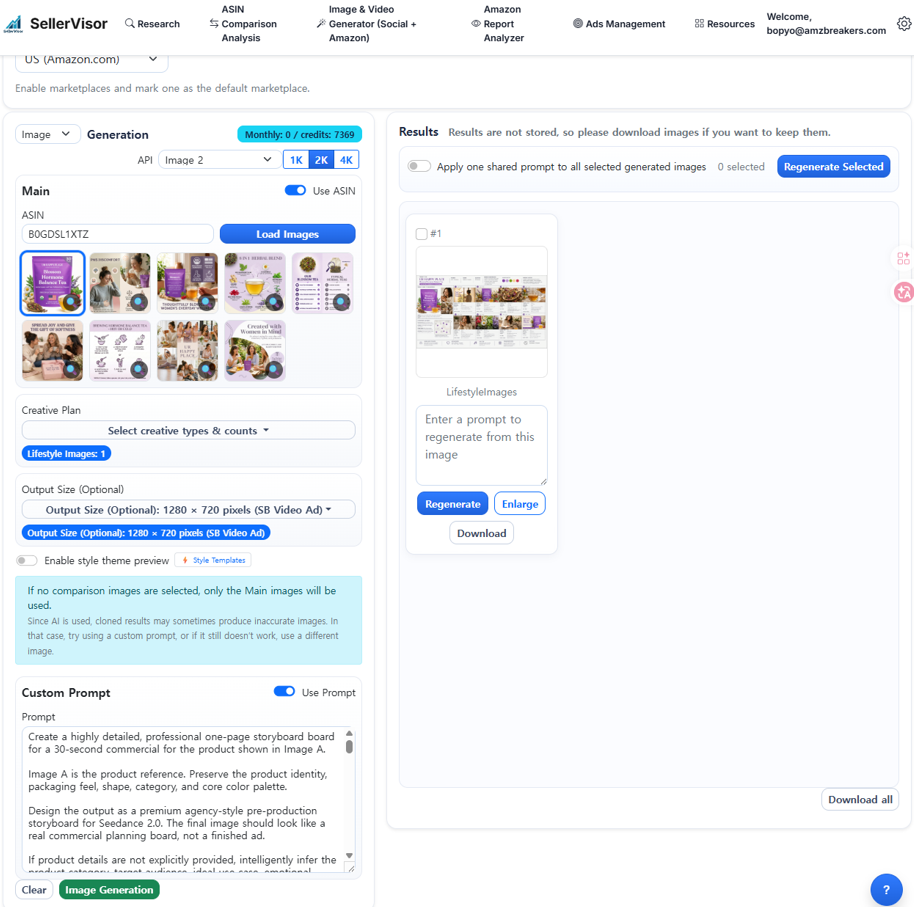
Step 1. Generate storyboard images in SellerVisor
First upload the product main image to SellerVisor or enter the ASIN
Then by using the prompt below, you can generate a 15-second vertical 9:16 ad storyboard suitable for the product.
This prompt is designed not just for a specific product but to be applicable across categories such as food, beauty, household goods, pet products, and tech products.
Storyboard image generation prompt
Create a highly detailed, professional one-page storyboard board for a 15-second vertical commercial for the product shown in Image A.
Image A is the product reference. Preserve the product identity, packaging appearance, product category, and overall visual character.
The output should look like a premium agency-style pre-production storyboard for Seedance 2.0, not a finished advertisement. Make it visually rich, highly informative, commercially persuasive, and easy to understand for AI video generation.
If product details are not explicitly provided, intelligently infer the product category, target audience, likely use case, emotional appeal, best ad angle, ideal environment, and most effective commercial style from Image A. Always choose the most premium, coherent, and commercially effective direction.
Use clean English text, highly legible typography, and a vertical 9:16 storyboard layout. The board should be optimized for mobile-first vertical commercial production.
Include these sections:
1. HEADER / PROJECT OVERVIEW
- Project Title
- Subtitle: 15-Second Vertical Commercial Storyboard
- Format: Vertical TV Commercial / Digital Spot / Short-Form Ad
- Genre
- Duration: 15 seconds
- Aspect Ratio: 9:16
- Creative Constraints
- Color Palette
- General Context
2. PRODUCT + TALENT / STYLING REFERENCE
- Product reference details
- Suitable talent or user persona if needed
- Wardrobe / accessories / props / interaction references
- If a model is not necessary, use product-interaction or hands-only references
- Vertical framing considerations for showing the product clearly in a 9:16 composition
3. ENVIRONMENT & SET DESIGN
- Primary filming environment(s)
- Set styling direction
- Lighting direction
- Category-appropriate context
- Top-down movement / camera plan with numbered positions and arrows
- Vertical-safe composition notes for product placement, talent placement, hands, props, and final hero shot
4. STORYBOARD PANEL SECTION
Create 6 storyboard frames. Each frame should include:
- shot number
- approximate time range
- frame visual
- camera / lens
- shot size
- camera movement
- action description
- optional voiceover or on-screen text
- mood or sound cue
Use a strong 15-second vertical ad sequence such as:
1. strong hero hook / product reveal
2. product introduction or user interaction
3. detail / feature / texture close-up
4. product-in-use moment
5. benefit, lifestyle, or emotional payoff
6. final packshot with tagline / CTA
Recommended 15-second timing:
- Shot 1: 0–2s — strong visual hook or product hero reveal
- Shot 2: 2–5s — product introduction or user interaction
- Shot 3: 5–7.5s — detail / feature / texture / ingredient / material close-up
- Shot 4: 7.5–10s — product-in-use moment
- Shot 5: 10–12.5s — lifestyle benefit or emotional payoff
- Shot 6: 12.5–15s — final hero packshot with tagline / CTA
Adapt the sequence if a different structure is better for the product.
5. SHORT SCRIPT / VOICEOVER SECTION
Include a concise 15-second script that matches the 6 storyboard frames.
The script should be short, natural, and commercially persuasive.
Include:
- voiceover suggestions if appropriate
- short on-screen text suggestions
- final CTA line
Keep the script suitable for a 15-second vertical ad.
6. LIGHTING / MOOD / STYLE NOTES
7. MOOD & KEYWORDS
8. AUDIO / TONE
9. CINEMATOGRAPHY NOTES
Adapt intelligently to the product type, such as food, beverage, beauty, skincare, supplements, wellness, household, fashion, accessories, pet, tech, or luxury products.
Requirements:
- premium creative agency presentation style
- real commercial planning aesthetic
- vertical 9:16 storyboard board
- clear grid structure and section dividers
- high information density
- concise but specific production notes
- highly legible English text
- mobile-first visual planning
- enough detail for Seedance 2.0 to understand visual flow, subject styling, scene design, shot progression, camera direction, pacing, and emotional tone
Vertical 9:16 Requirements:
- All storyboard frames should be composed for vertical video.
- Keep the product, talent, hands, face, key action, and on-screen text inside the vertical safe area.
- Avoid placing important product details too close to the edges.
- Use centered product hero shots, elegant vertical close-ups, clean negative space, and mobile-friendly framing.
- The final packshot should clearly display the product as the visual hero.
Optimization Priority:
1. Preserve product identity
2. Optimize for 15-second short-form commercial clarity
3. Maximize vertical 9:16 composition quality
4. Make the storyboard specific enough for AI video generation
5. Use the most persuasive premium ad logic
6. Keep the board clean, structured, and readable
Generate the strongest possible 15-second vertical 9:16 commercial storyboard for the product in Image A.
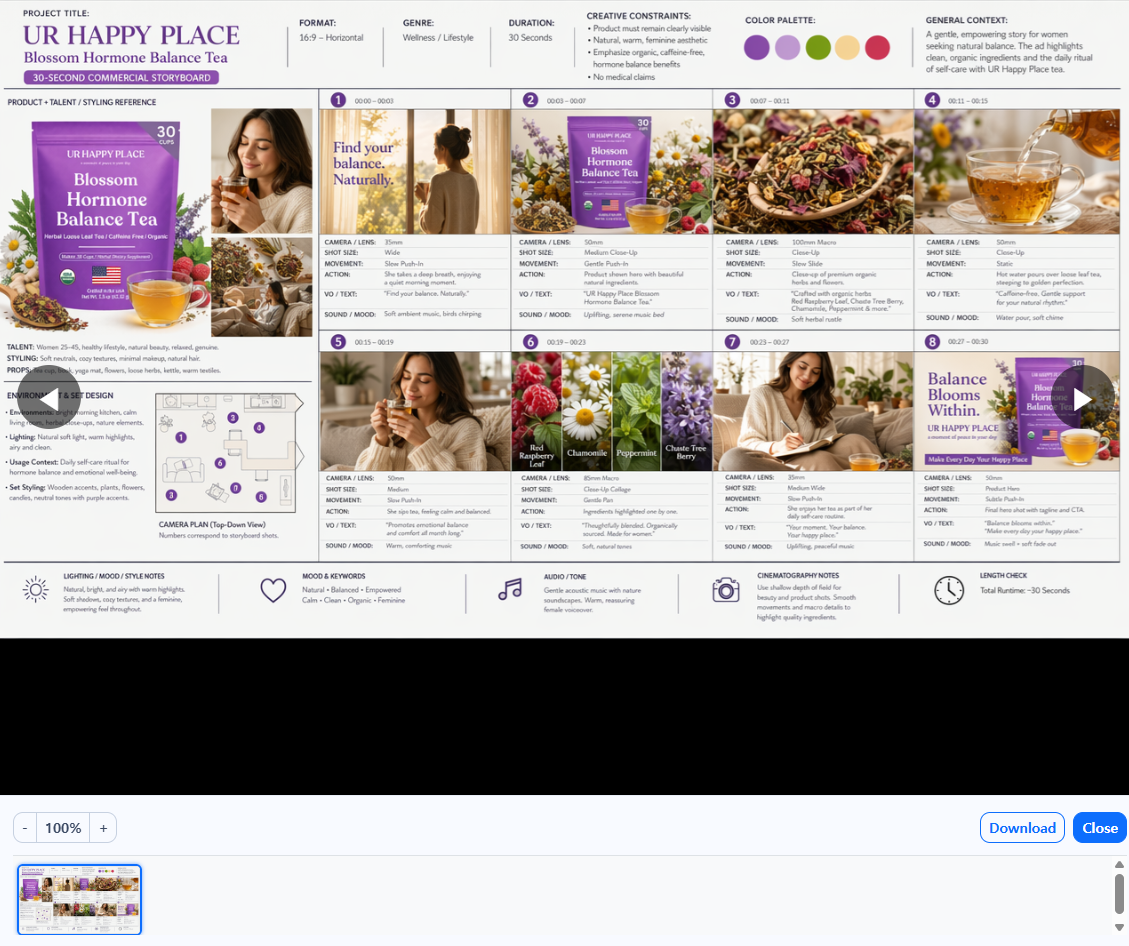
(It is recommended to select the infographic among the images generated by the above prompt and enter the prompt)
Key points of this storyboard prompt
There are four main important points in this prompt.
First, establish the 15-second ad structure.
For a 15-second video, 6 cuts are more appropriate than 8 cuts.
If you include too many scenes, the video may pass too quickly and the message can become blurred.
If you include too many scenes, the video may pass too quickly and the message can become blurred.
Therefore this prompt is designed to consist of 6 scenes.
Second, explicitly specify the 9:16 vertical composition.
YouTube Shorts, Instagram Reels, TikTok, Meta ads, etc. center on vertical video consumption.
Designing the storyboard in vertical format from the start prevents scenes from being cropped during later video production.
Designing the storyboard in vertical format from the start prevents scenes from being cropped during later video production.
Third, automatically infer the product category.
The ad flow should differ depending on whether the product is food, beauty, pet supplies, or a tech product.
This prompt is designed to infer the category, target audience, usage scenes, and emotional points from the product image.
Fourth, include production language that video generation models can understand.
Including camera lens, shot size, camera movement, lighting, sound, and emotional tone increases the likelihood that the video generation model will understand it not as a simple image but as a “shooting continuity”.
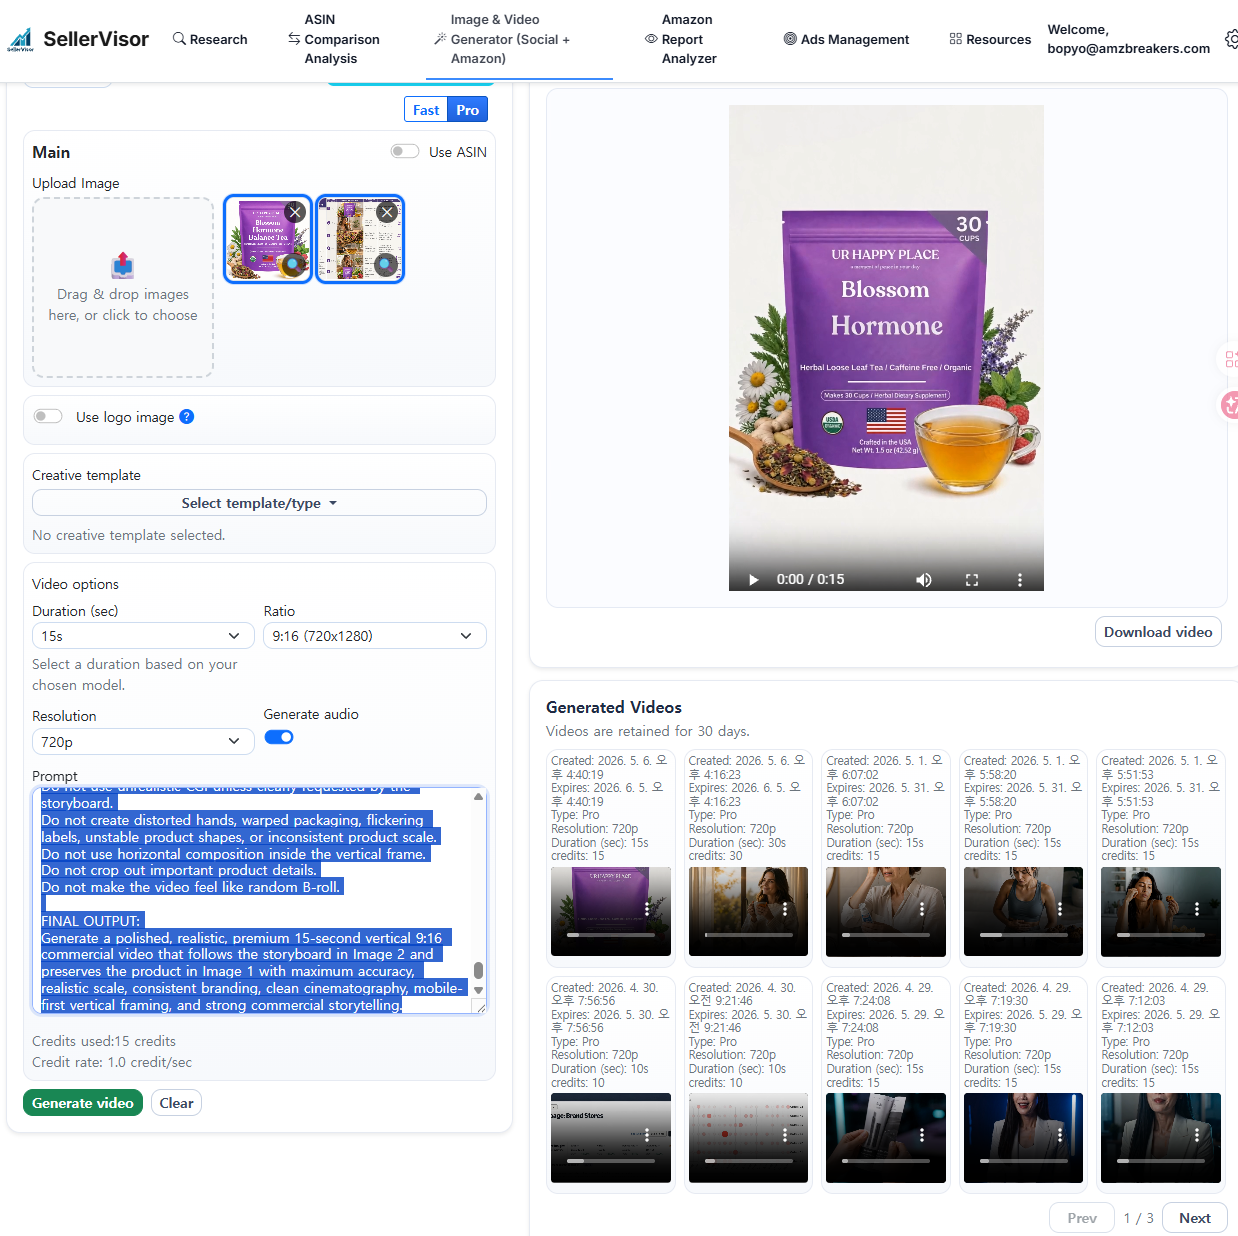
Step 2. Generate a storyboard-based video in SellerVisor
Once the storyboard images are created, proceed to the next step.
When generating a video in SellerVisor, use two images together.
Image 1 = main product image
Image 2 = storyboard image generated in SellerVisor
Image 2 = storyboard image generated in SellerVisor
The important point here is to clearly separate the roles of Image 1 and Image 2.
Image 1 serves as the reference to preserve product name, logo, package color, product form, and actual size.
Image 2 serves as the reference to direct scene order, camera flow, lighting, mood, and the final product cut.
Image 2 serves as the reference to direct scene order, camera flow, lighting, mood, and the final product cut.
In other words, during the SellerVisor video generation stage, instruct it like this.
Keep the product like Image 1, and make the video like Image 2's storyboard.
Create a high-quality 15-second vertical commercial video based on the two uploaded reference images.
VIDEO FORMAT:
- Duration: 15 seconds
- Aspect ratio: 9:16 vertical
- Style: premium TV commercial / high-end vertical digital ad
- Platform fit: mobile-first short-form commercial
INPUT IMAGE ROLE:
- Image 1 is the main product reference image.
- Image 2 is the storyboard reference image.
- Image 1 defines the exact product identity.
- Image 2 defines the creative direction, scene flow, shot order, visual style, camera movement, mood, lighting, pacing, and production plan.
Do not show Image 2 as a storyboard sheet inside the video.
Use Image 2 only as the creative and production guide for generating the final video.
CORE OBJECTIVE:
Generate a polished, cinematic, premium 15-second vertical commercial that follows the storyboard direction in Image 2 while preserving the product in Image 1 as accurately as possible.
If Image 2 was originally designed for a longer video or a horizontal format, intelligently condense the storyboard into the strongest possible 15-second 9:16 vertical commercial.
Keep the core commercial idea, key product moments, emotional flow, and final product hero shot, but simplify the sequence for short-form pacing.
PRODUCT ACCURACY — HIGHEST PRIORITY:
Treat the product in Image 1 as a locked visual reference.
Preserve the following from Image 1:
- product type
- product shape
- packaging structure
- packaging material
- main colors
- logo
- brand name
- product name
- label layout
- visible icons, badges, claims, and certifications
- size relationship compared to hands, props, furniture, and environment
- overall product identity
Do not redesign, reinterpret, rename, or replace the product.
Do not create a different brand.
Do not invent a new logo.
Do not alter the product name.
Do not change the packaging format.
Do not change the main product color.
Do not add fake certifications, fake badges, fake claims, or unrelated text.
Do not generate random unreadable text on the product label.
Do not make the product look like a different category.
PRODUCT SCALE REQUIREMENT:
The product must appear in a realistic physical size based on Image 1 and its product category.
When held in hands, placed on a table, placed near props, or shown in lifestyle scenes, the product scale must remain believable and consistent.
Do not make the product oversized.
Do not make the product too small.
Do not distort the product proportions.
Keep the product size consistent across all scenes.
VERTICAL 9:16 COMPOSITION REQUIREMENT:
Compose every shot for a vertical 9:16 frame.
Keep the product, hands, face, and important action inside the vertical safe area.
Avoid placing key product details too close to the edges.
Use vertical framing that feels intentional, premium, and mobile-first.
If the storyboard in Image 2 is horizontal, adapt the composition into vertical framing without losing the key story or product focus.
Use centered product hero shots, vertical close-ups, clean negative space, and mobile-friendly framing.
STORYBOARD FOLLOWING REQUIREMENT:
Use Image 2 as the primary storyboard guide.
Carefully follow:
- core shot sequence
- scene progression
- visual direction
- camera angles
- camera movement
- shot sizes
- environment design
- talent direction
- props
- lighting mood
- color palette
- audio direction
- on-screen text suggestions
- final hero product shot
If Image 2 includes more than 4–6 shots, compress the storyboard into a concise 15-second structure.
Prioritize:
1. strong opening product hook
2. product or user interaction
3. close-up feature/detail moment
4. product-in-use or emotional benefit moment
5. final hero packshot with clear product focus and CTA
If Image 2 contains written shot notes, camera notes, timecodes, or production directions, follow them as closely as possible.
If some text in Image 2 is not fully readable, infer the intended commercial flow from the storyboard visuals, layout, and sequence.
15-SECOND PACING:
Use fast but premium pacing.
The video should not feel rushed or chaotic.
Use approximately 4 to 6 clean shots across 15 seconds.
Each shot should be visually clear and easy to understand.
The first 2 seconds must create a strong visual hook.
The final 2 to 3 seconds must clearly show the product hero shot.
Recommended pacing:
- 0–2s: strong product or lifestyle hook
- 2–5s: product introduction or user interaction
- 5–8s: detail, feature, texture, ingredient, material, or benefit close-up
- 8–12s: product-in-use or emotional lifestyle payoff
- 12–15s: final product hero shot with clean CTA
COMMERCIAL STYLE:
Create a premium, realistic, cinematic commercial.
The video should look like a professional TV commercial or high-end digital advertisement.
Use smooth camera movement, clean composition, polished lighting, realistic environments, and natural human performance when people are shown.
The visual style should match the product category and the storyboard direction.
Do not use cartoon, anime, toy-like CGI, cheap stock-video style, or unrealistic fantasy effects unless the storyboard clearly requires it.
SCENE AND CHARACTER CONSISTENCY:
If the storyboard includes a human model, keep the same general model appearance consistent across shots.
Maintain consistent wardrobe, hair, lighting, and environment unless the storyboard shows a scene change.
Human movement should be natural, realistic, and commercially polished.
Hands and product interaction should look realistic.
Avoid distorted hands, unnatural gestures, flickering faces, or inconsistent character identity.
PRODUCT VISIBILITY:
The product should appear clearly in key product moments according to the storyboard.
For product hero shots, the product should be sharp, centered, and visually accurate.
For lifestyle shots, the product should remain recognizable and consistent.
For final packshot scenes, prioritize product accuracy, clean composition, realistic scale, and label readability.
TEXT AND LOGO CONTROL:
Use on-screen text only if the storyboard suggests it or if it supports the commercial clearly.
Keep all on-screen text minimal, clean, short, and professionally typeset for 9:16 vertical video.
Use no more than 1 short text line per scene unless the storyboard clearly requires more.
Do not create misspelled product names.
Do not create random marketing claims.
Do not alter or rewrite text that appears on the product packaging.
If label text cannot be perfectly preserved, keep the product visually accurate and avoid long close-up shots that expose distorted text.
CAMERA AND EDITING:
Follow the camera plan from Image 2, adapted for 9:16 vertical framing.
Use professional commercial camera language:
- slow push-ins
- smooth dolly movement
- clean tracking shots
- elegant close-ups
- macro detail shots if appropriate
- vertical lifestyle framing
- final product hero shot
Transitions should feel smooth, premium, and intentional.
The pacing should match a 15-second short-form commercial.
The video should feel like one cohesive commercial, not disconnected random clips.
LIGHTING AND COLOR:
Follow the color palette and lighting mood from Image 2.
Also respect the product’s original color palette from Image 1.
Use polished commercial color grading.
Keep lighting realistic and premium.
Avoid overexposure, harsh shadows, color shifts, or changes that make the product look inaccurate.
AUDIO:
If audio is generated, follow the audio/tone direction from Image 2.
Use music and sound design appropriate for the product category and commercial style.
Sound should feel premium, clean, and emotionally aligned with the storyboard.
If voiceover is used, make it natural, clear, concise, and suitable for a 15-second commercial.
Do not add exaggerated or aggressive audio unless the storyboard requires it.
VOICEOVER / SCRIPT TIMING:
If the video includes voiceover, keep it short enough for 15 seconds.
Use only 1 to 3 concise voiceover lines.
The voiceover should support the storyboard, not explain everything.
Prioritize emotion, product experience, and a clear final CTA.
CLAIM AND COMPLIANCE SAFETY:
Do not make unsupported claims.
Do not add medical, legal, financial, safety, or performance claims unless they are clearly shown on the product image or storyboard.
Do not say the product cures, treats, prevents, diagnoses, guarantees, or permanently solves anything unless that exact claim is clearly part of the provided reference and is compliant.
When uncertain, focus on lifestyle, use case, product experience, quality cues, convenience, emotional benefit, and visual storytelling.
NEGATIVE INSTRUCTIONS:
Do not show the storyboard board itself.
Do not ignore the storyboard.
Do not create a new video concept unrelated to Image 2.
Do not change the product identity from Image 1.
Do not change the logo.
Do not change the product name.
Do not change the packaging type.
Do not change the product color.
Do not add fake text to the package.
Do not make the product scale unrealistic.
Do not create multiple inconsistent product versions.
Do not introduce unrelated products.
Do not use unrealistic CGI unless clearly requested by the storyboard.
Do not create distorted hands, warped packaging, flickering labels, unstable product shapes, or inconsistent product scale.
Do not use horizontal composition inside the vertical frame.
Do not crop out important product details.
Do not make the video feel like random B-roll.
FINAL OUTPUT:
Generate a polished, realistic, premium 15-second vertical 9:16 commercial video that follows the storyboard in Image 2 and preserves the product in Image 1 with maximum accuracy, realistic scale, consistent branding, clean cinematography, mobile-first vertical framing, and strong commercial storytelling.
Advantages of this approach
The core advantage of this second workflow is that the entire process continues within SellerVisor.
Previously, the flow was to create a storyboard in ChatGPT and then move to a separate video generation tool.
But this approach is different.
Upload the product image to SellerVisor
Create the ad storyboard in SellerVisor
Generate the video based on that storyboard in SellerVisor.
Create the ad storyboard in SellerVisor
Generate the video based on that storyboard in SellerVisor.
This makes the workflow much simpler for sellers.
Why does this matter to Amazon sellers?
Amazon sellers are people who sell products, but they also need to continuously produce content.
They need product detail images, social posts, ad creatives, and short videos.
The importance of video content increases even more when considering external traffic.
However, shooting every product is practically difficult.
Here, SellerVisor's AI video workflow can become an experimentation tool for sellers.
Rather than replacing a finished TV commercial in one go,
it is closer to a tool to quickly test ad concepts and create multiple versions of product videos.
it is closer to a tool to quickly test ad concepts and create multiple versions of product videos.
For example, these tests are possible.
- Product hero-cut-focused ad
- Usage scene-focused ad
- Ingredient or material-focused ad
- Lifestyle-focused ad
- Problem-solving ad showing before-and-after context
- Premium ad emphasizing brand sentiment
Previously, conducting these tests required shooting costs.
Now you can start from a single product image and quickly create multiple video concepts.
Practical cautions
However, AI video generation is not perfect yet.
There are parts that must be reviewed, especially in product advertising.
First, is the product name accurate?
AI video models sometimes fail to perfectly preserve the text on product labels.
AI video models sometimes fail to perfectly preserve the text on product labels.
Second, has the logo been altered?
If the brand logo changes even slightly, it's hard to use as actual ad creative.
If the brand logo changes even slightly, it's hard to use as actual ad creative.
Third, is the product size consistent with reality?
If the product looks too big or too small when held, trustworthiness decreases.
If the product looks too big or too small when held, trustworthiness decreases.
Fourth, are the package color and shape preserved?
AI can sometimes change the product into a bottle, box, pouch, or other form.
AI can sometimes change the product into a bottle, box, pouch, or other form.
Fifth, are the ad claims exaggerated or potentially policy-violating?
Be especially careful with efficacy expressions in health supplements, beauty, and supplement categories.
Be especially careful with efficacy expressions in health supplements, beauty, and supplement categories.
Therefore, AI-generated videos should not be used as ads immediately; a human must perform final review.
This is also why we strongly include product name, logo, packaging, actual size, and false-claim prevention in the prompts.
Recommended usage in SellerVisor
This workflow is best carried out in the following order.
- Prepare the main product image.
- Generate a 15-second vertical ad storyboard in SellerVisor.
- Review the generated storyboard and check whether the scene flow matches the product.
- Upload the product image and storyboard images together in SellerVisor and generate the video.
- Inspect the finished video for product name, logo, packaging, product size, and ad copy.
- If needed, supplement the final end card with a separate product image.
The final 2–3 seconds of the product hero cut are especially important.
If AI cannot perfectly preserve the product label, it's a good idea to edit and attach a separate high-quality product image for the final end card.
Conclusion
The core of this second installment is simple.
Create the storyboard in SellerVisor, and create the video in SellerVisor.
Last time we used ChatGPT to create the storyboard.
This time we brought that process into SellerVisor.
This time we brought that process into SellerVisor.
This difference is not small.
For Amazon sellers, it's much more practical to have a flow that centers on a single product image and moves through ad concept to video, rather than switching between many tools.
AI video is not perfect yet.
But if you fix identity based on the product image, structure the video flow with a storyboard, and have a human perform final review, the usability increases significantly.
SellerVisor will continue to improve this workflow so Amazon sellers can create product content faster and test more ad concepts.
Creating ad videos starting from one product photo.
This is no longer just a simple experiment; it is becoming a content production method that sellers can actually test.