本页面将向您介绍SellerVisor的广告管理功能的使用方法。
这是2025年10月30日(2025年)更新的功能,作为亚马逊卖家的广告进行更高效管理的能力,现以测试版形式推出。
我将指导您逐步设置的方法,请务必确认后再使用该功能。
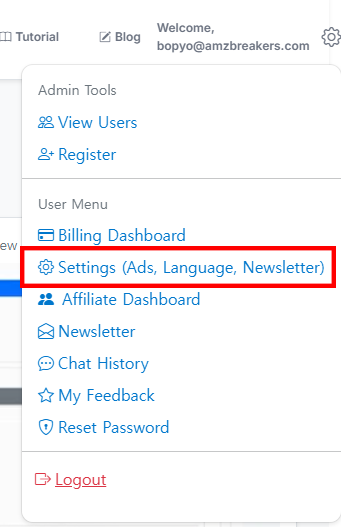
1. 访问SellerVisor并登录账号。登录后,在右上角点击齿轮图标,选择上图中显示的设置(Settings)菜单。(红色框内的菜单)
注意事项:此功能仅在注册并订阅SellerVisor后才可使用广告功能。首次订阅可享受14天免费试用期,在此期间可以使用广告功能。请注册订阅后再进行使用。
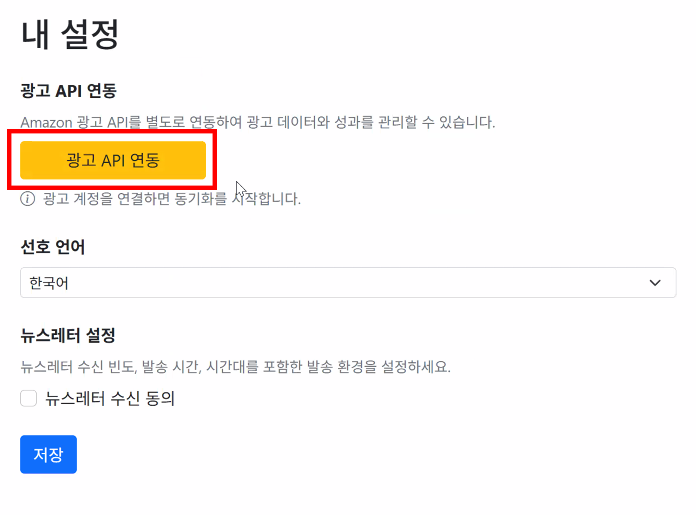
2. 选择设置菜单后,会出现如图所示的界面。需要连接广告API。点击黄色按钮“광고 API 연동”。此时会跳转到亚马逊广告控制中心登录界面,便于快捷连接。完成连接。

3. 成功连接亚马逊广告API后,界面会显示“Connected”,下方显示“Preparing your first sync... this may take a while”。由于连接亚马逊广告数据需要时间,您需等待。首次连接可能需要几小时至最多10小时内完成。
*注意事项:只有在亚马逊广告数据连接完成后,才能使用SellerVisor的广告管理功能。
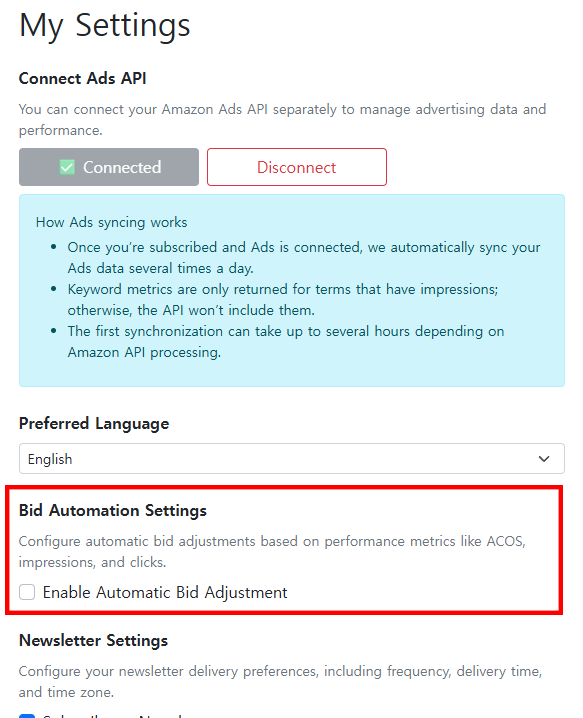
4. 连接成功后,下方会显示“Bid Automation Settings”菜单,并可勾选“Enable Automatic Bid Adjustment”。请勾选以启用此功能,才能使用相关功能。启用后界面如下所示,虽然看起来复杂,但实际上非常简单。请务必完成全部操作。
以下逐个介绍这些选项的具体内容。
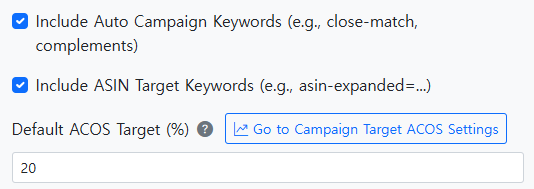
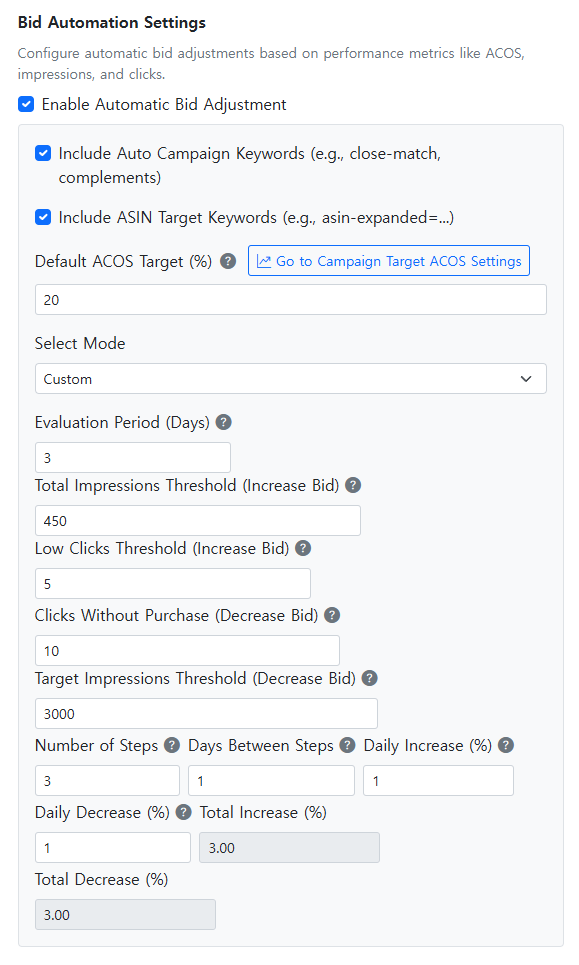
4-1) Include Auto Campaign Keywords(例如,close-match, complements)选项,确认是否将自动广告关键词包含在自动出价调节中。选中即代表自动广告也会被自动调节。建议运营自动广告的用户勾选此项。
4-2) Include ASIN Target Keywords(例如,asin-expanded=...)选项,确认是否包含产品目标广告。若运营此类广告,建议勾选此项。
4-3) 默认ACOS目标(%)设置,调整整体广告的目标ACOS百分比。比如输入“20”,系统会自动调节,将整体广告的ACOS控制在20%。
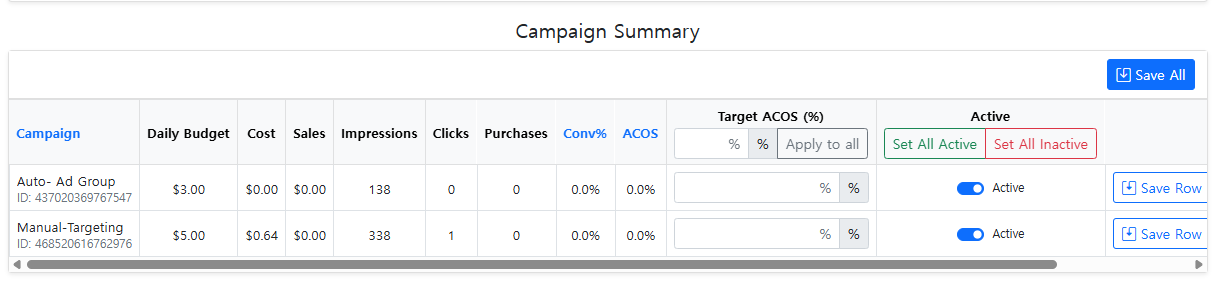
如果想为不同的广告系列设置不同的目标ACOS,可以点击“Go to Campaign Target ACOS Settings”。在此界面可以为每个广告系列单独设置ACOS目标,请参考下图操作。
注意事项:若“Go to Campaign Target ACOS Settings”未显示,表示广告数据尚未完全同步,或没有运营任何广告系列。
返回设置界面,接下来介绍剩余的设置。从“Select Mode”开始说明。
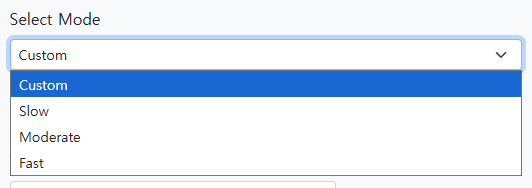
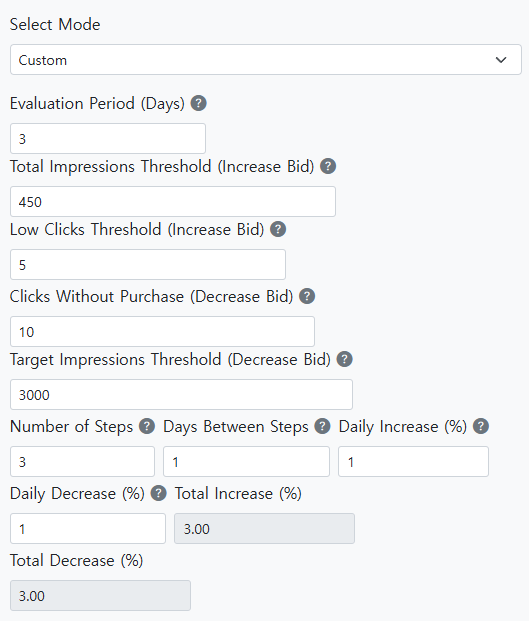
4-4)“Select Mode”用于设置“Bid Automation”功能的周期。提供“Slow”、“Moderate”、“Fast”三种模式,不同模式有不同的默认值。例如选择“Moderate”,界面显示如下:
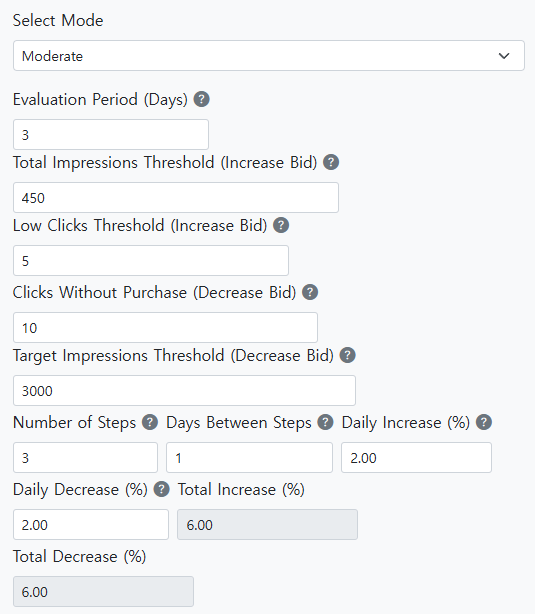
以下为参数说明。若已跟随至此,差不多都掌握了。接下来介绍根据不同条件的设置思路。理解为“按条件设计设置”。
第一组条件
Evaluation Period (Days): 这是最基本的条件,目前设为“3”。代表以过去3天的数据作为标准。例如,输入曝光量“450”,代表在评估期间内曝光量低于450时会增加出价,达到450后不再变化;如果超过450则说明已满足条件。450的“评估周期”即是前述“Evaluation Period (Days)”设定的天数。理解正确吗?
第二组条件
Total Impressions Threshold (Increase Bid): 该条件代表曝光量阈值。例如,输入“450”,在评估周期内曝光量少于450时会提升出价,增加曝光;若超过,则无变化。
第三组条件
Low Clicks Threshold (Increase Bid): 输入“5”代表点击数少于5次时会提高出价。假设评估周期为3天,若点击少于5次(比如3次),则提升出价;若超过,则不调整。这就是设置希望获得的最小点击数目标。
第四组条件
Clicks Without Purchase (Decrease Bid): 输入“10”,代表在评估周期内发生10次点击但没有购买时,会降低出价。以评估周期为3天为例,若10次点击后未有购买,则调低出价以节省广告支出。这有助于避免点击多但无效的浪费。
第五组条件
Target Impressions Threshold (Decrease Bid): 输入“3000”代表在3天内曝光量超过3000时,会降低出价,因为此时曝光过多,可能导致广告浪费。设置曝光上限,调节出价确保不过度曝光,系统自动调节,使用方便。
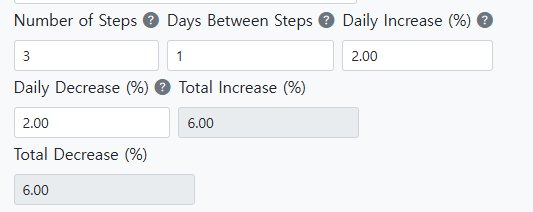
第六组条件
- Steps 数量:输入“3”代表共进行3个周期的自动调节。
- Days Between Steps:输入“1”代表每天执行一次调节。
- Daily Increase (%):设置每日提升的百分比,控制调节幅度。
- Daily Decrease (%):设置每日降低的百分比。
- Total Increase (%):自动计算的最高调高幅度。
- Total Decrease (%):自动计算的最大调低幅度。
举例:根据上述设定,系统会在3天内每隔一天调整一次出价。逐步调节,操作简便。
到此为止,Settings菜单中的广告部分介绍完毕。设置完成后,账号全部同步,SellerVisor顶部导航会显示“Ads Management(Beta)”功能。请参考下图:
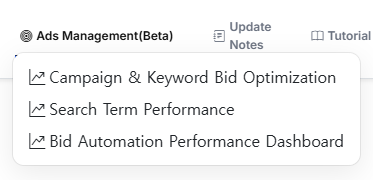
菜单上共有3个选项:
Campaign & Keyword Bid Optimization
Search Term Performance
Bid Automation Performance Dashboard
接下来介绍这几个菜单。
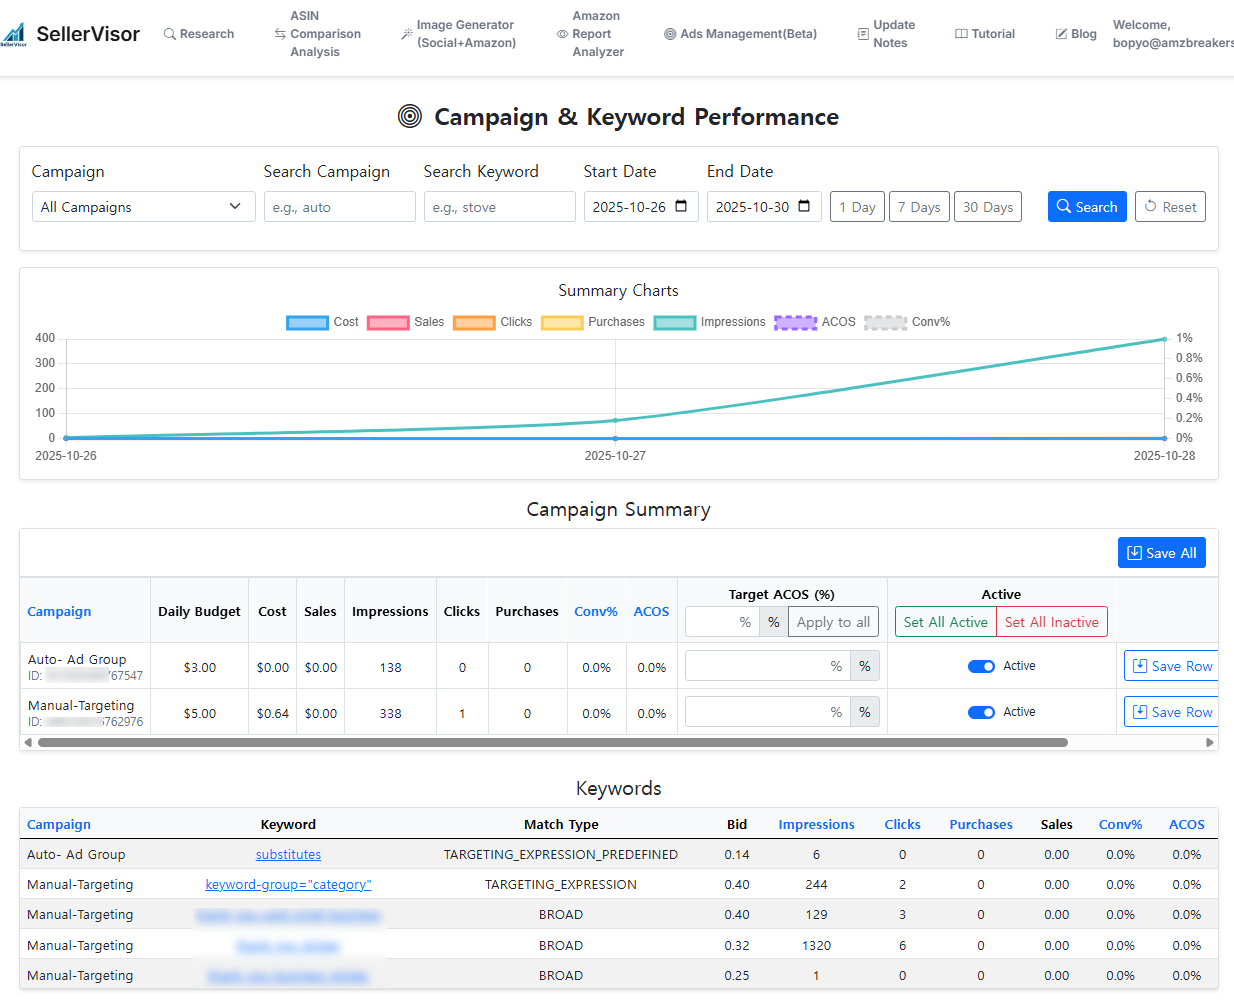
“Ads Management”中的第一个菜单是“Campaign & Keyword Bid Optimization”,在此界面可以查看整体广告表现。界面如下:
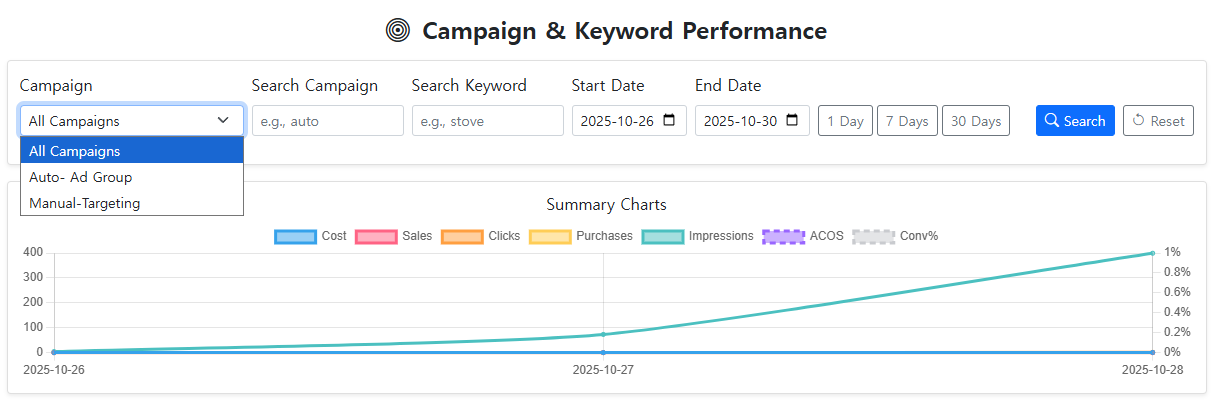
上方的图表区域,通过选择“Campaign”可以显示亚马逊广告中绑定的广告系列名称,“自动广告”、“手动广告”等,联动亚马逊后台数据。选择特定广告系列即可查看详细数据。
“Search Campaign”可以搜索特定广告系列,“Search Keyword”功能强大,可搜索关键词,比如“wooden trays”,帮助确认该关键词在哪些广告系列中投放。还可以按起止日期过滤数据,显示1天、7天、30天的数据走势。
底部图表显示“Cost”、“Sales”、“Clicks”、“Purchases”、“Impressions”、“ACOS”、“Conv%”等指标,可自行选择显示内容,操作简单,只需点一下即可切换。请参考下图:
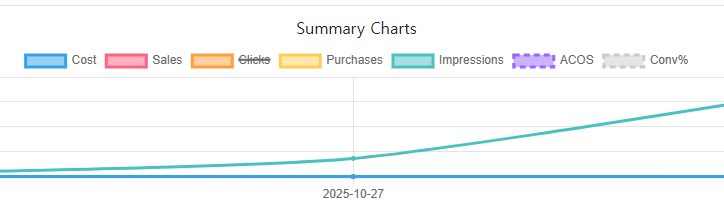
点击“Clicks”后,图表上的线条会隐藏,界面清爽,便于聚焦重点数据。接下来介绍“Campaign Summary”部分。
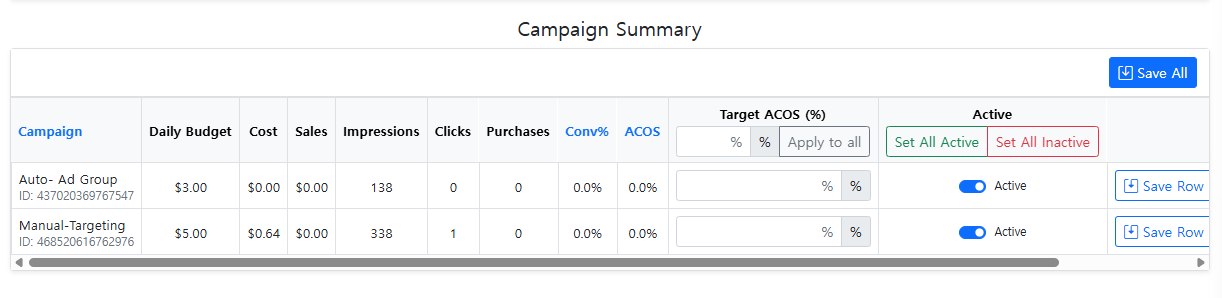
这里会显示每个广告系列的表现,包括可设置Target ACOS,和启用或禁用自动出价调节功能。希望关闭自动调节的,可以关闭其自动调节开关。

“Keyword”部分显示关键词级别的表现信息。对自动广告,显示“Target”项目;手动关键词会显示匹配类型、出价、曝光量、点击、转化率等详细数据。点击关键词还能查看具体的出价调节历史,方便追踪调价过程。

这也是一个非常实用的功能,帮助亚马逊卖家了解出价的具体调整情况。以上就是“Campaign & Keyword Bid Optimization”的界面介绍,没有难点。如有疑问,可留言或发邮件咨询,我的邮箱会留在页面底部。
接下来讲“Ads Management(Beta)”中的第二个菜单:“Search Term Performance”。
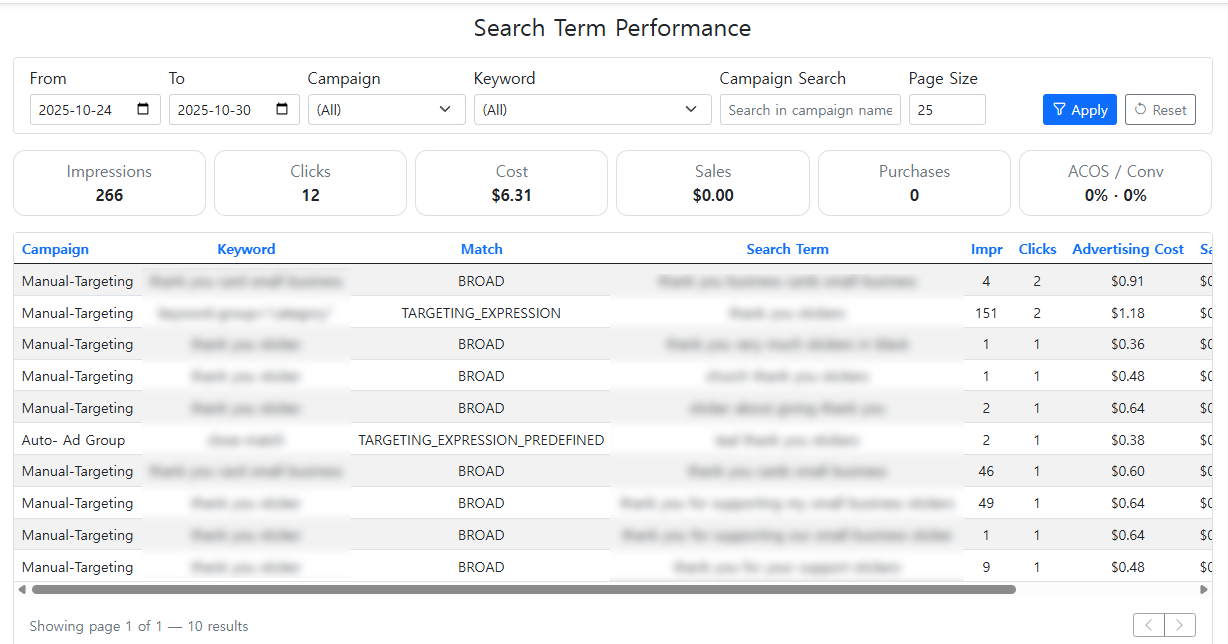
“Search Term Performance”功能很简单,即可以查看每个广告系列的搜索词报告。这通常是亚马逊卖家较为繁琐的部分,但在此界面可以统一查看所有广告系列的搜索词表现,节省时间,提升效率。可以识别出哪些关键词带来浪费,哪些关键词效果良好,可以作为添加为负关键词的依据,十分实用。
最后介绍“Auto Bid Performance Dashboard”——自动出价调节的效果表现界面。
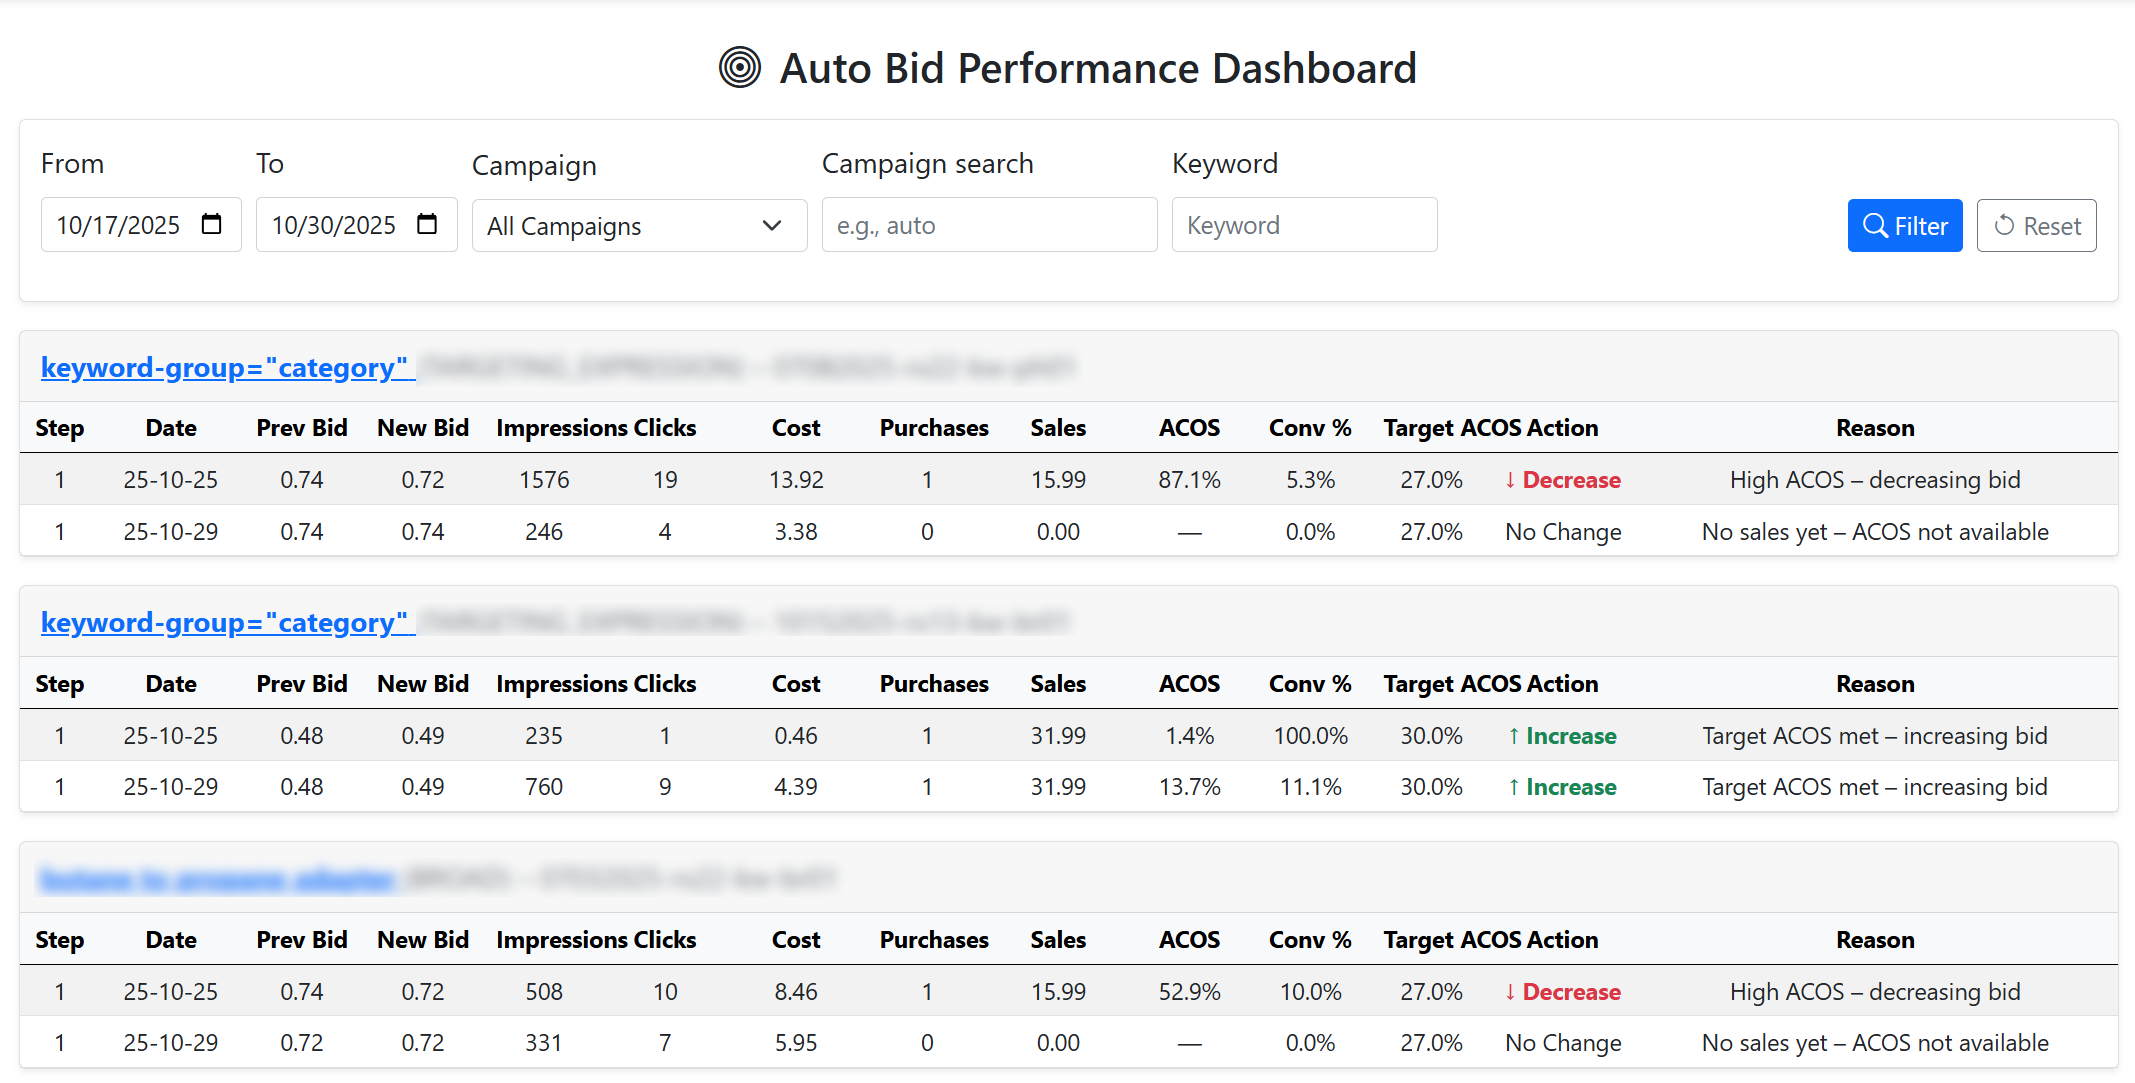
界面显示每个广告系列的自动调节历史、调整原因,用户可以一目了然地看到出价变动的原因,还能查看是否有实际购买发生,方便分析投放效果。总结来说,是自动出价策略成效的直观体现空间。
至此,SellerVisor的“Ads Management(Beta)”功能介绍完毕。这些功能由我们团队根据多次运营亚马逊广告的经验提炼开发,旨在自动化繁琐操作、提升效率。虽然目前是测试版,但未来会不断完善和更新,希望大家持续关注。
有任何建议和反馈,欢迎随时联系。邮箱地址在页面底部。
感谢您阅读这篇长文,也感谢您使用SellerVisor。祝您广告投放顺利!