
How to automate the repetitive “Request a Review” for every order with a one-time setting
Reviews on Amazon selling directly affect conversion rates and trust building. But as orders increase, clicking the review request button for each order in Seller Central quickly becomes repetitive work. Using SellerVisor’s Review Requests feature, you can link your Seller Central account and set the sending timing and exclusion conditions to automate this process.
This article explains, based on the actual SellerVisor review request setup video, the steps from account connection to full automation, ASIN-specific settings, and manual sending for existing orders.

Key points to know first
- SellerVisor’s Review Requests automatically executes Amazon’s standard “Request a Review” request.
- It is not a feature to request only positive reviews or to offer customers rewards.
- You can apply the same criteria across the entire account or set sending rules and Delay Days differently by ASIN.
- The number of review requests available may vary depending on the connected account and service policies, so check usage in the dashboard.
How to set up SellerVisor Review Requests
STEP 1. Check SellerVisor on the Amazon Selling Partner Appstore
Apps approved for Amazon integration are registered in the Amazon Seller Central Selling Partner Appstore. If you search for SellerVisor in the Appstore, you can view its official registration page. The actual automation setup is done inside SellerVisor, but if you want to verify the official app registration before connecting your account, use this route.
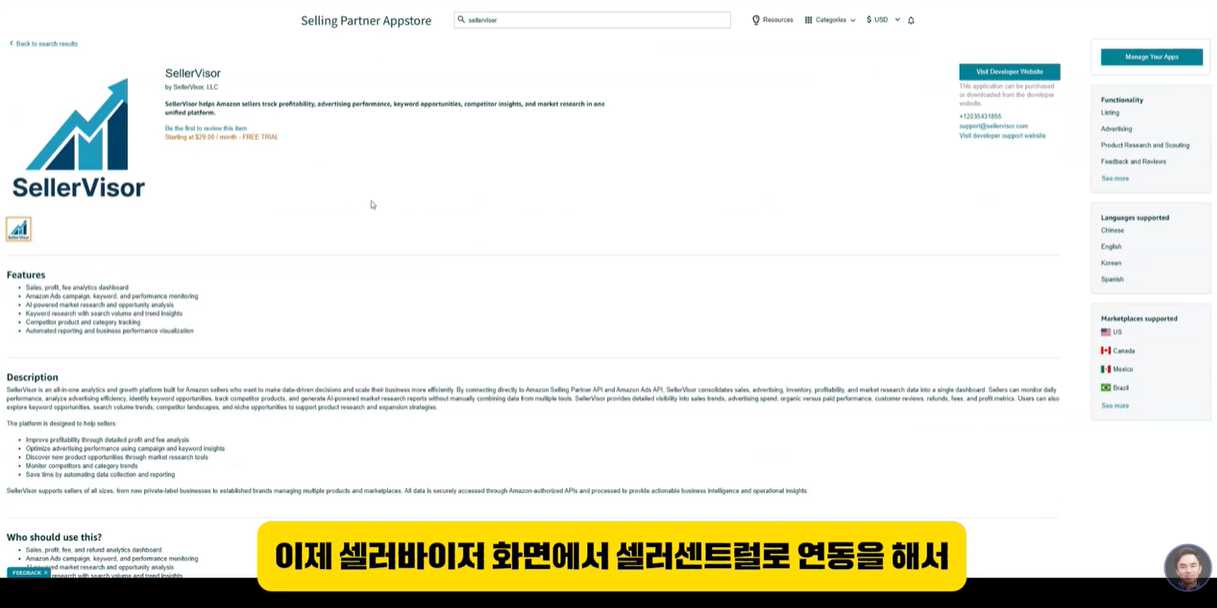
▲ SellerVisor screen registered in the Amazon Selling Partner Appstore
STEP 2. Connect your Seller Central account
After logging into SellerVisor, click the gear icon at the top right and go to Settings. In the Connect Seller Central menu, click the connect button to go to the Amazon Seller Central authorization screen. Review the requested permissions and approve them to connect SellerVisor with your Seller Central account.
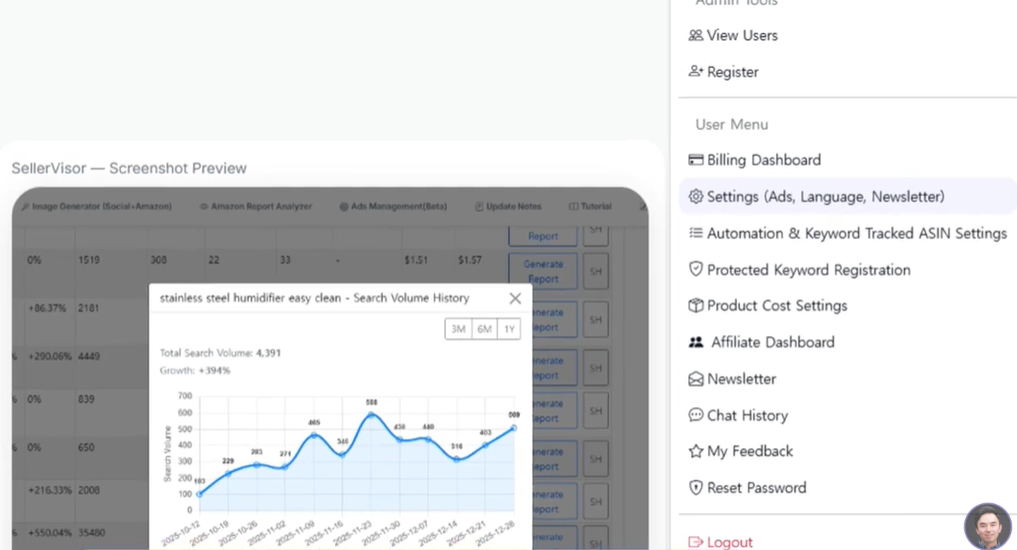
▲ Navigate: top right gear → Settings → Connect Seller Central.
- When connecting for the first time, it may take some time to fetch Amazon order data.
- If the connection is not complete, you cannot properly use the order list and automation features in the Review Requests menu.
STEP 3. Open Review Requests under Resources
Once the account connection is complete, open Resources in the top menu and select Review Requests. On this page you can manage automation settings, order synchronization, sending status, and ASIN-specific settings all in one place.
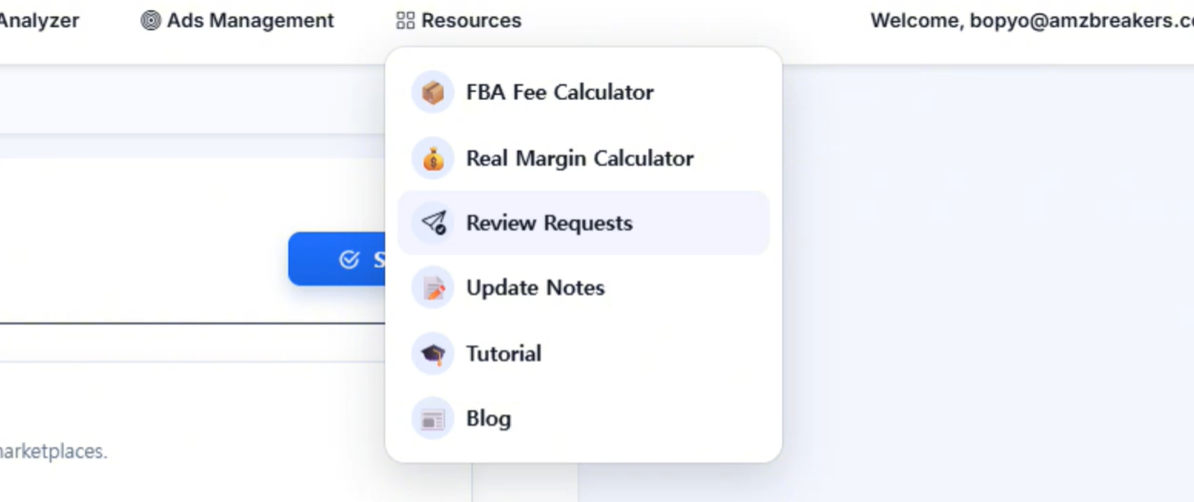
▲ Select Review Requests from the Resources menu.
STEP 4. Set automation for the entire account
In the Automation area you specify the default rules to apply to the whole account. The first value to check is Delay Days. This determines how many days after the order date the review request will be sent.
In the video, considering delivery times for non-Prime customers, 11–14 days is recommended as a default starting point. If the product requires more time for customers to gain usage experience, it is reasonable to set a longer period. Conversely, for simple consumables where usage judgment is quick, you can adjust after checking actual delivery speed and return patterns.
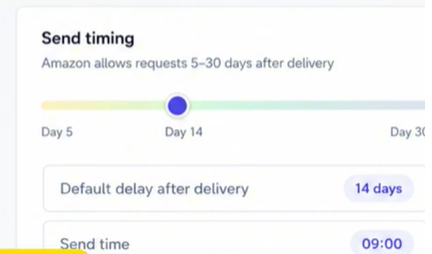
▲ Set Delay Days. 11–14 days is recommended as a basic starting point.
Exclude returned/refunded orders
Sending review requests to customers who returned or were refunded may result in requests arriving immediately after a negative experience. It is recommended to enable the Skip returned/refunded orders option to automatically exclude returned/refunded orders from sending targets.
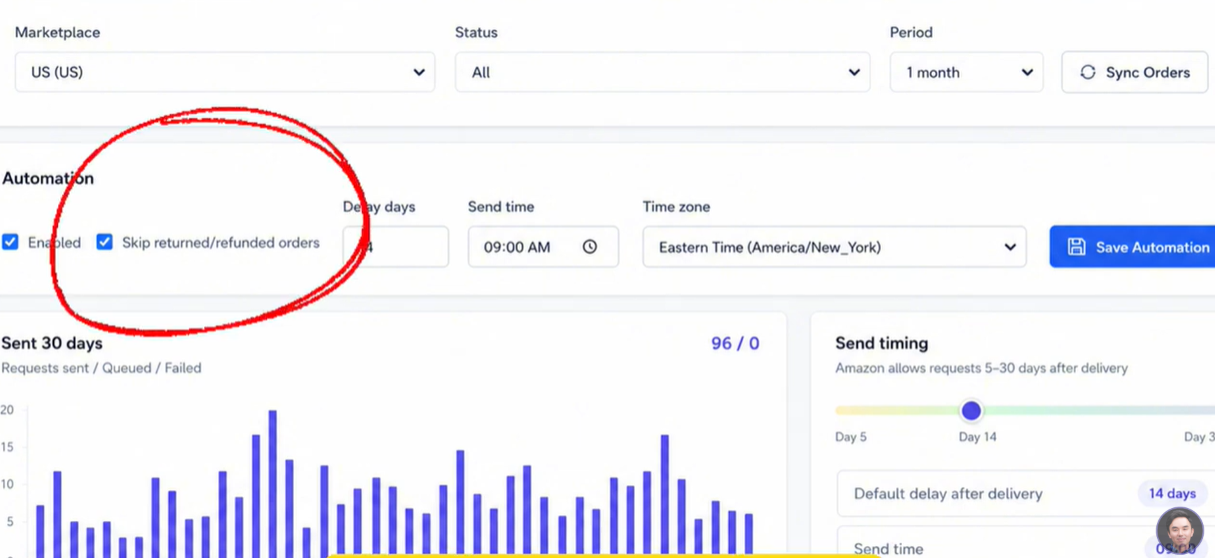
▲ Turn on the exclude returned/refunded orders option, then enable Enable.
Finally, toggle Enable on and click Save Automation to save the account-wide automation rules. Orders that meet the conditions will then be automatically processed according to the configured Delay Days.
STEP 5. Apply different rules by ASIN
Applying the same sending timing to all products is not always optimal. In the Automation by ASIN area you can turn automation on or off per product and specify Delay Days for each ASIN separately.
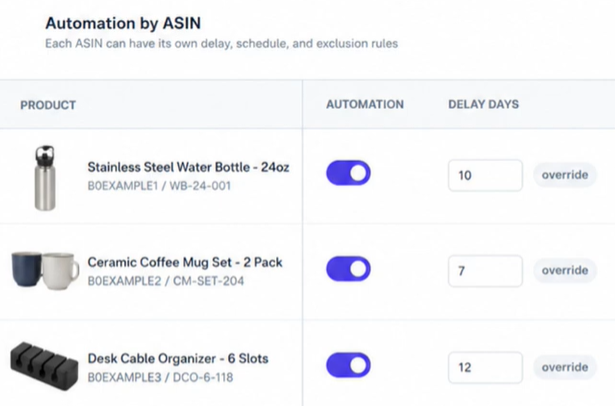
▲ Manage per-product sending and Delay Days in Automation by ASIN.
The important point is that ASIN-specific settings take precedence over the overall default. For example, even if the global default is 14 days, saving a specific ASIN as 10 days will apply the 10-day rule to that product. You can toggle off products for which review requests are not appropriate.
STEP 6. Sync orders
If orders do not appear immediately after first connecting Seller Central, click Sync Orders. When order synchronization starts, SellerVisor will fetch orders from the connected account. Depending on the order volume, it may take time to reflect, so it’s better to run it once and wait rather than clicking multiple times in succession.
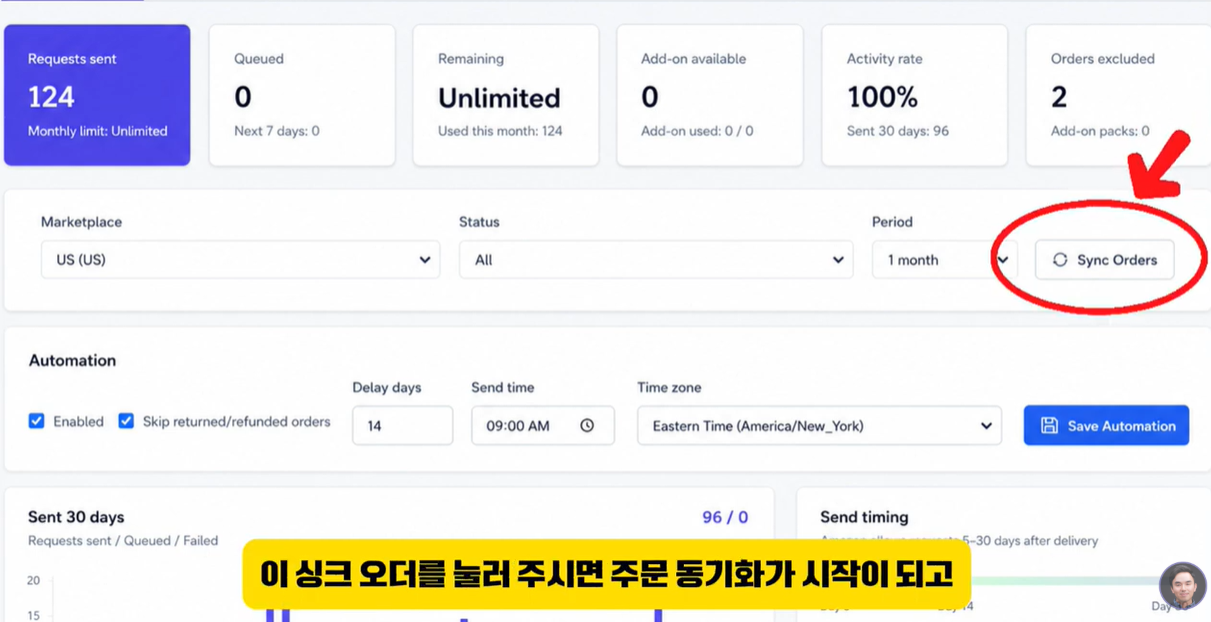
▲ Click Sync Orders to fetch Seller Central orders.
STEP 7. Send review requests for existing orders
Existing orders created before setting up automation can be sent by selecting them directly from the order list. Check multiple orders and click Send Selected to batch process only the selected orders.
Manually send one order at a time
To process only a specific order, use the Send button on the order’s row. Before selecting all or batch sending, always confirm that returned/refunded orders are not included. Separate from the exclusion option in automation settings, when manually sending existing orders it is safer to review the order status displayed on the screen directly.
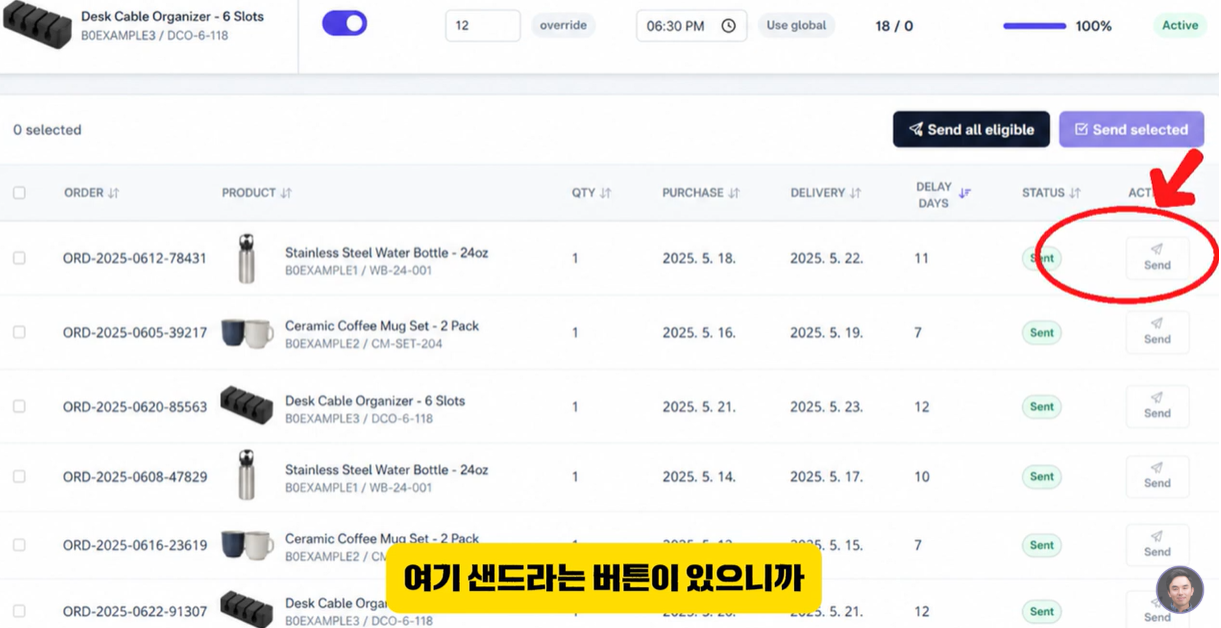
▲ You can also manually send one order at a time using each order’s Send button.
Checklist to verify after setup
- Is the Seller Central connection status displayed as Connected?
- Are Delay Days aligned with the product’s actual delivery and usage cycle?
- Is Skip returned/refunded orders enabled?
- Did you toggle Enable on and click Save Automation?
- Are ASIN-specific settings not unintentionally overriding the global default?
- After Sync Orders, are the order list and available quantity displayed correctly?
Additional use: Check Review Intelligence
After connecting Seller Central, the Review Intelligence menu lets you view processed insights from product reviews. If review request automation is “an operation to avoid missing reviews,” Review Intelligence is the stage where accumulated customer feedback is used for product improvement and messaging strategy.
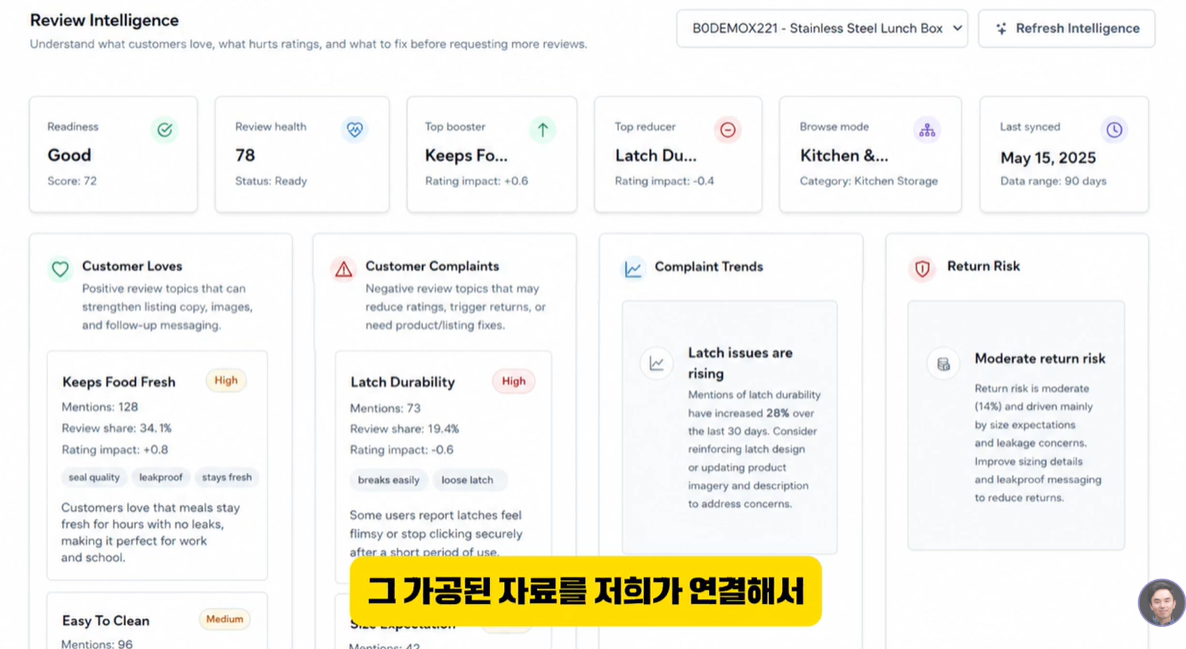
▲ You can check customer review insights in Review Intelligence.
Frequently Asked Questions
Q1. Does SellerVisor send direct marketing messages to customers?
No. Review Requests executes the standard Request a Review flow provided by Amazon. It does not have the function to write messages that conditionally request positive reviews or promise rewards.
Q2. How many days is best for Delay Days?
The recommended starting point in the video is 11–14 days after the order. However, you should adjust while considering delivery speed, product usage cycle, and when returns concentrate. It is better to design the timing so the request arrives after the customer has had enough time to use the product rather than sending it as fast as possible.
Q3. What if orders do not appear in the list?
First check the Seller Central connection status and run Sync Orders. It may take time to synchronize orders immediately after the initial connection.
Q4. If I set both account-wide automation and ASIN-specific automation, which takes precedence?
ASIN-specific settings take precedence. Use ASIN-level automation when you want only certain products to follow a different schedule or sending rule, and apply the global default to the rest for simpler management.
Q5. Will turning on automation definitely increase reviews?
Automation helps reduce missed review requests and creates consistent operations, but whether customers write reviews and what they write is up to the customers. Review automation is not a substitute for product quality, delivery experience, accurate detail pages, or customer service.
Closing: Manage review requests with a system, not memory
The key to review requests is not sending many at once, but executing consistently and without omission for orders that meet the conditions. By connecting Seller Central in SellerVisor and setting Delay Days, excluding returned/refunded orders, and ASIN-specific exceptions, you can standardize the review request process while reducing repetitive work.
Log into SellerVisor now and set up Review Requests. If it's your first time, save the global default rules first and then set exceptions only for ASINs with significant differences — this is the easiest way to manage.
※ Screen and menu names were written based on the time of the video recording and may change with service updates. Please check your account screen for the actual number of sendable requests and applicable scope.